Table of Contents
Advertisement
Quick Links
Advertisement
Table of Contents

Related Manuals for Carbatec BS-B200H


Summary of Contents for Carbatec BS-B200H
- Page 1 8" (205 mm) Benchtop Bandsaw B S - B 2 0 0 H M A N U A L CA RBAT E C .C OM .AU...
-
Page 2: Introduction
Carbatec to keep you woodworking, as promised. We look forward to sharing in your woodworking journey! If you have any questions about our products or service, please call us on 1800 658 111 or email us at info@carbatec.com.au Find us on social media facebook.com/Carbatec instagram.com/Carbatec... -
Page 3: What's In The Box
BS-B200H WELCOME WHAT’S IN THE BOX The following items are provided in the shipping box: BS-B200H 8" BANDSAW Fence Alloy table Push stick Front fence rail Fence mounting knobs Bench brackets and bolts Table mounting bolts Tools Mitre gauge This bandsaw will require a minimal amount of assembly. -
Page 4: Key Information
DATE OF PURCHASE: Date: Made for: CARBATEC PT Y LTD Brisbane - Australia F O R T E C H N I C A L S U P P O RT C A L L 1 8 00 65 8 1 11... -
Page 5: Table Of Contents
Changes and improvements may be made at any time, with no obligation on the part of Carbatec to modify previously delivered units. Reasonable care has been taken to ensure that the information in this manual is correct, to provide you with the guidelines for the proper safety, assembly and operation of this machine. -
Page 6: Safety Instructions - General
Australian/New Zealand Standards to ensure their compliance with all mandatory standards and regulations (applicable at time of original sale). Carbatec Pty Ltd are registered as a responsible supplier with relevant Australian government departments and our products are registered on the EESS & ACMA database. -
Page 7: Safety Instructions - Bandsaw
BS-B200H SAFETY INSTRUCTIONS GENERAL SAFETY Operating a power tool can be dangerous if GROUND ALL TOOLS. If the tool is supplied safety and common sense are ignored. The with a 3-prong plug, it must be plugged into operator must be familiar with the operation of a 3-contact electrical receptacle. - Page 8 BS-B200H GENERAL SAFETY ALWAYS UNPLUG THE TOOL FROM THE MAINTAIN TOOLS WITH CARE. Always ELECTRICAL RECEPTACLE keep tools clean and in good working order. when making adjustments, changing parts or Keep all blades and tool bits sharp, dress performing any maintenance.
- Page 9 BS-B200H SAFETY INSTRUCTIONS avoid prolonged contact with dust. Allowing enough to carry the current your product will dust to get into your mouth or eyes, or lay on draw, and with compatible pin configuration your skin may promote absorption of harmful and connections.
- Page 10 BS-B200H BANDSAW SAFETY INTENDED USE • Always use the blade guard to avoid • The machine must only be used in possible injury due to blade breakage. technically perfect condition in accordance • Never leave the work area with the power...
-
Page 11: Safety Instructions - Electrical
BS-B200H SAFETY INSTRUCTIONS ELECTRICAL SAFETY CHECK WITH A QUALIFIED ELECTRICIAN or service personnel if you do not completely This tool must be grounded while in use to understand the grounding instructions, or if you protect the operator from electric shock. IN THE are not sure the tool is properly grounded. -
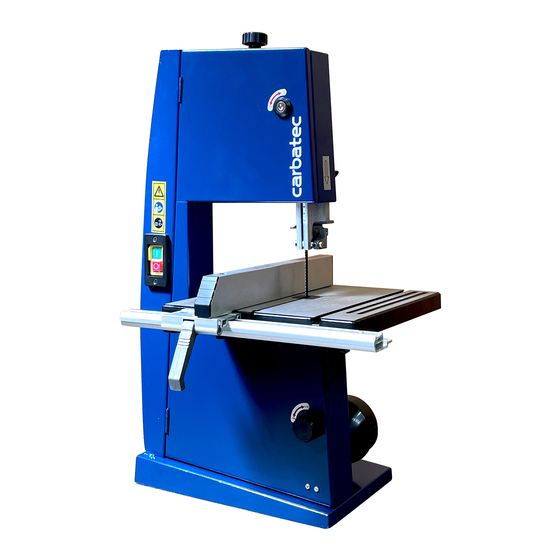
Page 12: Overview
BS-B200H OVERVIEW BS-B200H 8” (200MM) BENCHTOP BANDSAW Blade tension knob Alloy table Blade tracking and locking knobs Bottom blade guide Table tilt trunnion Bottom door lock Top door lock 4” Dust port Blade guard lock and adjustment knobs Top & bottom door access... -
Page 13: Specifications
BS-B200H SPECIFICATIONS SPECIFICATIONS CODE BS-B200H MOTOR 370 W (1/2 HP) induction - regular 10 A plug SWITCH TYPE Magnetic NVR BLADE GUIDES Euro style with rack and pinion rise and fall BLADE LENGTH 1490 mm BLADE RELEASE Standard tension release knob... -
Page 14: Assembly
BS-B200H ASSEMBLY TABLE ASSEMBLY Fig. A1 Fig. A1 With the machine safely placed on a flat, stable surface such as a workbench, tilt the trunnion to 30˚ and lock it in place. Fig. A1 Slide the table into approximate position... - Page 15 BS-B200H ASSEMBLY Fig. A4 Fig. A5 Once you are happy with the alignment, go ahead and tighten all the table bolts with the spanner provided. You can then adjust the tilt of the table back to 0˚. Fig. A5 The blade needs to run through the middle of the table insert.
- Page 16 BS-B200H ASSEMBLY Fig. A9 Place the fence onto the rail to the left of the blade. The fence needs to be parallel to the table slot/mitre track. If necessary, this can be adjusted via two Allen bolts, one through the hole in the top face of the fence;...
- Page 17 BS-B200H ASSEMBLY Fig. A13 Check the table is set at 90˚ (square) to the blade, using a quality square. If necessary adjust the tilt on the trunnion and lock in place. Fig. A13 Ensure your “pointer” on the trunnion scale is accurately pointing to “0” in this position.
-
Page 18: Setup
BS-B200H SETUP Fig. B1 Ensure power is disconnected from your machine before undertaking any adjustments or alignment. SETTING UP THE BANDSAW Using the Allen key provided, unlock the top door by rotating a quarter turn Fig. B2 Fig. B2 anti-clockwise. This machine requires a “tool”... - Page 19 BS-B200H SETUP Fig. B5 Fig. B5 Adjust the blade tension by turning the knob located on the top of the bandsaw. Clockwise rotation will increase tension, anti-clockwise will reduce tension. Fig. B5 Correct tension is applied when a deflection of approximately 5 mm is...
- Page 20 BS-B200H SETUP Fig. B9 To adjust the blade tracking, turn the tracking knob on the rear of the machine. Clockwise will move the blade towards the front of the tyre, anti- clockwise towards the back. Fig. B9 The aim is to have the blade tracking on the crown of the tyre, that is the middle of the wheel.
- Page 21 BS-B200H SETUP Fig. B13 The upper blade guides can now be set in the same fashion. The thrust guide just behind the blade. Fig. B13 And the upper side guides in as close as possible without touching. Ensure the depth of the side guides is such that it...
-
Page 22: Operation
BS-B200H OPERATION HOW TO USE Fig. C1 The purpose of this overview is to provide the novice machine operator with a basic understanding of how the machine is used during operation. If you are not experienced with this type of machine, we strongly recommend that you Fig. - Page 23 BS-B200H OPERATION Fig. C5 Rip cuts can be achieved at fixed depths by using the fence. Simply unlock the fence, slide to the desired rip width and lock it down. Turn the machine on with the material to be cut clear of the blade, then feed the material into the blade slowly, while pressing against the fence.
-
Page 24: Maintenance
Blade length on this machine is 1490 mm. A wide variety of blades to suit this machine are available from Carbatec - check them out online. The machine accepts blades from 3.2 mm to 12.7 mm (1/8" to 1/2") wide. - Page 25 (avoid silicone based products that may cause issues with wood finishes later on). Take a clean cloth to wipe any cleaning residue, dirt or dust off the table. When it’s dry, apply a surface protectant. Carbatec offer many products for machine cleaning and care.
-
Page 26: Troubleshooting
BS-B200H TROUBLESHOOTING PROBLEM LIKELY CAUSE(S) SOLUTION(S) Check the cable for breakage, the fuse and The machine does No power supply. that the cable is plugged in and turned on. not work when switched on. Return the machine to your local dealer Defective switch. -
Page 27: Wiring Diagram
BS-B200H WIRING DIAGRAM WIRING DIAGRAM C A RBATE C.C OM.AU... - Page 28 BS-B200H EXPLODED PARTS DIAGRAM 8” BENCHTOP BANDSAW BS-B200H F O R T E C H N I C A L S U P P O RT C A L L 1 8 00 65 8 1 11...
-
Page 29: Parts Diagram/Parts List
BS-B200H PARTS PARTS LIST Seq Description Seq Description QTY Seq Description QTY Seq Description Upper guide slide bar baffle Upper guide slide bar baffle Butterfly spring 8 Butterfly spring 8 Slide board Slide board Upper conductor base Upper conductor base... -
Page 30: Warranty
1. a copy of the order or receipt for the goods; 2. the serial or batch number printed on the A. We warrant that this Carbatec product will be free machinery manufacturing plate; and from defects caused by faulty workmanship or faulty materials for a period of 1 year from date of sale. -
Page 31: Notes
BS-B200H NOTES C A RBATE C.C OM.AU... - Page 32 C a r b at e c P t y L td E info@carbatec.com.au AU 1800 658 111 NZ 0800 444 329 128 Ingleston Road, Wakerley, Queensland Australia 4154 ABN 84 010 706 242 CA R BATEC .C O M .AU...
Need help?
Do you have a question about the BS-B200H and is the answer not in the manual?
Questions and answers