Advertisement
Quick Links
Advertisement

Subscribe to Our Youtube Channel
Related Manuals for Progression Fitness B1100


Summary of Contents for Progression Fitness B1100
- Page 1 Recumbent Bike Model: B1100 Owner’s Operating Manual...
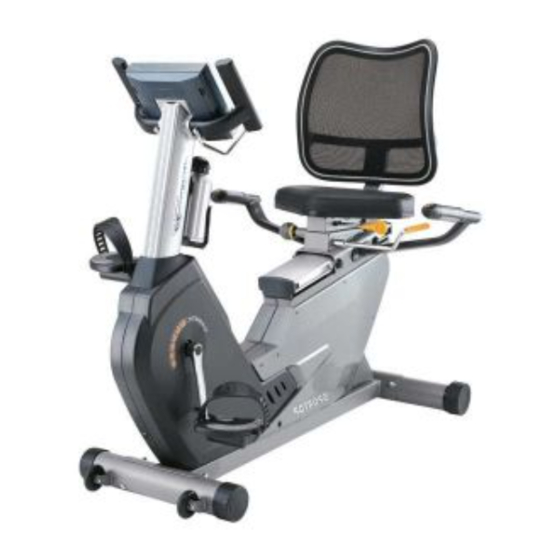
- Page 2 Main Frame Front Stabilizer Rear Stabilizer Central Support Tube Back Pad Support Tube Side Handle Bar Front Handle Bar (H9)Decoration (H4)Watter Bottle (H1)Monitor (H2)Book Stand (H3)Stop Bar (H7)Saddle Pad (H11 & H12)Pedal (H10)AC Adapter (H5)Bottle Holder (H8)Back Pad (J2)Flat Washer M6 (J3)Bolt1/4”x1-1/2”...
- Page 3 Turn the arrow on adjustment handle (A43) toward the left and then insert adjustment handle (A43) into axle (A42) ASSEMBLY OF THE REAR STABILIZER Attach the rear stabilizer (B) to the main frame (A) with bolts (B3), curved washers (B4) and nuts (B5). ASSEMBLY OF THE FRONT STABILIZER First, remove bolts(C3), curved washers(C4) and nuts(C5) from front stabilizer(C).
- Page 4 ASSEMBLY OF THE CENTRAL SUPPORT TUBE First, remove the bolts (A34). Washers (A33) from the main frame. Step 1: Slide decoration cover (H9) over the central support tube (E) from botton side. Step 2: Connect the sensors (E3) with (A16), (#2) with (A11).
- Page 5 ASSEMBLY OF THE MONITOR Step 1: Connect the cables (E2 & E3) with cables from the monitor (H1). Step 2: Slide monitor onto the steel plate of the central support tube (E). Step 3: Attach book stand (H2) to front handle bar (D) using washers (J2) and bolts (J1).
- Page 6 FIGURE 7 FIGURE 7 ASSEMBLY OF THE STOP BAR Insert the stop bar (H3) into the seat base (A37) and use stopping screws (A23) to secure it. HOW TO ADJUST THE SADDLE BASE Pull up the stop bar (H3) and adjust the seat base (A37) to a comfortable distance, then push down.
- Page 7 FIGURE 9 FIGURE 9 ASSEMBLY OF THE SEAT PAD Secure the seat pad (H7) onto seat base using washers (J7) and bolts (J6). FIGURE 10 FIGURE 10 HOW TO ADJUST THE BACK PAD Push the adjustment handle back to adjust the back pad to desired position.
- Page 8 ASSEMBLY OF THE PEDAL Attach the right pedal to right crank arm. The right pedal threads into the crank in a clockwise direction, and the left threads in a counter clockwise direction. Note: To plug in machine, locate the AC adapter hole at the rear of the machine. The front stabilizer has built-in transport wheels.
-
Page 9: Function Description
BUTTONS ON HANDRAIL In order to offer more flexibility during your workout, additional toggle switches are placed on the handrail. The buttons are the +/- and MODE. They are used the same way as the buttons on the console. These buttons may be used at anytime as a substitute for pressing the buttons located on the console. -
Page 10: Program Mode
FUNCTION DESCRIPTION MANUAL MODE Set the resistance level using the dot matrix display then (if required) set exercise parameters TIME/DISTANCE/CALORIES/PULSE then press ST/STOP to START manual program. Operating Process: 1. Set your exercising TIME by turning dial from 0:00 to 99:00. 2. -
Page 11: Watt Mode
CLOCKWISE OR CLOCKWISE OR CLOCKWISE OR COUNTER-CLOCKWISE COUNTER-CLOCKWISE COUNTER-CLOCKWISE CLOCKWISE OR CLOCKWISE OR CLOCKWISE OR COUNTER-CLOCKWISE COUNTER-CLOCKWISE COUNTER-CLOCKWISE CLOCKWISE OR COUNTER-CLOCKWISE WATT MODE Default WATTS value is 100. User can adjust WATTS value using the dial. The entered WATTS will be maintained automatically regardless of speed. Operating Process: 1. -
Page 12: User Mode
USER MODE You can create your own Program profile U1-U4 by setting the resistance level for each individual segment. The Program will be automatically saved for future use. U0 can be set the same as U1-U4 but this Program cannot be saved. Operating Process: 1. - Page 13 CLOCKWISE OR CLOCKWISE OR CLOCKWISE OR COUNTER-CLOCKWISE COUNTER-CLOCKWISE COUNTER-CLOCKWISE CLOCKWISE OR CLOCKWISE OR CLOCKWISE OR COUNTER-CLOCKWISE COUNTER-CLOCKWISE COUNTER-CLOCKWISE CLOCKWISE OR CLOCKWISE OR COUNTER-CLOCKWISE COUNTER-CLOCKWISE RECOVERY The RECOVERY will determine your fitness level after your workout. When you have finished your workout press RECOVERY. For RECOVERY to function correctly it needs your Heart Rate input.
- Page 14 Press key to start workout exercise, don’t need to input USER data.
- Page 15 -14-...
- Page 16 -15-...
- Page 17 Description Q’ty Description Q’ty Magnetic housing (A) MAIN FRAME SET Washer Bolt (A2) DRIVING WHEEL SET Bush B) FRONT STABILIZER SET (A3) FLYWHEEL SET C) REAR STABILIZER SET (A4) PRESSING SET (A5) CHAIN COVER SET (D) FRONT HANDLE BAR SET E) CENTRAL SUPPORT TUBE SET F) SIDE HANDLE BAR SET G) BACK PAD SUPPORT TUBE SET...
Need help?
Do you have a question about the B1100 and is the answer not in the manual?
Questions and answers