ETC Eos Setup Manual
Hide thumbs
Also See for Eos:
- Operation manual (393 pages) ,
- Installation manual (7 pages) ,
- Operating manual (649 pages)
Advertisement
Quick Links
ETC Setup Guide
Eos Rackmount Devices
This guide outlines the installation and setup of the Eos Family rackmount devices:
Eos Apex Processor
•
Eos Remote Interface
•
Ion Xe Remote Processor Unit
•
For information on using the Eos Family software, please refer to the Eos Family Operations Manual.
ETC manuals can be downloaded free of charge from ETC's website at etcconnect.com.
Rack Mounting
All Eos Family rackmount devices ship with the hardware necessary to mount the associated device
into a 19" rack enclosure with 2U of rack space. Both the front and rear mounting brackets are
required for a stable rack mounting installation.
The following 2U metric rack mount kits are also available separately:
Apex Processor and Eos Remote Interface Rack Mount Kit (ETC Part Number 4450A2040)
•
Ion Xe RPU Rack Mount Kit (ETC Part Number 4311A2003)
•
Mounting Hardware
1
1. Front left bracket
2. Front right bracket
3. Rear left bracket
4. Rear right bracket
5. Rail adapter (2)
You will also need a Phillips screwdriver.
C orporate Headquarters n Middleton, WI, USA | +1 608 831 4116
Global Offices n London, UK | Rome, IT | Holzkirchen, DE | Paris, FR | Hong Kong | Dubai, UAE | Singapore
New York, NY | Orlando, FL | Los Angeles, C A | Austin, TX
Web
© 2022 Electronic Theatre C ontrols, Inc. | Trademark and patent info:
Product information and specifications subject to change. ETC intends this document to be provided in its entirety.
4250M2240 Rev A Released 2022-07
3
2
etcconnect.com
| Support
support.etcconnect.com
4
6 7 8 9
5
6. M5 x 12mm screws (8)
7. 10-32 x 1/2 screws (8)
8. 6-32 x 1/4 screws (8)
9. 6-32 x 3/8 screws (4)
10. Optional spring clips (8)
| C ontact
etcconnect.com/contactETC
10
etcconnect.com/ip
Advertisement

Related Manuals for ETC Eos


Summary of Contents for ETC Eos
- Page 1 • Ion Xe Remote Processor Unit • For information on using the Eos Family software, please refer to the Eos Family Operations Manual. ETC manuals can be downloaded free of charge from ETC’s website at etcconnect.com. Rack Mounting All Eos Family rackmount devices ship with the hardware necessary to mount the associated device into a 19"...
- Page 2 6. Use the remaining hardware to secure the unit into the 19" rack enclosure. Desktop Use - Installing Rubber Feet All Eos Family rackmount devices also ship with four rubber feet for desktop use. 1. Locate the four rubber feet and four accompanying M3-0.5 x 6mm screws.
-
Page 3: Hardware Setup
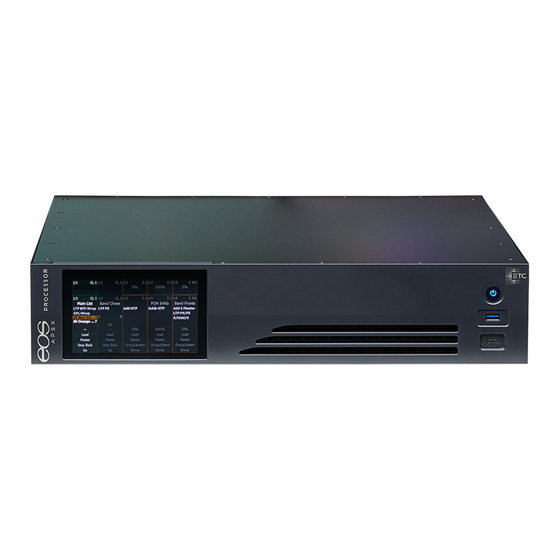
A fully-functional controller in a rackmount unit, ETC's Eos Apex Processor can provide primary and backup control for Eos Apex systems, or be used as a stand-alone lighting playback unit. A 2U device, it can be mounted into 19" equipment racks or road cases. - Page 4 5. Vent with highlight lamp 3. USB-A port Press the soft power button on the front of the device. By default, it will boot into the Eos environment in Primary mode. If you wish to designate your device as a backup or client, you must exit the Eos environment and choose a different designation from the Eos Configuration Utility (ECU) welcome screen.
- Page 5 Eos Rackmount Devices Eos Remote Interface The Eos Remote Interface is a rackmount device designed to offer remote video and programming functions for Eos Family control systems. INLINE SNIPPET. The Eos Remote Interface supports up to three external 4K monitors, with optional multi-touch via USB.
- Page 6 5. Vent with highlight lamp 3. USB-A port Press the soft power button on the front of the device. By default, it will boot into the Eos environment in Client mode, but must be connected to a session before it can be used.
-
Page 7: Touchscreen Overview
This menu gives you control of your system via your show file's direct selects. A settings menu can be toggled with the gear icon, allowing you to choose which set of custom direct selects to interact with. For more information, refer to the following section(s) of the Eos Family User Manual: System Basics •... - Page 8 This sub-menu gives you options to adjust the brightness of the touchscreen display and front vent highlight lamp, as well as set an automatic timeout. Power This sub-menu gives you options to exit the Eos application, physically power off, and remotely control the power of a multiconsole system. Eos Rackmount Devices...
- Page 9 Eos Rackmount Devices Ion Xe Remote Processor Unit The Ion Xe RPU can be used as a primary, backup, or client processor with any Eos Family desk. It can also be used for independent playback applications. The Ion Xe RPU ships with the following: One three-button scroll mouse and mousepad •...
- Page 10 4. Soft power switch Press the soft power button on the front of the device. By default, it will boot into the Eos environment in Primary mode. If you wish to designate your device as a backup or client, you must exit the Eos environment and choose a different designation from the Eos Configuration Utility (ECU) welcome screen.
- Page 11 ETC Setup Guide Eos Rackmount Devices Importing and Exporting Button Configurations You may import an RPU button configuration file from a USB device. 1. Select {Import} in the RPU area of the Buttons section of the ECU. The ECU will search for a valid RPU button file.
-
Page 12: Additional Resources
ETC Setup Guide Eos Rackmount Devices Additional Resources For Eos Family resources, software, support, and the Eos user community, please visit Eos [Home] at etcconnect.com/eos-home. Regulatory Information WARNING: This device contains a lithium battery. Battery may explode if mistreated. Do not recharge, disassemble or dispose of in fire.
Need help?
Do you have a question about the Eos and is the answer not in the manual?
Questions and answers