Pantum BM5100FDN Series User Manual
Monochrome laser mfp(fax model)
Hide thumbs
Also See for BM5100FDN Series:
- Maintenance manual (137 pages) ,
- Maintenance manual (142 pages)

Related Manuals for Pantum BM5100FDN Series


Summary of Contents for Pantum BM5100FDN Series
- Page 1 Pantum BM5100 Series Monochrome Laser MFP(Fax model) It is recommended that you read this Guide carefully before using the printer...
- Page 2 Version:V1.0 Disclaimer For a better user experience, Zhuhai Pantum Electronics Co.,Ltd. reserves the right to make changes to the User Guide. The information contained herein is subject to change without notice. Users are responsible for any damages arising from failing to follow this User Guide. Meanwhile, except the express warranty made in the product maintenance manual or service commitment, Zhuhai Pantum Electronics Co.,Ltd.
- Page 3 Safety Precautions Disconnect the power supply The product should be placed close to or easily accessible to power sockets, so as to allow easy disconnection of power supply! Laser Safety The laser radiation is harmful to the human body. Since laser components are completely sealed in the printer, laser radiation will not leak.
- Page 4 Safety Warning Please note the following safety warnings before using the printer: Warning There is high-voltage electrode inside the printer. Before cleaning the printer, make sure the power is turned off! Plugging and unplugging the power cord plug with a wet hand can result in an electric shock.
- Page 5 Precautions Precautions before Using the Printer: 1. Read and understand all instructions. 2. Familiarize yourself with the basic principles associated with operating electrical appliances. 3. Comply with all warnings and instructions marked on the equipment or specified in the manual supplied with the equipment.
- Page 6 23. This product is sold as a complete machine. The consumers can go to Pantum Aftersales Service Centre to purchase parts they need. If the product sold is inconsistent with the package list, please go to the specified Aftersales Service Centre to solve the problem.
- Page 7 If this equipment does cause harmful interference to radio or television reception, which can be determined by turning the equipment off and on, the user is encouraged to try to correct the interference by one or more of the following measures: •...
- Page 8 the equipment. Users should ensure for their own protection that the electrical ground connections of the power utility, telephone lines and internal metallic water pipe system, if present, are connected together. This precaution may be particularly important in rural areas. Caution: Users should not attempt to make such connections themselves, but should contact the appropriate electric inspection authority, or electrician, as appropriate.
- Page 9 Radio Equipment directive 2014/53/EU only for models ending with suffix “W”. The manufacturer of this product is: Zhuhai Pantum Electronics Co.,Ltd., No.3883, Zhuhai Avenue, Zhuhai, Guangdong, China 519060. A declaration of conformity to the requirements of the Directives is available upon request from the Authorized Representative.
-
Page 10: Table Of Contents
Table of Contents 1. Before Using the Printer ......................1 1.1. Product series introduction .................... 1 1.2. Supplied Accessories ....................2 1.3. Product View ......................... 3 1.4. Laser Toner Cartridge ....................6 1.5. Control Panel ........................ 7 1.5.1. Control Panel ...................... 7 1.5.2. - Page 11 5.2.3. How to disable the Wi-Fi Direct ................. 59 5.3. How to switch wireless frequency ................59 5.4. Wireless network setup FAQs ..................59 6. Web server ........................... 61 6.1. Visit the embedded Web server .................. 61 6.2. Use Web server to manage printer ................61 6.2.1.
- Page 12 11.1.1. Operating systems supported ............... 117 11.1.2. How to download Pantum App ..............117 11.1.3. How to use this "Pantum" APP ..............117 11.2. Mopria mobile print ....................118 11.2.1. The operating systems and applications which support Mopria mobile printing 11.2.2.
- Page 13 12.1.9. Time/date ...................... 125 12.2. Network Settings ..................... 126 12.3. Network Information ....................126 12.4. Print information report .................... 127 12.5. Consumable information..................127 12.6. Configure the e-mail address book ................128 12.7. Configure the FTP address book ................128 12.8.
-
Page 14: Before Using The Printer
1. Before Using the Printer 1.1. Product series introduction Product series parameters BM5100FDN/ BM5105FDN Series BM5100FDW Series ● ● Interface type ● ● ● Wi-Fi Print Language PDL ● ● ● ● Control Panel Touch screen ● ● 40ppm Print Speed Letter ●... -
Page 15: Supplied Accessories
1.2. Supplied Accessories Name Parts Toner cartridge Drum component USB Interface Cable Power Cord Quick Setup Guide Pantum Warranty • The Pantum Warranty may not be attached in some regions. Note:... -
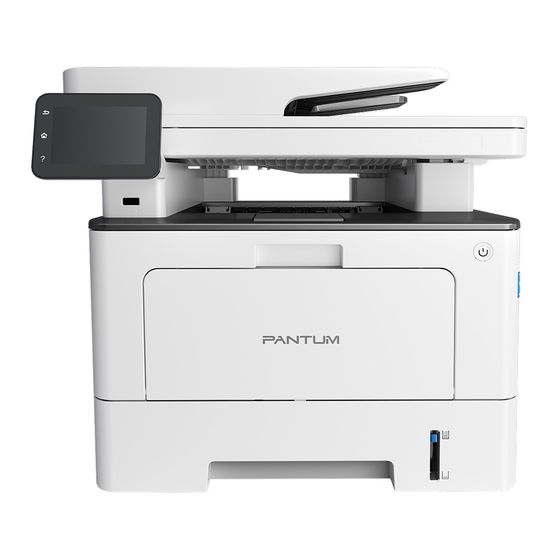
Page 16: Product View
1.3. Product View Side view This is used to remove the paper jammed in scanning for Cover of automatic document feeder the ADF. Feed tray of automatic document feeder This is used to place originals scanned from the ADF. Exit tray of automatic document feeder Prevent originals scanned from falling off. - Page 17 10 Output Tray To prevent the printed paper from falling. 11 Front Cover To open the front cover to take out the laser toner cartridge. 12 Multipurpose feed tray For placing media to be printed in multi-purpose tray. Turn the power on or off and press this button under Ready state to enter energy-saving mode.
- Page 18 4 USB Interface For connecting product to computer with USB cable. 5 Power Interface For connecting product to power with power cord. 6 Rear Cover For paper release when it gets jammed. For paper feed at duplex printing and paper release when paper 7 Duplex Printing Unit gets jammed at duplex printing.
-
Page 19: Laser Toner Cartridge
1.4. Laser Toner Cartridge Laser toner cartridge is composed of drum component and toner cartridge. Service life of drum component Type Average Print Volume About 30,000 Pages (based on 3 A4/LTR-size pages per print job and Standard drum component ~5% coverage) Service life of toner cartridge Type Average Print Volume... -
Page 20: Control Panel
1.5. Control Panel 1.5.1. Control Panel The layout of the printer control panel is shown below: No. Name Functions • Check printer status and message. Color touch screen • Set and operate printer. Return button Return to the previous menu. Home button Go to the home screen. -
Page 21: Home Screen
1.5.2. Home screen Use home screen buttons and icons to initialize print, fax or scan. The layout is shown as below: No. Name Functions Access to “Copy” menu and make a copy. Copy Access to “Scan” menu and scan document. Scan Access to “Fax”... -
Page 22: Touch Screen Button
USB print Access to USB storage job and make a job print. “Setting” button Open menu setting interface. Status message bar Display the current printer status. 1.5.3. Touch screen button Layout of touch screen buttons of printer control panel is shown as below: No. -
Page 23: Function Of Power Indicator
1.5.4. Function of power indicator Status displayed by power Status Status Description indicator Die out Shutdown status Always on Booting and ready states Blink Sleep mode... -
Page 24: Paper And Print Media
2. Paper and Print Media 2.1. Paper Specification Plain paper(70~105g/m² ),thin paper(60~70g/m² ),thick Media Type Paper(105~120g/m² ),Transparent film,Recycled Paper A4, Letter, Legal, Folio, Oficio, Statement, Executive, JIS B5, ISO Media size Automatic B5, A5, A5 L, A6, B6, 16K, Big 16K, 32K, Big 32K, Custom Feeder Tray Media weight 60~120 g/m²... -
Page 25: Special Paper
This may be due to incorrect operation, inappropriate temperature and humidity, or other factors beyond the control of Pantum. Before purchasing large quantities of print media, make sure that the print media meets the specifications specified in this User Guide. -
Page 26: Non-Printing Area And Non-Scanning Area
2.3. Non-printing Area and Non-scanning Area The shaded part indicates the non-printing area and non-scanning area. Usage Paper Size Top and bottom margins (A) Left and right margins (B) 4.2mm(0.165inch) 4.2mm(0.165inch) Printing Letter 4.2mm(0.165inch) 4.2mm(0.165inch) 2mm(0.079inch) 2mm(0.079inch) Scan Letter 2mm(0.079inch) 2mm(0.079inch) -
Page 27: Loading Paper
2.4. Loading Paper • Printer appearance may differ because of various models and functions, so the Note: schematic diagram is only for your reference. 2.4.1. Load paper in automatic tray 1. Slide out the automatic feeder tray from the printer. 2. - Page 28 3. Before loading paper, please unfold the stacked paper to avoid a paper jam or feed error, and then load the paper into the tray print-side down.The automatic feeder tray can be loaded up to 250 pages, 80g/m² paper. 4. Raise the output tray to avoid the printed paper from slipping and falling, or immediately remove the printed document after the printing is complete.
-
Page 29: Load Paper In Multi-Purpose Tray
2.4.2. Load paper in multi-purpose tray 1. Open the multipurpose feed tray. 2. Slide the paper guide of the multipurpose feed tray to match both sides of the paper. Do not apply excessive force; otherwise, paper jamming or tilting may occur. - Page 30 3. Unfold the stack of paper for feeding to avoid jamming or feeding error, place the side of paper to be printed upwards into the automatic feed tray. The multipurpose feed tray can hold up to 60 pieces of 80g/m² paper. 4.
-
Page 31: Load Paper In Optional Tray
2.4.3. Load paper in optional tray • For the installation of optional trays, please refer to “Installing optional tray” or the Note: Installation Guide supplied with the optional trays. • Before you use it, please remove the A5/A6 stopper before loading paper. 1. - Page 32 • Do not overly squeeze the “paper length guide” and “paper width guide”, otherwise it Note: could easily lead to deformation of paper. • To load Legal size paper, press inwards the Release button at the rear end of the tray and pull out the rear end of the tray to lengthen the tray.
-
Page 33: Paper And Manuscript Use Process
• If more than 550 pieces of paper (80g/m²) are put inside the optional tray at one time, Note: it will lead to paper jam or paper feed failure. • For single-sided printing, please make sure that the side to be printed (the blank side) faces down. -
Page 34: Scanning With Tablet
2.5.1. Scanning With Tablet • Printer appearance may differ because of various models and functions, so the Note: schematic diagram is only for your reference. Steps of Use: 1. Lift up the scanner cover. - Page 35 2. Load the manuscript face down. 3. Align the manuscript to match the appropriate paper size. • If the manuscript does not match with any size marker, please align the upper-left Note: corner of the manuscript with the arrow. • Make sure there is no document in the ADF. If a document is detected in the ADF, it will be more preferential than that on glass platen.
- Page 36 4) Close the scanner cover gently. • Please put the paper or document on the scanner glass after the glue, ink or correction Note: fluid are completely dried. • Rough textured, uneven, oil stained and extremely smooth paper will make printing effect poor.
-
Page 37: Scan With The Automatic Document Feeder (Adf)
2.5.2. Scan with the automatic document feeder (ADF) The document feeder supports single-sided scanning and automatic duplex scanning. Refer to Chapter 9 for the scanning method. 1. Put the original into the ADF with its front upward and top fed first. 2. -
Page 38: Driver Installation And Uninstallation
3. Driver installation and uninstallation 3.1. How to install Windows printer driver Windows driver installation software provides two installing methods: one-click installation and manual installation.We recommend one-click installation, which can help to install driver automatically in a faster and more convenient way.If you have any difficulty in using one-click installation, please try manual installation. - Page 39 4. Click on the "One-click installation" button in Method I and enter into the installation process. The process may need some time, and the duration is related to your computer configuration, please wait patiently. 5. After the installation, click "Print &Test Page" button. If your printer prints the test page successfully, it means that you have installed the driver correctly.
- Page 40 • Windows 10 system: When the “DVD RW driver” window pops up from the lower right corner of Computer desktop, click anywhere in the pop-up window, then click “Autorun.exe” to run the installation program. • Some computers may be unable to auto play the CD beacase of system configuration. Note: Please double click "Computer"...
- Page 41 • Click on the "One-click installation" button to enter installation process if your software has searched only one printer. The process may need some time, and the duration is related to your computer configuration. Please wait patiently.
- Page 42 • If your software has searched several printers, click on the"One-click intallation" button, and the printer list interface will pop up. Please select the printer that you need according to your printer wired network IP address or host ID. • If the printer you need is not shown in the list, please click "Refresh" button to search Note: again.
- Page 43 3.1.1.3. Method III: Connect the printer via wireless network Please check if the printer is connected with wireless network when installing the printer driver software. If disconnected, please install it with reference to Chapter 3.1.1.3.1. If connected, please install it with reference to Chapter 3.1.1.3.2.
- Page 44 • Click "One-click installation" button if your software has searched only one printer, and enter into installation process to complete automatic network configuration and driver installation.
- Page 45 • If your software has searched several printers, click "One-click intallation" button, and the printer list interface will pop up. Please select "Configure printer with Wi-Fi via USB and install" and select USB printer, click "Confirm" button and enter into installation process to complete automatic network configuration and driver installation.
- Page 46 • Windows 7/Vista/Server 2008 system: Pop up "Autoplay" interface, click “Autorun.exe” to run the installation procedure. • Windows 8 system: When the “DVD RW driver” window pops up from the right top corner of Computer desktop, click anywhere in the pop-up window, then click “Autorun.exe” to run the installation program.
- Page 47 • Click on the "One-click installation" button if your software has only searched only one printe, and the wireless network configuration interface will pop up, input the SSID and password that you need, then click "Confirm" button, and enter into installation process. The process may need some time, and the duration is related to your computer configuration, please wait patiently.
- Page 48 • If your software has searched more than one printers, the printer list interface will pop up.You need to configure the current printer which is connected via USB cable to wireless network and install driver. Please select "Configure the print via USB and install" on the printer list interface and check the USB printer option.
- Page 49 • When the printer IP address changes under printer driver installed with host ID , you can Note: also directly print without re-installing the driver. If you need to install the printer driver with the host ID, please check the option "Install the printer in the list with host ID". 6.
- Page 50 4. Read and agree to the terms contained in the End User License Agreement and the Privacy Policy, click the “Next” button in the lower right corner of the interface to enter the driver installation interface. 5. Click on the "One-click installation" button in Method III, and enter into installation process. The process may need some time, and the duration is related to your computer configuration, please wait patiently.
- Page 51 • Windows 8 system: When the “DVD RW driver” window pops up from the right top corner of Computer desktop, click anywhere in the pop-up window, then click “Autorun.exe” to run the installation program. • Windows 10 system: When the “DVD RW driver” window pops up from the lower right corner of Computer desktop, click anywhere in the pop-up window, then click “Autorun.exe”...
- Page 52 • If the software has searched several printers, the printer list interface will pop up. Please select the printer you need according to your printer wired network IP address or host ID .
-
Page 53: Manual Installation
• If the printer you need is not shown in the list, please click "Refresh" button to search Note: again. If it is not found, please check if the printer and computer are in the same network. (Please see Chapter 5.3 for how to check). - Page 54 6. Select "Connect via USB" and click on "Install". 7. The software installs the driver automatically and the installation process may need some time. The duration is related to your computer configuration, please wait patiently. 8. After the installation, click "Print &Test Page" button. If your printer prints the test page successfully, it means that you have installed the driver correctly.
- Page 55 8. Select "Wireline network connection" and click on "Install". 9. The installation software will search the printer automatically and the searching process may need some time. 10. After finishing searching, select the printer that needs to be connected and click “Next”. •...
- Page 56 8. The software installs the driver automatically and the installation process may need some time. The duration is related to your computer configuration, please wait patiently. 9. After the installation, click "Print &Test Page" button. If your printer prints the test page successfully, it means that you have installed the driver correctly.
- Page 57 8. Select “Yes, I want to configurate the printer's wireless network” on the wireless setup window popped out, and operate according to the prompts to set up the printer to wireless network (please refer to Chapter 5.1.1 for setup method). 9.
- Page 58 11. The software installs the driver automatically and the installation process may need some time. The duration is related to your computer configuration, please wait patiently. 12. After the installation, click "Print &Test Page" button. If your printer prints the test page successfully, it means that you have installed the driver correctly.
- Page 59 8. Select “No, the printer has been connected to wireless network” on the wireless setup window popping out, and then click “Next”. 9. The installation software will search the printer automatically and the searching process may need some time. 10. Select the printer needs to be connected and click “Next”. •...
-
Page 60: Method Of Driver Unistallation
1. Turn the power of printer and computer on. 2. Insert the CD companying with printer in the CD driver of your computer, and double click Pantum XXX Series installation package. (XXX in Pantum XXX Series represents product model.) - Page 61 3. Click “Continue”. 4. Read licensing agreement and then click “Continue”. 5. Click “Agree” on the prompt window popping out to accept the licensing agreement. 6. Read the Privacy Policy and press "Continue". 7. In the popped-up prompt window, press "Agree" to accept the Privacy Policy. 8.
- Page 62 9. Input computer password and click “Install Software”. 10. Click “Continue Installation” on the prompt window popping out. 11. The system will finish driver installation automatically. • If using a USB cable to connect a computer with a Wi-Fi model printer, a wireless network configuration prompt window will pop up during driver installation, as shown in following picture.
-
Page 63: Add Printer To Macos System
3.3. Add printer to macOS system 3.3.1. Add up the printer via USB 1. Connect the printer to computer with USB cable and then turn power on. 2. Enter the “System Preferences” – “Printers & Scanners” of computer. button to select “Add Printer or Scanner”. 3. -
Page 64: Add Airprint Printer
3.3.4. Add AirPrint printer 1. Turn the power of printer and computer on. 2. Make sure the connection between printer and computer is set up (USB connection or network connection). 3. Enter the “System Preferences” – “Printers & Scanners” of computer. button to select “Add Printer or Scanner”. -
Page 65: Wired Network Setup (Applicable To Wired Network Models)
4. Wired network setup (applicable to wired network models) In case printers support wired network printing, they can be connected to network to control printer to print in wired network mode. 4.1. Set IP Address The IP address of the printer may be automatically obtained through DHCP function or set manually. -
Page 66: Wireless Network Setup (Applicable To Wi-Fi Models)
3. A printer that has wireless network function. 5.1.1.2. Setup methods of wireless network setup tools 1. Take the wireless network setup tool in computer. Click the “Start menu” – “All programs” - “Pantum”- Product name – Windows system: “Wireless network setup tool”. - Page 67 "Go" - "Applications" - "Pantum" - "Utilities" - "Wireless Network Configuration Tool" on the computer Finder menu bar. 2. Use USB cable to connect and configure. Select "Yes, I have an USB cable that can be used for installation"...
- Page 68 2) Please tick “No” to configure other wireless network needed to connect to. Complete configuration according to interface prompt. • The display password is not ticked by default; if it is ticked, all passwords input can be Note: seen in clear text. 2.2 The computer is not connected to wireless network.
-
Page 69: Wi-Fi Protected Setup (Wps) Setup
3. Use WPS connection . Select “No, I don't have a USB cable” in the interface below and then click “Next”. Operate as per real interface. (Please refer to Chapter 5.1.2 for detailed WPS configuration.) • If the printer cannot be used normally after wireless network setup is finished, please Note: install the drive again. -
Page 70: How To Disable The Wi-Fi Network Connected
3. From printer control panel navigate to: “ ” -Network set-Wireless conf.-PIN mode. 4. Record 8-digit WPS PIN code. 5. Open Web browser, enter IP Add. of access point (wireless router) in Add. field. 6. Access to WPS setting, enter 8-digit PIN code and save. 5.1.3. - Page 71 2. Turn on the mobile device and select setup to enter Wi-Fi connection interface. 3. Select “Advanced” and then select “Wi-Fi Direct” in advanced WLAN interface. 4. Select printer SSID on direct interface to launch a connection invitation. 5.When the panel inquires if connect or not, click “OK” button for confirmation and Wi-Fi Direct. •...
-
Page 72: How To Disable The Wi-Fi Direct
5.2.2.2. Connection method of wireless client that does not support Wi-Fi Direct function (input password to connect) 1. Turn on printer power. 2.From printer control panel navigate to: “ ”-Network info-Wi-Fi dir. info to check “Network name” and “Password” 3. Turn on the computer or mobile device with wireless network function; select the SSID of Wi-Fi Direct and input password to connect. - Page 73 • Every time when the setup of access point (wireless router) is changed, you must set up the wireless network of printer again. 3. Connection failure • Please inspect if the safe mode and password of access point (wireless router) and printer is correct.
-
Page 74: Web Server
6. Web server You can manage printer setup via the embedded Web server. 6.1. Visit the embedded Web server 1. Turn on the power of printer and computer. 2. Connect the printer to network to ensure that the printer is connected to the network where the computer is connected to (please refer to Chapter 4 Chapter 5... -
Page 75: Ip Address Setup
5. It supports configuration of e-mail address, FTP address and SMB address to scan the file to be scanned directly to E-mail, FTP or SMB server. 6.2.1. IP address setup You need to connect your printer to network before IP address setup. 1. -
Page 76: Wireless Settings
• The printer supports using the following IPv6 addresses for network printing and Note: and print “NetConf Pg” view IPv6 address). management(please refer to Chapter 12.4 • IPv6 local-link address: local IPv6 address set up by oneself (addresses beginning with FE80). -
Page 77: Machine Setup
6.2.2.3. Wireless IP setup Only when the wireless network of printer is turned on, the Wireless IP Configuration can be displayed on Web server. 1. Click “Settings” – “Network settings” – “Wireless setup” – “Wireless IP Configuration”. 1) DHCPv4 is ticked by default. If IP address needs to be set up manually, please cancel the DHCPv4 checkbox ticked and input the “IPv4 Address”, “Subnet Mask”... - Page 78 6.2.3.2. Configure the E-mail address book If you want to scan a file to an e-mail address, you need to configure the e-mail address book first and then scan the file to the assigned e-mail address.The e-mail will not be received before proper setting on the e-mail box;...
- Page 79 II. Set the e-mail group 1. Log in the embedded Web server (please refer to Chapter 6.1 for login method). 2. Click “Settings”, “Machine Settings” and then “E-mail Group” to enter the setting interface of e-mail group. 3. Click “Create” to pop out a window as below and edit the group name and check the e-mail address to be added in the contact name (e-mail address) listbox, and then click "Apply".
-
Page 80: Recover Factory Settings Via Web Server
6.2.3.4. Configure SMB Address Book To scan documents to SMB server, you need to configure the SMB address book first. You can send the scanned images to SMB server while scanning. 1. Log in the embedded Web server (please refer to Chapter 6.1 for login method). -
Page 81: Print
7. Print 7.1. Print Function You can set the print function through "Start"-"Devices and Printers"- select corresponding printer- right click – set print function in "Printing preferences". Some functions are as follows: Functions Diagram Automatic Two-Sided Printing Collate Print Reverse Print N-in-1 Poster Print(for Windows Operation System only) -
Page 82: Printing Method
• Windows 7 is taken as example in the above description. Note: • You can realize poster printing feature by selecting 2x2 poster printing in multipage. • You can enable Printing Preferences and click the Help button to view detailed “Open Help Document”... -
Page 83: Paper Source
7.2.2. Paper source 7.2.2.1. Auto Select printing If you set the paper source to “Auto Select”, the printer will select the appropriate tray to print according to your paper settings. 7.2.2.2. Automatic tray printing Before printing, make sure that the print media of appropriate size is loaded in the automatic tray. •... - Page 84 7.2.2.3. Multi-purpose tray printing Before printing, make sure that the print media of appropriate size is loaded in the automatic tray. • For precautions on loading paper, see “Paper and Print Media” Note: • Special paper, such as envelope paper and film paper, can only be printed through the multi-purpose tray.
-
Page 85: Print Settings
• For precautions on loading paper, see “Paper and Print Media” Note: • For the type of media to be printed with the automatic tray, see the “Paper Specification”. 7.3. Print Settings 7.3.1. Setting the printing parameters Before sending a print job, you can set the printing parameters in the following two ways. Operating Temporary printing setup change Permanent default setup change... - Page 86 1. Draw out duplex unit. 2. Make the backside of duplex unit up. 3. Adjust paper size slide to A4 or Letter position to finish setting up.
- Page 87 4. Install the duplex unit in the printer. 7.3.2.2. How to carry out auto duplex printing 1. Open the print job to be printed from the application (such as a Notepad). 2. Select Print from the File menu.
- Page 88 3. Select printer of the corresponding model. 4. Single click “Preferences” for printing setup. 5. Select the “Duplex” in “Basic” tab and then select “Long Edge” or “Short Edge”.
- Page 89 6. Single click “OK” to finish printing setup. Click “Print” to realize auto duplex printing.
-
Page 90: Fine Mode Printing
7.3.3. Fine mode printing The Fine mode is applicable to engineering drawings and fine lines printing. Set up fine mode in the basic page of printer preference After setup, fine printing mode can be realized. 7.3.4. Booklet printing • "Booklet" cannot be concurrently used with "Multipage" or "Zooming". Note: •... - Page 91 5. Click “OK” in the lower left, to complete print settings. Click “Print”, to print the booklet. • Documents will be re-paged after selecting booklet printing. It will print two pages on Note: each side of the paper, and then fold out of it to form a book-like booklet.
-
Page 92: Mute Printing
7.3.5. Mute Printing If the Mute Printing is set, the printing noise will be reduced but the printing will slow down to some extent. The operating steps of mute printing are as follows (applicable to printers that are installed via USB connection) Windows 7 is taken as the example in the following operation. -
Page 93: Auto Shut-Off Setting
7.3.6. Auto shut-off setting “Auto shut-off setting” to set off condition and off delay of printer. 1. Enter computer “Start Menu” – “Control Panel” – View “Devices and Printers”. 2. Right click printer, select “Printer properties” in drop-down list. 3. Enter “Secondary Settings” option and set “Auto shu-off setting”. 4. -
Page 94: Open Help Document
7.3.7. Open Help Document You can open the "Printing preferences" and click "Help" button (for Windows Operation System only). The help document contains the user guide where you can find the information on print settings. -
Page 95: Usb Print
7.3.8. USB print The printer supports direct print from USB and quick document print without the need of computer transmission. 1. Insert the USB stick into the front USB disk interface of the printer. 2. Once the USB flash disk is inserted, the USB flash disk drive interface will automatically pop up. Select “USB Flash Disk Print”. -
Page 96: Secure Printing
3. Select document to be printed and set print properties as required. 4. Click “Print” after setting. • Formats of USB memory device supported by the printer’s USB port include MS-DOS Note: (FAT), FAT16 and FAT32. • Document formats supported by USB print include: .pdf、.jpeg. 7.3.9. - Page 97 5. Click “OK”. 6. Then click "Print" to send a secure printing job. 7. Select "Secure Print" in the control panel of the printer, and select the user according to the secure printing job information you have set. • The default job information is “Use System Defaults”, and the user name of the secure Note: printing job is the computer user account name (click Start-Control Panel-User Account on PC to view the computer user account name).
-
Page 98: Cancel Printing
• After printing is done successfully, this secure printing job will be deleted. Note: • You can extend the storage capacity of secure printing by inserting a USB flash disk into the back USB interface of the printer. • If wrong passwords are entered 3 times consecutively, the interface of user secure printing job list will appear. -
Page 99: Copying
8. Copying 8.1. Copying function Copy Instructions Original Size Set the paper size of the originals. Copy To Set the paper size and type of the specified tray. Multipage Print a multi-page document to a piece of paper. Clone Print several identical images to a piece of paper. Poster Print a one-page original to pieces of paper. -
Page 100: Image Quality
• The image quality, intensity, resizing and paper setting can keep valid after options are Note: set. • N-in-1, Clone, Poster, Collate, 2-Sided Copy and Watermark Settings. After completion of copying operation, switching the control panel button, or restarting the printer, the settings are restored to default. -
Page 101: Clone
The multipage includes 3 modes: (1) Two-in-one: (2) Horizontal four-in-one: (3)vertical four-in-one: • "Multipage” and “resizing function” cannot be set at the same time. Note: 8.4.5. Clone Through setting on clone feature, you may print multiple original images on one piece of paper. Copying with the ADF and the glass platen are both supported. -
Page 102: Poster
8.4.6. Poster Poster setting enables the printing of one piece of original document on several pieces of paper. The "Poster" feature supports only copying with the glass platen. The poster copying includes 3 modes: 2x2: 3x3: 4X4: • The “poster” and “resizing function” cannot be set at the same time. Note: 8.4.7. -
Page 103: Watermark
2. One-sided → Two-sided: 3. Two-sided → One-sided: 4. Two-sided → Two-sided: 8.4.9. Watermark You can add watermark on your copies via Watermark on printer control panel. •This printer presets 4 watermark types - “Copy”, “Draft”, “Confidential” and “Urgent”. You Note: can also edit a custom watermark as needed. -
Page 104: Arrangement Mode
8.5.1. Arrangement mode ID copy supports four layouts: Half page Whole page up-down Half page left-right A5 left and right up-down Position: Half page up-down: default mode; put ID card at “orange left half area” of glass platform. Half-page up and down, half-page left and right or A5 left and right: put the ID card in the "blue area"... -
Page 105: Paper Dimension
8.5.3. Paper dimension If arranged in modes of "Full Page Up and down", "Half-page Up and down" and "Half-page Left and right", the paper size supports "A4" and "Letter" only; if arranged in mode of "A5 Long Edge", the paper size supports "A5" only. Please follow instructions on panel to put the paper vertically for printing. -
Page 106: Scan
9.1.1.1. Pantum Scan Application Operation Steps: 1. Double click on "Pantum Scan Application" on the computer, the icon is shown as below: 2. The prompt window is shown as below: 3. Set Scan in the right list. Click "Scan" on the bottom right corner and start scan. - Page 107 • Images scanned by Pantum scanning application software support six file types: BMP, Note: JPG, TIF, PDF, PNG and OFD. • You may click "Help (F1)" to open the help document of the scanning application to learn more scanning setting information.
- Page 108 4. After the window pops up, set the scan information in the right list of "Basic Setting" and "Advanced Setting". Click on "Scan" and start scan. If you desire to change a scanning port, please click "Port" at the lower part of above picture to select a scanning port, as shown below:...
- Page 109 9.1.1.2.2. Photoshop Operation Steps: 1. Launch Photoshop, click on "File" – "Import" on the top left corner and select TWAIN Scan, as is shown below: 2. After the window pops up, please refer to Step 4 of 9.1.1.2.1 to see the specific operation steps.
- Page 110 9.1.1.3. WIA Scan Driver 9.1.1.3.1. WIA1.0 Scan (Windows XP / Windows Server 2003) 1. Office Software (Word and Excel) Operation Steps: 1) Open the Office software (Word or Excel). 2) Keyboard shortcuts: Alt+I+P+S to open the application’s window. 3) Click on "Device" and select WIA Scan,click the “Custom Insert” below. 4) The prompt window as is shown below, set the scan information.
- Page 111 5) Click on "Adjust the Scanned Image Quality" on the bottom left corner of the above picture, the advanced properties interface will pop up, then users can set the scan; After finishing the settings, click on the "OK" button, then "Scan" button to start scan. 2.
- Page 112 9.1.1.3.2. WIA 2.0 Scan (Windows Vista / Windows Server 2008 and later versions) Operation Steps: 1. Click on "Start"- "All Programs"- "Device and Printer" on the left bottom of the desktop. 2. When the pop-up window appears, select the printer you want to use, and right click the mouse.
- Page 113 3. Click on "Start Scan" in the above option bar. 4. After the window pops up, set the scan and click "Scan" on the bottom right corner and start scan.
-
Page 114: Macos System Scan
9.1.2. macOS System Scan 9.1.2.1. ICA Scan 9.1.2.1.1. Open ICA via "Print and Scan" Operation Steps: 1. After installing the printer driver, click "System Preferences" icon on the bottom left corner of the computer desktop. 2. After the window pops up, click on "Print and Scan". - Page 115 3. After the window pops up, click on "Scan". 4. Click on "Open Scanner" and the scan window will pop up.
- Page 116 5. Click on "Show Details" on the bottom right corner to set the scan parameters. 6. Click on "Scan" on the bottom right corner and start scan. 9.1.2.1.2. Call CIA through applications Operation Steps: 1. Click on "Finder" icon on the bottom left corner of the computer desktop, or use keyboard shortcuts command+shift+C to open the window.
- Page 117 2. After selecting the printer in the left list, set the scan parameters in the right list. Click on "Scan" on the bottom right corner and start scan. 9.1.2.2. TWAIN Scan Take Photoshop as an example. Operation Steps: 1. Launch Photoshop, click on "File" – "Import" on the top left corner and select TWAIN Scan, as is shown below: 2.
-
Page 118: Push Scan
9.1.3. Push Scan This section is mainly to introduce how to scan files to PC, E-mail, FTP and USB with the printer’s control panel. • Stored document types supported by “Scan to PC/Email/FTP/USB flash disk”: JPEG, Note: PDF, TIFF, OFD. 9.1.3.1. - Page 119 1. Insert the USB into the printer’s front USB interface. 2. Put an original on the glass platen or into the ADF (please see Chapter 2.5 for how to put an original). 3. Click “Scan-Scan USB” in printer control panel. 4.
- Page 120 9.1.3.5. Scan to SMB To use “Scan to SMB” function, you need to create a shared folder on the Windows or Mac computer first. 9.1.3.5.1. Create a shared folder Windows 7 is taken as example for description of the following steps. 1.
- Page 121 3. In the pop-up “Network Access” window, click the drop-down menu, select “Everyone”, and click “Add”. 4. Change the “Everyone” permission level added in Step (3) to “Read/Write”, and click “Share (H)” in the lower right corner.
-
Page 122: Scanning Function
4. Click “Scan - Scan to SMB” on printer control panel. 5. Select proper scan setting, click “Scan” button to make a scan. 9.2. Scanning function This machine supports ADF automatic duplex scanning. Take Pantum scanning application software as an example: 1. Place the original in ADF (see Section 2.5.2... -
Page 123: Cancel Scan Job
3. The Scan Setting window will pop up, Select “Document Feeder (Auto Duplex)” under “Document Source” on the right side. 4. After setting the scanning parameters, click "Scan" in the lower right corner to start scanning. • This machine also supports ADF automatic duplex scanning. You can “Enable” or Note: “Disable”... -
Page 124: Fax
10. Fax 10.1. Connect Devices • “ ” port is used to connect fax with telephone line. • “ ” is used to connect external telephone. • It is recommended to use the traditional analog phone service (PSTN: Public Switched Note: Telephone Network) in connecting telephone line. -
Page 125: Fax Functions
If Fax is sent or received abnormally due to disturbance on telephone line, try Compatibility to switch to VOIP compatibility mode. Country / To adapt to different telephone lines in different countries, settings on different Region countries or regions are needed. Fax Report You can use the options in Fax Report to print the Fax report as you need. -
Page 126: Receive Fax
10.3.1.2. Manual fax sending 1. Put an original on the glass platen or into the ADF (please see Chapter 2.5 for how to put an original). 2. Click “Fax” button in control panel to enter fax functional interface. 3. Click “Hands free” button or pick up the telephone receiver, enter fax number. 4. -
Page 127: Set The Compatibility Of Interference Voip Telephone Line
• The default remote code is “*90” which can be modified by users through “Fax”-“Fax Note: setting”-“Receive set.”-“Remote code”. • Received fax job may not be printed in case of low cartridge, please renew cartridge or turn “Continue to print in low cartridge” function on in fax receiving setting. 10.3.3. -
Page 128: Pc-Fax
5. Automatic Redial If the number you have dialed is busy or is not responding when you send a Fax, the machine will automatically redial the number. You can set the redial attempts and interval. 6. Auto Shrink When the paper size of the received Fax does not match the size specified in the printer, the received Fax will be shrinked according to the user-defined paper size to match the paper size in the printer. - Page 129 3. Select a printer named after the end of Fax and then click "Printer Properties"; next, set "Paper" and "Quality" of PC-Fax sending on the "Fax Settings" popup. 4. Click "Print" to present the "Send Fax" interface. 5. Enter the Name and Fax Number, then click Add to recipient list; If you want to send the Fax to multiple addresses, you can continue to enter their Name and Fax Number, then click Add to recipient list.
-
Page 130: Mobile Print/Scan/Fax
11.1.3.1.2. Operation steps 1. Turn on printer power. 2. For an Android mobile device, tap the “PANTUM” icon on the main screen to enter the first interface of “PANTUM”. 3. Select the connection method according to your habit to connect the printer. -
Page 131: Mopria Mobile Print
11.1.3.2.2. Operation steps 1. Turn on printer power. 2. For an iOS mobile device, tap the “PANTUM” icon on the main screen to enter the first interface of “PANTUM”. 3. Select the connection method according to your habit to connect the printer. -
Page 132: Nfc Label
3. Open the files you need to print with Adobe Reader on the Android device. 4. Click 5.Tap "print". 6.Please make sure the Pantum printer is selected. If you selected other printer (or failed to select any printer), please tap the pull-down menu of printer, and select your Pantum printer. -
Page 133: Airprint Mobile Print
4. Click 5.Tap "print". 6.Please make sure the Pantum printer is selected. If you select other printers (or no printer), please click printer option and then select your Pantum printer. 7. Set printing parameters such as number of copies to print. -
Page 134: General Settings
12. General Settings This Chapter mainly introduces some general settings. • The panel appearance may be a little different due to difference in type or function. All Note: diagrams are only for reference. 12.1. System Settings 12.1.1. Ink saving setting You can select the save toner mode which can reduce toner consumption and reduce printing cost. -
Page 135: Language Setting
12.1.2. Language Setting "Language Setting" is used to select the language to be displayed on the control panel. 1. Click “ ” button in control panel to enter “Menu setting” interface. 2. Click and select “System Setting”-“Language set” to set language. 12.1.3. -
Page 136: Sleep Time Setting
12.1.4. Sleep Time Setting Sleep mode can reduce the energy consumption of printer effectively, and “Sleep time setting” can be made in the idle time before the device enters sleep mode. 1. Click “ ” button in control panel to enter “Menu setting” interface. 2. -
Page 137: Print A Page For Clean & Fix
12.1.6. Print a Page for Clean & Fix "Print a Page for Clean & Fix"function can clean the toner, paper powder and other inpurities, so as to realize better printing effect.The printer will start up Print a Page for Clean & Fix function automatically after the printer has printed a certain number of pages. -
Page 138: Sound/Volume
12.1.8. Sound/volume You may set the up and down of sound/volume or shut down. 1. Click “ ” button in control panel to enter “Menu setting” interface. 2. Click and select “System Setting”-“Sound/Volume” to set “Warning tone”, “Ring tone”, “Fax tone”... -
Page 139: Network Settings
12.2. Network Settings You can check or set network through Network set. 1. Click “ ” button in control panel to enter “Menu setting” interface. 2. Click and select “Network set” to set “Wired config.”, “Wireless conf.” and “Wi-Fi direct setting”. 12.3. -
Page 140: Print Information Report
12.4. Print information report You can print information report by operating control panel. These pages can help you to learn about product information, and diagnose and solve product failures. 1. Click “ ” button in control panel to enter “Menu setting” interface. 2. -
Page 141: Configure The E-Mail Address Book
12.6. Configure the e-mail address book 1. Click and select “Scan”-“Scan to Email” in control panel to enter Scan to Email setting interface. 2. Enter Email Add. into input box, click “Add” button to add Email Add. into Email Add. book. 3. -
Page 142: Online Upgrade
12.9. Online upgrade This printer supports firmware upgrade with its control panel without a computer. 1. Switch on the printer and then connect it to network. 2. Click “ ” button in control panel to enter “Menu setting” interface. 3. Click and select “System Setting”-“Online upgrade” to upgrade firmware. •... -
Page 143: Routine Maintenance
13. Routine Maintenance • Printer appearance may differ because of various models and functions, so the Note: schematic diagram is only for your reference. 13.1. Cleaning the Printer • Cut off the power supply of the printer before cleaning. Note: •... - Page 144 2. Lift the scanner cover, and gently wipe the glass platen and automatic duplex document feeder CIS (D-CIS) with soft cloth. 3. Open the front cover and take the laser toner cartridge out along the track. • When removing the toner cartridge, put the toner cartridge in a protective bag or wrap Note: it with thick paper to avoid direct light damaging the toner cartridge.
- Page 145 4.Clean the inside of the printer by gently wiping the shaded area, as shown in picture, with adry and lint-free cloth. 5. Wipe the LSU lens of printer gently with dry lint cloth.
- Page 146 6. Open the auto feed tray and wipe the pickup roller gently with dry lint cloth.
- Page 147 • the machine with the ADF should be regularly cleaned, removing dirt on the top cover Note: of the ADF. Please wipe the place as shown in figure with a soft cloth.
-
Page 148: Toner Cartridge And Drum Component Maintenance
13.2. Toner cartridge and drum component maintenance 13.2.1. About toner cartridge and drum component component 1.Cartridge, use and maintenance of the drum assembly. Please use the original toner cartridge for better printing quality. Please pay attention to the following items while using the toner cartridge: •... -
Page 149: Replace Toner Cartridge And Drum Component
13.2.2. Replace toner cartridge and drum component Note: Please pay attention to the following matters before replacing toner cartridge: • Since there may be toner on the surface of toner cartridge, please pay attention while taking it out to avoid spattering. •... - Page 150 3. Press the blue button on the left side of drum component with left hand and lift the toner cartridge handle with right hand at the same time to take the toner cartridge out. 4. Open the package of the new toner cartridge and hold the toner cartridge handle to shake it left and right for 5 –...
- Page 151 7. Take the drum component with toner cartridge installed and install it inside the printer along the inner track of printer to finish installing. 8. Close the front cover. Replace the drum assembly steps are as follows: 1.Power off the printer.
- Page 152 2. Open the front cover and take the laser toner cartridge out along the track. 3. Press the blue button on the left side of drum component with left hand and lift the toner cartridge handle with right hand at the same time to take the toner cartridge out. 4.
- Page 153 5. Install the drum component along the inner track to finish installing toner cartridge. 6. Take the drum component with toner cartridge installed and install it inside the printer along the inner track of printer to finish installing. 7. Close the front cover.
-
Page 154: Installing And Removing The Optional Tray
13.3. Installing and removing the optional tray 13.3.1. Installing optional tray This printer supports the use of optional trays, and can hold up to 2 optional trays. Each tray can hold up to 550 pieces of 80g/m² paper.If you want to buy optional trays, please contact the local dealer who has purchased the printer. - Page 155 4. Make sure the printer body and optional trays are placed correctly, as shown in the figure below. 5. Plug the power cord into the printer and turn on the power. After installing the optional tray, you need to update the printer status again (For how to update “Updating the optional tray status”) .
-
Page 156: Removing The Optional Tray
13.3.2. Removing the optional tray 1. Turn off the printer. 2. Unplug the power cord from the electrical outlet, and then unplug the power cord from the printer. 3. Lift the printer body with both hands and remove the optional trays. After removing the optional tray, you need to update the printer status again (For how to update “Updating the optional tray status”). -
Page 157: Updating The Optional Tray Status
13.3.3. Updating the optional tray status Each time you install/remove the optional trays, you need to manually update the printer driver status.Take Windows 7 as an example for this section. “How to install Windows printer driver” 1. Install the printer driver (please refer to for installation). -
Page 158: Troubleshooting
14. Troubleshooting Please read this section carefully. It may help you to solve common problems encountered during the printing process. If the problems persist, please contact Pantum Aftersales Service Centre. Prior to handling common problems, first check that: • The power cord is connected correctly and the printer is powered on. - Page 159 2.Gently pull the jammed paper out. 3. Install paper tray.
- Page 160 4.Open the front cover. 5. Take the laser toner cartridge out along the track. (For the purpose of preventing printing quality from affecting by the exposure of photosensitive drum, please put the laser toner cartridge inside the protection bag or warp it with thick paper).
-
Page 161: Paper Jam In The Fuser Unit
6.Gently pull the jammed paper out. 7. After taking out papers jammed, install the laser toner cartridge again and close the front cover, then the printer will recover printing. 14.1.2. Paper Jam in the Fuser Unit Note: When papers jammed in fuser unit are taken out, please pay attention and do not touch the shaded area shown below in order to avoid burns. - Page 162 1. Open the front cover and then remove the laser toner cartridge along the guide rail. 2.Open the rear cover.
- Page 163 3.Open the fuser door using the handles on both sides. 4.Gently pull the jammed paper out.
- Page 164 5. Close the back cover after removing the paper jammed. 6. Install a new toner cartridge and then close the front cover; then, the printer will recover printing automatically.
-
Page 165: Duplex Unit Jam
14.1.3. Duplex Unit Jam 1. Remove the duplex printing unit from the back of the printer. 2. Remove the jammed paper from the duplex unit. - Page 166 • If the printer still does not start printing, please check that all the jammed paper inside the printer has been cleared. • If you cannot remove the jammed paper yourself, please contact your local Pantum authorized repair center or send the printer to the nearest Pantum authorized service center for repair.
-
Page 167: A Paper Jam Occurs On The Automatic Document Feeder (Adf)
14.1.4. A paper jam occurs on the automatic document feeder (ADF) 1. Open the ADF’s top cover. 2. Remove the paper jammed from the ADF. - Page 168 3. After removing the paper jamed, close the top cover and then the printer will be back to the ready state. 4. If it is difficult to remove the paper jammed, please try to open the scanner cover and remove it from the pressing block.
-
Page 169: Paper Jam Of Auto Feed Tray
14.1.5. Paper jam of auto feed tray 1. Pull out the automatic tray. 2. Gently pull the jammed paper out. -
Page 170: Paper Jam Of Multi-Purpose Tray
3. After removing the jammed paper, reinsert the automatic tray into the printer; press the front cover button to open and close the front cover, and the printer will resume printing automatically. 14.1.6. Paper jam of multi-purpose tray 1. Gently pull the jammed paper out. -
Page 171: Paper Jam Of Optional Tray
2. After removing the jammed paper, reload paper into the multi-purpose tray; press the front cover button to open and close the front cover, and the printer will resume printing. 14.1.7. Paper jam of optional tray 1. Pull out the optional tray. - Page 172 2. Gently pull out the jammed paper. 3. After removing the jammed paper, reinsert the optional tray into the printer, and the printer will resume printing automatically.
- Page 173 If paper cannot be seen in this area, stop and go to the next step: 1. Pull out the automatic tray. 2. Remove the jammed paper from the automatic tray.
-
Page 174: Software Failure
3. After removing the jammed paper, reinsert the automatic tray into the printer, and the printer will resume printing automatically. 14.2. Software Failure Problem Solution The printer icon will not be displayed in Reinstall the printer driver. Ensure that the USB interface the “Printer and fax”... -
Page 175: Error Message
Please cancel the current scan job or Scanner is Busy With other scan jobs. wait for the completion of other scan jobs. Please contact Pantum Customer Scan failed Scanner internal failure. Service. If you have selected ADF as the scan source, this... -
Page 176: Common Troubleshooting
ADF. • If the problem remains, please contact Pantum Customer Service. Note: 14.4. Common Troubleshooting 14.4.1. Common Trouble Trouble Fault Cause Solution Type phenomenon Problems in Poor print quality 14.4.2 Image Defects. - Page 177 Separate the print media or use • Internal parts failure. better quality and dry print media.. • If the trouble still can not be shooted after the above operations, please contact Note: Pantum Customer Service.
-
Page 178: Image Defects
14.4.2. Image Defects Problem Cause Solution • The print media does not meet the • Please use proper print media usage specifications, for within the specification range. • Set the resolution and example the media is damp or too rough. concentration setting of program, or •... - Page 179 • Dirty toner cartridge. • Clean or replace toner cartridge • Damaged inner parts of toner • Clean the mirror of the laser at the cartridge. back of the printer. • The reflective glass of the laser inside • Clean the feed path of printer. •...
- Page 180 assembly. • Dirty toner cartridge • Clean or replace toner cartridge • The transfer roller inside the printer is • Clean the internal transfer part of dirty. the printer. • The transfer voltage inside the printer is abnormal. The back of the printout is dirty •...
-
Page 181: Fax Faults
14.5. Fax faults Trouble Type Fault phenomenon Solution • If you cannot hear the dialing tone after picking up the receiver, please check the connection of all telephone lines between the fax and the The dialing tone cannot be wall-mounted socket. heard. - Page 182 the fax sending menu with the dialing way supported for telephone line. • Make one copy of original to check if the fax The printer is poor in scanner could work normally. transmitting files • Transmit with a higher resolution. •...
-
Page 183: Product Specifications
• Specification values vary slightly from printers with different models with different Note: functions ,and product specifications vary from different countries and regions. • These values are based on the initial data. For more information about the latest specifications, please visit: www.pantum.com. 15.1. Overview of the Specifications Product Size(W*D*H) 416mm*365mm*370mm... -
Page 184: Print Specifications
macOS 10.8/10.9/10.10/10.11/10.12/10.13/10.14/10.15 Linux (Ubuntu 14.04/16.04/18.04(32/64 Bit);Debian 10.0;Redhat 8.0.0;Astra Linux Special Edition V1.6;Centos 7(32/64 Bit)) iOS 7.0-13.0 Android 5.1-10.0 USB 2.0(High Speed) Communication interface Wired network: IEEE 802.3 10/100/1000Base-Tx Wi-Fi (2.4G/5G): IEEE 802.11a/b/g/n/ac (support WPS) NFC : 13.56MHZ Wi-Fi 2.4GHz : 2412MHz - 2472MHz Frequency Band Wi-Fi 5GHz : 5150MHz - 5350MHz;... -
Page 185: Scan Specifications
15.4. Scan Specifications Scan Type Flatbed+ADF Single-sided: 24ipm Scanning speed Duplex: 48ipm Flatbed: 216×297mm Maximum Scan Size ADF: 216×356 mm Chromoscan Scan Output Function Scan to E-mail, PC, FTP, SMB and USB 15.5. Fax specification Fax Type Black-and-white Modem Speed 33.6Kbps Fax Memory 650 pages... - Page 186 Unique Identifier Trade Name: Pantum Model No.: BM51****(suffix *: A-Z, 0-9, hyphen or blank) Responsible Party – U.S. Contact Information Company Name: PANTUM (USA) CO.,LTD Office address:13875 Ramona Ave.,Chino, CA 91710 TEL: 626-965-6662 FCC Compliance Statement This device complies with Part 15 of the FCC Rules. Operation is subject to the following two conditions: (1) This device may not cause harmful interference, and (2) this device must accept any interference received, including interference that may cause undesired operation.
Need help?
Do you have a question about the BM5100FDN Series and is the answer not in the manual?
Questions and answers