Advertisement
Quick Links
Sandwich Maker •
IMPORTANT
SAFEGUARDS
When using electrical appliances, basic safety
precautions should always be followed, including
the following:
1 Read all Instructions.
2 Do not touch hot surfaces. Use handles or
knobs.
3 To protect against electric shock do not immerse
cord, plugs, or sandwich maker in water or other
liquid.
4 Close supervision is necessary when any
appliance is used by or near children.
5 Unplug from outlet when not in use and before
cleaning. Allow to cool before putting on or
taking off parts, and before cleaning the
sandwich maker.
6 Do not operate the sandwich maker with a
damaged cord or plug or after the sandwich
maker malfunctions, or has been damaged in
any manner. Return the sandwich maker to the
nearest authorized service facility for
examination, repair or adjustment.
7 The use of accessory attachments not
recommended by the sandwich maker's
manufacturer may cause injuries, fire, or electric
shock.
8 Do not use outdoors.
9 Do not let power cord hang over edge of table
or counter, or touch hot surfaces.
10 Do not place on or near a hot gas or electric
burner, or in a heated oven.
11 Do not use the sandwich maker for other than
intended use.
12 Make sure that your household voltage
corresponds to the voltage stated on your
sandwich maker's rating label.
Before using your new product,
please read these instructions to prevent any damage.
NB-SAND15
13 Allow your sandwich maker to cool completely
before moving it.
14 This appliance has a polarized plug (one blade
is wider than the other). To reduce the risk of
electric shock, this plug is intended to fit into a
polarized outlet only one way. If the plug does
not fit fully into the outlet, reverse the plug. If it
still does not fit, contact a qualified electrician.
Do not attempt to modify the plug in any way.
SAVE THESE
INSTRUCTIONS
PACKAGE CONTENTS
•
Sandwich maker
•
Quick Setup Guide
FEATURES
•
Automatic temperature control
•
Non-stick cooking plates for easy cleaning
•
Cord wrap on the base for storing your power cord
when not in use
•
Store upright to save space
•
Power and ready lights
•
Cool-touch handle
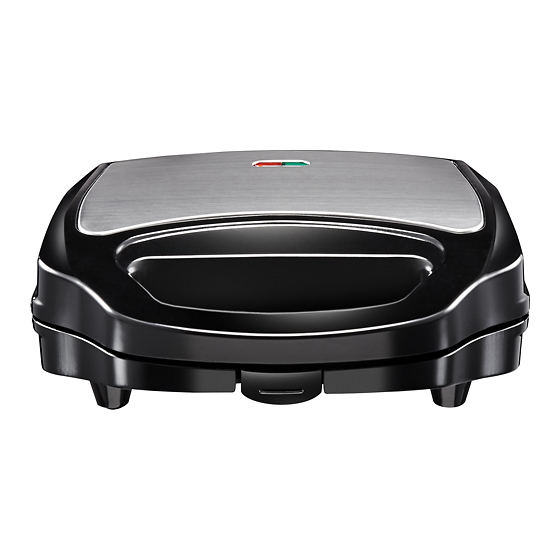
QUICK SETUP GUIDE
# ITEM
DESCRIPTION
1 Handle
Use to easily move and store the
sandwich maker when not in use.
2 Handle lock
Locks the lid into place.
3 Power light (red)
Lights when the sandwich maker
is plugged in.
4 Ready light (green)
Lights when the sandwich maker
is preheated or a sandwich is
done cooking.
5 Non-stick cooking
Place your sandwich between
plates (not visible)
these plates.
BEFORE USING YOUR SANDWICH
MAKER FOR THE FIRST TIME
1 Remove all packaging materials.
2 Wipe the cooking plates with a sponge or cloth
dampened in warm water.
Caution: Do not immerse your sandwich maker in water,
and do not run water directly onto the cooking plates.
3 Dry the plates with a cloth or paper towel.
USING YOUR SANDWICH MAKER
Note: The first time you heat your sandwich maker, it may
emit some smoke or odor, which is normal. This does not
affect the safety of your sandwich maker.
For best results, lightly coat the cooking plates with a little
cooking oil or cooking spray.
1 Close your sandwich maker and plug it into a power
outlet. The red power light turns on.
ON
OFF
Preheating takes approximately two to four minutes.
When your sandwich maker is preheated, the green
ready light turns on.
ON
ON
2 Open the lid, then place your constructed sandwich (a
slice of bread, sandwich components, then another slice
of bread) on the bottom cooking plate.
Advertisement

Related Manuals for Insignia NB-SAND15


Summary of Contents for Insignia NB-SAND15
- Page 1 Sandwich Maker • NB-SAND15 QUICK SETUP GUIDE IMPORTANT 13 Allow your sandwich maker to cool completely # ITEM DESCRIPTION before moving it. SAFEGUARDS 1 Handle Use to easily move and store the 14 This appliance has a polarized plug (one blade sandwich maker when not in use.
- Page 2 90-DAY LIMITED WARRANTY TO STORE YOUR SANDWICH MAKER 3 Close the lid and latch the handle lock. The green ready light turns off. 1 Unplug your sandwich maker. 2 Make sure that your sandwich maker is cool. CONTACT US: 3 Clean and dry the cooking plates and exterior, if For customer service, e-mail The sandwich cooks for approximately three to five necessary.
Need help?
Do you have a question about the NB-SAND15 and is the answer not in the manual?
Questions and answers