Table of Contents
Advertisement
Quick Links
QUICK SETUP GUIDE
1-Tap Beverage
Cooler / Kegerator
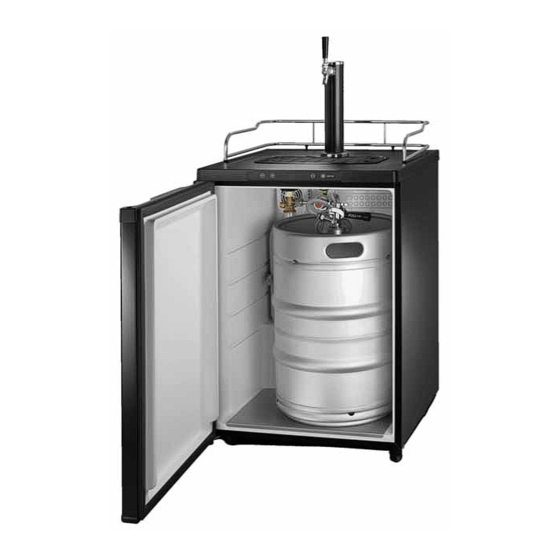
NS-BK1TBK8
Congratulations on your purchase! Your NS-BK1TBK8 kegerator is designed for
years of fun and trouble-free performance. This Quick Setup Guide is provided to
help you get your kegerator up and running quickly. If you need more help,
however, take a look at the online manual, located at
www.insigniaproducts.com.
PACKAGE CONTENTS
Adjust
Change
temperature
temperature unit
Display
Quick Cool
1 Beer tap handle
13 Beer keg (not included)
2 Draft arm assembly
14 Metal washers for locking casters (2)
3 Guard rail
15 Locking casters (2)
4 Drip tray (2 pieces)
16 Beer gasket
5 Worktop
17 Hose clamp
6 Control Panel
18 CO
back tank retainer
2
7 Sankey Type-D keg coupler
19 Extra valve washers
8 CO
tank regulator
20 Wire shelf
2
9 5 lb. CO
tank (shipped empty)
21 Wire half-shelf
2
10 Bolt and nut for retainer
22 Metal wrench (for cleaning)
11 CO
tank retainer
23 Casters (2)
2
12 CO
gas line
2
Before using your new product, please read these instructions to prevent any damage.
Before assembly
Fill the CO
See your local beer keg
provider, air/gas or
welding supplier, or
sporting goods store.
Find a suitable location
Position the kegerator away from direct
sunlight and sources of heat, and avoid
positioning the kegerator in moist areas.
Assembling your kegerator
1
INSTALLING THE CASTERS (OPTIONAL)
1 Tip the kegerator onto its side on a soft surface to protect it from
scratches.
2 Unscrew and remove the black front feet. Keep them in a safe place in
case you want to use the feet later.
3 Attach the two metal washers (included) to the locking casters to
prevent scratching the cabinet, then install the two locking casters in the
front positions on the bottom of the kegerator (closest to the door).
4 Install the other two casters in the rear positions on the bottom of the
kegerator.
Quick cool
Quick Cool
5 With all four casters tightened evenly, stand the unit in the upright
position.
6 Step on the front of the locking casters to lock the kegerator into place
or step on the back to unlock the kegerator.
2
ATTACHING THE GUARD RAIL
Place the guard rail into the holes on the top of the kegerator.
Do not use an
tank
Allow for space
2
extension cord
Make sure that there
3"
is 3" between the
back and sides of the
kegerator and any
surrounding walls.
You will need
Pliers/
clamp crimper
Phillips
Adjustable
screwdriver
Wrench
Front
Metal washers
Locking casters
Casters
3
INSTALLING THE DRAFT ARM ASSEMBLY
1 Remove the cabinet plug from the top of the kegerator.
2 Align the beer gasket with the holes on the top of the cabinet.
3 Pass both the wing nut and the beer tube (both are attached to the
draft arm assembly) through the hole on the worktop until the draft
arm assembly is resting on the top of the cabinet.
4 Rotate the draft arm 60 degrees until the tap is facing the front. It may
take some force.
5 Attach the black plastic beer tap handle to the top of the faucet,
tightening it by hand until it's secure. Hold the silver ring snug so it
does not move.
Full keg of beer
(1/2 barrel size
or smaller)
4
INSTALLING THE CO
REGULATOR & TANK
2
Note: The CO
tank (provided) is empty when you receive it. Visit your local beer keg
2
provider, air/gas or welding supplier, or sporting goods store to get it filled.
Caution: Before installing the CO
the manual.
1 Feed the hose clamp over one end of the CO
2 Attach that end to the gas line connector on the CO
Shut-off valve
Hose clamp
CO
gas line
2
3 Tighten the clamp to prevent leaks. Leave about ½ inch between the
top of the clamp and the end of the hose. You may need to squeeze
with a pliers or crimper.
4 Attach the CO
regulator to the CO
2
nut onto the tank valve and tightening with an adjustable wrench.
Tank
Regulator
valve
nut
5 Slide the CO
tank through the retainer inside the kegerator and
2
secure it with the bolt and nut. Position the tank so that you can read
the numbers on the gauge and have easy access to the shut-off valve.
OR
Install the CO
tank retainer on the back of the kegeratorcoole for
2
extra space inside the unit. Refer to the manual for additional
information.
Beer tap handle
Draft arm assembly
Wing nut and beer tube
Beer gasket
Cool
Quick
regulator and tank, review important safety tips in
2
gas line.
2
regulator.
2
CO
tank regulator
2
Sankey keg
coupler
tank by screwing the regulator
2
Advertisement
Table of Contents

Related Manuals for Insignia NS-BK1TBK8


Summary of Contents for Insignia NS-BK1TBK8
- Page 1 Wrench Draft arm assembly Assembling your kegerator Congratulations on your purchase! Your NS-BK1TBK8 kegerator is designed for Wing nut and beer tube years of fun and trouble-free performance. This Quick Setup Guide is provided to INSTALLING THE CASTERS (OPTIONAL) help you get your kegerator up and running quickly.
- Page 2 24 hours. Press - or + to exit quick cool mode 01-800-926-3000 (Mexico) early. www.insigniaproducts.com INSIGNIA is a trademark of Best Buy and its affiliated companies Distributed by Best Buy Purchasing, LLC 7601 Penn Ave South, Richfield, MN 55423 U.S.A. ©2017 Best Buy. All rights reserved.
Need help?
Do you have a question about the NS-BK1TBK8 and is the answer not in the manual?
Questions and answers