
Related Manuals for TSC Alpha-30R


Summary of Contents for TSC Alpha-30R
- Page 1 Alpha-30R Direct Thermal Moblie Barcode Printers Series Lists: User Manual Alpha-30R...
- Page 2 All other trademarks are the property of their respective owners. Information in this document is subject to change without notice and does not represent a commitment on the part of TSC Auto ID Technology Co. No part of this manual may be reproduced or transmitted in any form or by any means, for any purpose other than the purchaser’s personal use, without the...
-
Page 3: Table Of Contents
Table of Content 1. Introduction ........................................3 1.1 Product Specification ....................................4 2. Operation Overview ......................................7 2.1 Unpacking and Inspection ....................................7 2.2 Printer Overview ......................................8 2.2.1 Front View ......................................8 2.2.2 Interior View ......................................9 2.2.3 Rear View ......................................10 2.3 Controls and Indicators ....................................11 2.3.1 Status LED indication: .................................. - Page 4 3.6 Installing the IP54-rated environmental case with shoulder strap (Optional) ....................25 4. TSC Console ........................................26 4.1 Start TSC Console ..................................... 26 4.2 Set WiFi and Add to TSC Console Interface .............................. 28 4.3 Initialize the Printer WiFi Setting ................................31 4.4 TPH Care ........................................32 4.5 Printer Function ......................................
-
Page 5: Introduction
With the Apple-certified MFi Bluetooth® 5.0 connection and 802.11 a/b/g/n/ac Wi-Fi fast roaming features, the Alpha-30R Series not only provide reliable and seamless communication with users’ devices, they also securely print labels wherever they are needed. -
Page 6: Product Specification
1.1 Product Specification Model Alpha-30R Version Basic Premium Resolution 8 dots/mm (203dpi) Printing method Direct Thermal Up to 127 mm (5”)/second Up to 152 mm (6”)/second Max. print speed 72 mm (2.83”) Max. print width 2,794 mm (110“) Max. print length... - Page 7 Gap Sensor • Reflective sensor Reflective sensor Sensors • • Head open sensor Head open sensor Standard Real time clock 8 alpha-numeric bitmap fonts Internal fonts One Monotype Imaging® CG Triumvirate Bold Condensed scalable font 1D bar code: Code 39, Code 93, Code128UCC, Code128 subsets A.B.C, Codabar, Interleave 2 of 5, EAN-8, EAN-13, EAN-128, UPC-A, UPC-E, EAN and UPC 2(5) digits add-on, MSI, Bar code...
- Page 8 Battery: 1 year Linerless kit Factory options • Type C USB 2.0 cable • 0.75" media core adaptor • Protective case with shoulder strap • Shoulder strap • 1-slot docking cradle (for premium model only) • 4-slot docking cradle (for premium model only) User options •...
-
Page 9: Operation Overview
2. Operation Overview 2.1 Unpacking and Inspection This printer has been specially packaged to withstand damage during shipping. Please carefully inspect the packaging and printer upon receiving the bar code printer. Please retain the packaging materials in case you need to reship the printer. Unpacking the printer, the following items are included in the carton. -
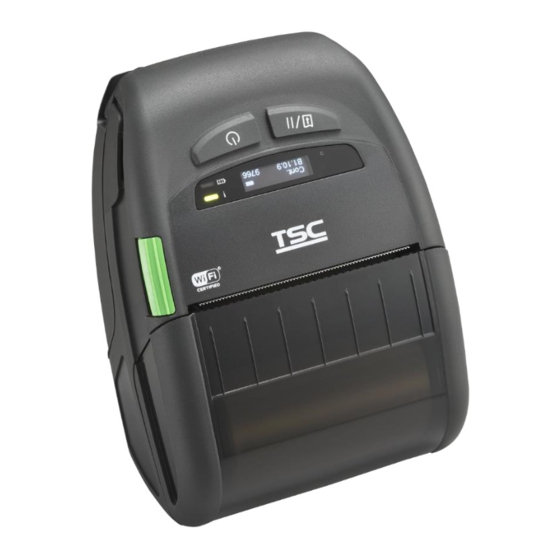
Page 10: Printer Overview
2.2 Printer Overview 2.2.1 Front View Media cover LCD screen Media cover release button Buttons... -
Page 11: Interior View
2.2.2 Interior View Power jack & Type C interface Media holder Tear bar Print head Gap/Black mark sensors Platen roller... -
Page 12: Rear View
2.2.3 Rear View Charging position for docking cradle Li-ion battery Battery open clasp Installation location for belt clip... -
Page 13: Controls And Indicators
2.3 Controls and Indicators Media Type Battery level Status LED Battery charging LED Firmware Version Bluetooth last 4 digits Start Key Feed/Pause key When Wifi is connected, the IP Address will replace the firmware version and Bluetooth number on the display. -
Page 14: Status Led Indication
2.3.1 Status LED indication: Color Meaning Printer is ready to use The system Flash: System is downloading data or printer is paused. System is clearing data. (Amber) Solid: Printer head open, cutter error. Flash: Printing error, such as paper empty, paper jam, ribbon empty, or memory error (Red) etc. -
Page 15: Setup
3. Setup 3.1 Setting up the Printer Put battery beneath the right side of the battery slot. Press the left side of the battery. Battery safety warning: DO NOT throw the battery in fire. DO NOT short circuit the contacts. DO NOT disassemble the battery. -
Page 16: Charging Battery / Smart Battery
3.2 Charging Battery / Smart Battery Battery Charging Mode and Operation Instructions In order to battery storage safety and increase battery storage time, the battery will be in shutdown mode for storage and shipping. The smart battery is charged for the first time, it needs to unlock this shutdown mode. ... -
Page 17: Charging The Battery
3.2.1 Charging the Battery Open the interface cover. Plug the power cord to the power jack and power outlet. When charging, the battery status LED indicator on the printer turns solid amber. After fully charged, the printer LED indicator turns off. It will stop charging automatically after the battery is fully charged. -
Page 18: Charging The Battery By 1-Bay Battery Charger (Optional)
3.2.2 Charging the Battery by 1-bay Battery Charger (Optional) Put the battery in to the slot as Place the battery shown and press down to lock charger on a flat surflace. When charging, the battery status LED indicator on the printer turns solid amber. -
Page 19: Charging The Battery By 1-Bay Docking Cradle (Optional)
3.2.3 Charging the Battery by 1-bay Docking Cradle (Optional) Push the printer to the top of Install the transfer casing the cradle. on fixing hook. Plug the power adapter of the charger into a properly lay it down to fit the hole grounded outlet and plug the as shown. -
Page 20: Charging The Battery By 4-Bay Docking Cradle (Optional)
3.2.4 Charging the Battery by 4-bay Docking Cradle (Optional) Place the 4-bay cradle on a flat surface. Put on the transfer board. Screw up the screw. - Page 21 Place the printer on the cradle, the printer media cover should face the bottom. Plug the power adapter of the charger into a properly grounded outlet and plug the charger connector to a battery charger DC socket. Switch on the power. When charging, the battery status LED indicator on the printer turns solid amber.
-
Page 22: Loading The Media
3.3 Loading the Media Open the printer media cover by pressing the media cover release button. Pull the media holders apart to fit the label roll width. - Page 23 Press each side of media cover to close the media cover and make sure the media cover closed correctly. Use TSC Console software to make calibration. Note: Please calibrate the gap/black mark sensor when changing (Refer to chpter 4 )
-
Page 24: Loading The Media (Linerless Model)
3.4 Loading the Media (Linerless Model) Open the printer media cover by pressing the media cover release button. Pull the media holders apart to fit the label roll width. - Page 25 Press each side of media cover to close the media cover and make sure the media cover closed correctly. Use TSC Console software to make calibration. Note: Please calibrate the gap/black mark sensor when changing (Refer to chpter 4 )
-
Page 26: Installing The Belt Clip
3.5 Installing the Belt Clip Lock the belt clip on lower of the printer. Press the hook of belt clip into the bars on the lower printer as pictured. The printer can be hung on the belt. -
Page 27: Installing The Ip54-Rated Environmental Case With Shoulder Strap (Optional)
3.6 Installing the IP54-rated environmental case with shoulder strap (Optional) Zip up the case Place the printer in cover. the case. Close the case cover. Zip up the outside cover to check. The outside cover should be opened and fixed while printing. -
Page 28: Tsc Console
4. TSC Console TSC Console is a management tool combining the Printer Management, Diagnostic Tool, CommTool and Printer Webpage settings, which enables you to adjust printer’s settings/status; change printers’ settings; download graphics, deploy fonts, graphics, label templates or upgrade the firmware to the group of printers, and send additional commands to printers at the same time ※... - Page 29 Select the current interface of the printer. The printer will be added to TSC Console’s interface. Select the printer and set the settings. For more information, please refer to TSC Console User Manual.
-
Page 30: Set Wifi And Add To Tsc Console Interface
4.2 Set WiFi and Add to TSC Console Interface Use USB or COM Port to set up the interface. (refer to chp.5.1) Double click to enter the printer configuration page. Click Get to receive printer’s information. Click Wi-Fi to the wi-fi setting page. - Page 31 For WPA-Personal Fill-in the SSID. Select the Encryption option to WPA-Personal. III. Fill-in the Key. Select DHCP to ON. (For OFF option, please fill-in the IP Address, Subnet Mask and Gateway) After setting, click the Set button. Note: Before setting, the entered field will be shown in yellow for reminding.
- Page 32 After clicking Set button, it'll pop-up the window tip as below shown. IP address will be shown in the “IP address” field and the Wi-Fi logo and IP address will be displayed on the LCD control panel as shown below. The Wi- Fi module has been connected.
-
Page 33: Initialize The Printer Wifi Setting
4.3 Initialize the Printer WiFi Setting Return to the main page of TSC Console. Click Functions to expand the page. Click Wi-Fi Default to initialize the printer Wi-Fi module setting to factory default setting. -
Page 34: Tph Care
4.4 TPH Care TPH Care provides users to check the condition of the print head and be able to set the dot failure threshold for indicating errors when the threshold is triggered. This option is used to set the This option is used to enable treshhold for unhealthy TPH dot (ON)/ disable (OFF) the TPH number. -
Page 35: Printer Function
4.5 Printer Function Printer Function could be found in Printer Configuration. “Printer Function” will be shown on the left side of the window. Functions Description Calibrate Sensor Detect media types and the size of the label RTC Setup Synchronize printer with Real Time Clock on PC Factory Default Initialize the printer to default settings Reset Printer... -
Page 36: Smart Battery
4.6 Smart Battery Smart Battery shows the battery information of the printer (Mobile Printers only.) -
Page 37: Troubleshooting
5. TroubleShooting Problem Possible Cause Recovery Procedure * Reinstall the battery. * The battery is not properly installed. * Switch the printer on. No Power * Battery out of power. * Charge the battery. * Battery damage. * Replace a new battery. * Check if interface cable is well connected to the * Re-connect cable to interface change a new cable. - Page 38 * SD card is damaged. * Use the supported capacity SD card. SD card is unable to use * SD card doesn’t insert correctly. * Insert the SD card again. * Reload the supply. * Media is loaded incorrectly * Clean the print head. * Dust or adhesive accumulation on the print * Clean the platen roller.
-
Page 39: Maintenance
6. Maintenance This session presents the clean tools and methods to maintain the printer. For Cleaning Depending on the media used, the printer may accumulate residues (media dust, adhesives, etc.) as a by-product of normal printing. To maintain the best printing quality, you should remove these residues by cleaning the printer periodically. Regularly clean the print head and supply sensors once change a new media to keep the printer at the optimized performance and extend printer life. - Page 40 Cleaning Tools Cotton swab Lint-free cloth Brush with soft non-metallic bristles Vacuum cleaner 75% Ethanol (for disinfecting) 99% Isopropyl alcohol (for printhead and platen roller cleaning) Genuine printhead cleaning pen Mild detergent (without chlorine) Cleaning Process: Printer Part Method...
-
Page 41: Agency Compliance And Approvals
7. Angency Compliance and Approvals EN 55032, Class B EN 55035 EN IEC 61000-3-2 EN 61000-3-3 EN 62368-1 FCC part 15B, Class B ICES-003, Class B This equipment has been tested and found to comply with the limits for a Class B digital device, pursuant to part 15 of the FCC Rules. - Page 42 including interference that may cause undesired operation. This Class B digital apparatus complies with Canadian ICES-003 Cet appareil numérique de la classe B est conforme à la norme NMB-003 du Canada AS/NZS CISPR 32, Class B GB 4943.1 GB/T9254 GB 17625.1 IS 13252(Part 1)/ IEC 60950-1 TP TC 004...
- Page 43 K 60950-1 KS C 9832:2019 KS C 9835:2019 KS X 3124:2020 KS X 3126:2020 CNS 13438 CNS 14336-1 NBTC...
- Page 44 VCCI-TECHNICAL REQUIREMENTS (VCCI-CISPR 32:2016) CISPR 32:2015+COR1:2016 45 (E) Dated 28-01-2005 1048 (E) Dated 18-10-2018 IMDA TS SRD BS EN 55032 BS EN IEC 61000-3-2 BS EN 61000-3-3 BS EN 55035...
- Page 45 Important safety instructions: 1. Read all of these instructions and keep them for later use. 2. Follow all warnings and instructions on the product. 3. Disconnect the power plug from the AC outlet before cleaning or if fault happened. Do not use liquid or aerosol cleaners. Using a damp cloth is suitable for cleaning. 4.
- Page 46 ◎ 勿将电池扔于火中。 ◎ 勿将电池接点短路。 ◎ 不可拆解电池。 ◎ 不乱将电池当成一般废弃物处理。 ◎ 打叉的垃圾桶符号表示电池不应该被放置到一般废弃堆中。 注意: ◎ 更换不正确型号类型的电池, 将产生爆炸危险。 ◎ 请根据使用说明处理用过的电池。 鋰電安全使用指南: 注意:電池若未正確更換,可能會爆炸。請用原廠建議之同款或同等級的電池來更換。請依原廠指示處理廢棄電池。 CAUTION: The printhead may be hot and could cause severe burns. Allow the printhead to cool. CAUTION: Any changes or modifications not expressly approved by the grantee of this device could void the user's authority to operate the equipment.
- Page 47 30mW 5470-5725MHz Hereby, TSC Auto ID Technology Co., Ltd. declares that the radio equipment type [Wi-Fi] IEEE 802.11 a/b/g/n is in compliance with Directive 2014/53/EU The full text of the EU declaration of conformity is available at the following internet address: http:// www.tscprinters.com...
- Page 48 RF exposure warning (For Bluetooth) The equipment complies with FCC RF exposure limits set forth for an uncontrolled environment. The equipment must not be co-located or operating in conjunction with any other antenna or transmitter. Canada, Industry Canada (IC) Notices This Class B digital apparatus complies with Canadian ICES-003 and RSS-210.
- Page 49 Informations concernant l'exposition aux fréquences radio (RF) La puissance de sortie émise par l’appareil sans fil est inférieure à la limite d'exposition aux fréquences radio de l'Industry Canada (IC). Utilisez l’appareil sans fil de façon à minimiser les contacts humains lors du fonctionnement normal. Ce périphérique a été...
- Page 50 NCC 警語: 經型式認證合格之低功率射頻電機,非經許可,公司、商號或使用者均不得擅自變更頻率、加大功率或變更原設計之特性及功能。(即 低功率電波輻射性電機管理辦法第十二條) 低功率射頻電機之使用不得影響飛航安全及干擾合法通信;經發現有干擾現象時,應立即停用,並改善至無干擾時方得繼續使用。 前項合法通信,指依電信法規定作業之無線電通信。低功率射頻電機須忍受合法通信或工業、科學及醫療用電波輻射性電機設備之干 擾。(即低功率電波輻射性電機管理辦法第十四條)
-
Page 52: Revise History
8. Revise History Date Content Editor...
Need help?
Do you have a question about the Alpha-30R and is the answer not in the manual?
Questions and answers