
Related Manuals for Amica 608EE2TAW/1


Summary of Contents for Amica 608EE2TAW/1
- Page 1 TYPE 6017EE2.37eEHTaFGQW MODEL 608EE2TAW/1 INSTRUCTION MANUAL ELECTRIC COOKER IO-CFS-1174 / 8504702 (06.2019 V2)
- Page 2 DEAR CUSTOMER, The cooker is exceptionally easy to use and extremely efficient. After reading the instruction manual, operating the cooker will be easy. Before being packaged and leaving the manufacturer, the cooker was thoroughly checked with regard to safety and functionality. Before using the appliance, please read the instruction manual carefully.
-
Page 3: Table Of Contents
TABLE OF CONTENTS Safety instructions ....................4 How to safe energy ...................7 Description of the appliance ..................9 Specifications of the appliance ..................10 Installation ......................11 Electrical connection ..................12 Operation ....................13 Electric hob ....................14 Oven functions and operation..................18 Baking in the oven – practical hints ..............21 Cleaning and maintenance..................26 Troubleshooting ....................30 Technical data ....................31... -
Page 4: Safety Instructions
SAFETY INSTRUCTIONS Warning: The appliance and its accessible parts become hot during use. Care should be taken to avoid touching heating elements. Children less than 8 years of age shall be kept away unless continuously supervised. This appliance can be used by children aged from 8 years and above and persons with reduced physical, sensory or mental capabilities or lack of experience and knowledge if they have been given supervision or instruction concerning... - Page 5 SAFETY INSTRUCTIONS Warning: Ensure that the appliance is switched off before re- placing the lamp to avoid the possibillity of electric shock. Before opening the cover, cleaning it of any dirt is recom- mended. The cooker hob surface should be cooled down before closing the cover.
- Page 6 SAFETY INSTRUCTIONS The appliance becomes hot during operation. Take care not to touch the hot parts inside the oven. Always keep children away from the cooker. While in operation direct contact with the cooker may cause burns! Ensure that small items of household equipment, including connection leads, do not touch the hot oven or the hob as the insulation material of this equipment is usually not resistant to high temperatures.
-
Page 7: How To Safe Energy
HOW TO SAVE ENERGY Using energy in a respon- Make use of residual heat from the sible way not only saves oven. money but also helps the If the cooking time is greater than 40 minutes environment. So let’s save switch off the oven 10 minutes before the energy! And this is how you end time. - Page 8 DISPOSAL OF THE APPLIANCE UNPACKING During transportation, protec- Old appliances should not sim- tive packaging was used to ply be disposed of with normal protect the appliance against household waste, but should any damage. After unpacking, be delivered to a collection and please dispose of all elements recycling centre for electric and of packaging in a way that will...
-
Page 9: Description Of The Appliance
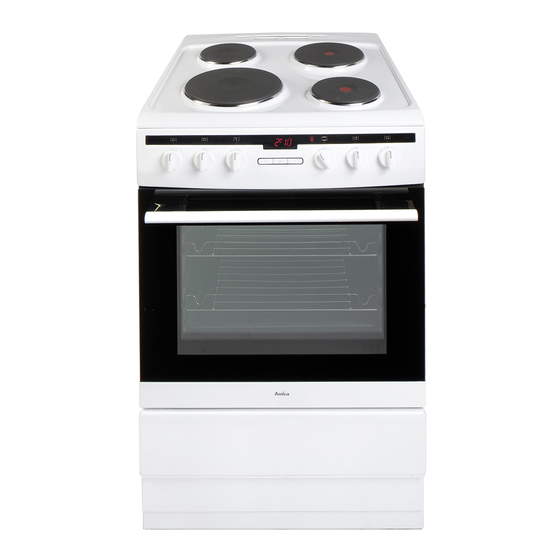
DESCRIPTION OF THE APPLIANCE 3, 4 5, 6 1 Temperature control knob 2 Oven function selection knob 3, 4, 5, 6 Heating plate control knobs 7 Temperatureregulatorsignal light red 8 Cooker operation signal light yellow 9 Oven door handle 10 Drawer 11 Electric hob 12 Electronic programmer... -
Page 10: Specifications Of The Appliance
SPECIFICATIONS OF THE APPLIANCE Oven fittings: Grill grate (drying rack) Roasting tray *All images are for indication only; please refer to your individual unit for actual item. -
Page 11: Installation
INSTALLATION Anti-tilt protection Installing the cooker CAUTION! You must install the anti-tilt pro- tection. If you do not install it, the appliance The kitchen should be dry and airy and can tilt. have effective ventilation according to the The appliance must be secured by using existing technical provisions. -
Page 12: Electrical Connection
INSTALLATION Electrical connection Warning: This appliance must be earthed. The appliance must be installed by a com- petent electrician using a double pole control unit of 40 ampere minimum capacity with 3 mm minimum contact separation at all poles. We recommend that the appliance is con- nected by a qualified electrician who is mem- ber of the N.C.E.I.C. -
Page 13: Operation
OPERATION Before first use Remove packaging, clean the interior of the oven and the hob. Take out and wash the oven fittings with warm water and a little washing–up liquid. Switch on the ventillation in the room or open a window. Heat the oven (to a temperature of 250°C, for approx. -
Page 14: Electric Hob
OPERATION How to use the heating plate The level of heat can be adjusted gradually by turning the appropriate knob to the right or left. Switching on the plate results in a yellow signal light on the control panel turning on. An appropriately selected pan saves energy. - Page 15 OPERATION Electronic programmer Timer The timer can be activated at any time, re- – functions gardless of the status of other functions. The timer can be set for from 1 minute to up to 23 OK – function selection button hours and 59 minutes.
- Page 16 OPERATION Semi–automatic operation Automatic operation If the oven is to be switched off at a given If the oven is to be switched on for a specified time, then you should: period of time and switched off at a fixed hour then you should set the operation time and Set the oven function knob and the tem- the operation end time:...
- Page 17 OPERATION The function AUTO is now on; the oven will Cancel settings start operating from the point when the differ- Timer and automatic function settings may ence between the set operation end time and be cancelled at any time. the operation duration time occurs (e.g. the operation time is set to 1 hour, the operation Cancel automatic function settings: end time is set to 14.00, so the oven will start...
-
Page 18: Oven Functions And Operation
OPERATION Oven functions and operation. Oven is off Oven with automatic air circulation Rapid Preheating (including fan) Top and bottom heater, roaster and fan on. Use to preheat the oven. The oven can be warmed up using the bottom Defrosting and top heaters, as well as the grill. - Page 19 OPERATION Use of the grill Top and bottom heaters on Set the knob in this position for co- The grilling process operates through infrared nventional baking. This setting is ideal rays emitted onto the dish by the incandes- for baking cakes, meat, fish, bread cent grill heater.
- Page 20 OPERATION Use of the grill The grilling process operates through infrared rays emitted onto the dish by the incandescent grill heater. In order to switch on the grill you need to: Set the oven knob to the position marked grill ...
-
Page 21: Baking In The Oven - Practical Hints
BAKING IN THE OVEN – PRACTICAL HINTS Baking we recommend using the baking trays which were provided with your cooker; it is also possible to bake in cake tins and trays bought elsewhere which should be put on the drying rack; for baking it is better to use black trays which conduct heat better and shorten the baking time;... - Page 22 BAKING IN THE OVEN – PRACTICAL HINTS ECO Heating ECO Heating an optimised heating function designed to save energy when preparing food. You cannot reduce the cooking time by setting a higher temperature; preheating the oven is not recommended. Do not change the temperature setting and do not open the oven door during ...
- Page 23 BAKING IN THE OVEN – PRACTICAL HINTS Oven with automatic air circulation (including a fan and top and bottom heaters) Type of Type Temperature Level Time dish of heating (min.) 160 - 200 2 - 3 30 - 50 25 - 35 160 - 170 25 - 40 155 - 170...
- Page 24 TEST DISHES. According to standard EN 60350-1. Baking Type of dish Accessory Level Type Temperature Baking of heating time (min.) Baking tray 160 - 170 25 - 40 Baking tray 155 - 170 25 - 40 Baking tray 155 - 170 25 - 40 Small cakes 2 + 4...
- Page 25 TEST DISHES. According to standard EN 60350-1. Grilling Type of dish Accessory Level Type Temperature Time of heating (min.) Wire rack 1,5 - 2,5 White bread toast Wire rack 2 - 3 Wire rack + 4 - wire rack roasting tray 1st side 10 - 15 Beef burgers 3 - roasting...
-
Page 26: Cleaning And Maintenance
CLEANING AND MAINTENANCE By ensuring proper cleaning and mainte- nance of your cooker you can have a sig- nificant influence on the continuing fault-free operation of your appliance. Before you start cleaning, the cooker must be switched off and you should ensure that all knobs are set to the “”/“0”... - Page 27 CLEANING AND MAINTENANCE Oven Replacement of the oven light bulb The oven should be cleaned after every In order to avoid the possibility of an use. When cleaning the oven the lighting electric shock ensure that the appliance is should be switched on to enable you to switched off before replacing the bulb.
- Page 28 CLEANING AND MAINTENANCE Door removal Removing the inner panel In order to obtain easier access to the oven 1. Using a flat screwdriver unhook the up- chamber for cleaning, it is possible to remove per door slat, prying it gently on the sides the door.
- Page 29 CLEANING AND MAINTENANCE 3. Pull the inner glass panel from its seat (in the lower section of the door). Re- move the inner panel (fig. D, D1). 4. Clean the panel with warm water with some cleaning agent added. Carry out the same in reverse order to reassemble the inner glass panel.
-
Page 30: Troubleshooting
CLEANING AND MAINTENANCE Caution! Regular inspections All repairs and regulatory activities should be carried out by the ap- Besides keeping the cooker clean, you propriate service centre or by an should: appropriately authorised fitter. carry out periodic inspections of the con- trol elements and cooking units of the cooker. -
Page 31: Technical Data
TECHNICAL DATA Type/Model 6017EE2.37eEHTaFGQW / 608EE2TAW/1 Rated Voltage 230V~ Rated Frequency 50 Hz Power 10000 W Electric hob 6500 W Oven 3500 W Grill 1500 W Bottom heater 1100 W Top heater 900 W External Dimensions (W x D x H) 600(W) x 600(D) x 900(H) mm The product meets the requirements of European standards EN 60335- 1;... -
Page 32: Product Fiche
The information in the product data sheet is given in accordance with the Commission delegated Regulation (EU) No 65/2014 supplementing Directive of the European Parliament and of the Council 2010/30/EU with regard to energy labelling of household ovens and range hoods Supplier name Amica S.A. 608EE2TAW/1 Model identifier 6017EE2.37eEHTaFGQW... -
Page 33: Product Information
Product information given in accordance with Commission Regulation (EU) No 66/2014 supplementing Directive of the European Parliament and Council Directive 2009/125/EC with regard to eco-design requirements for household ovens, hobs and range hoods Household ovens 608EE2TAW/1 Model identifier 6017EE2.37eEHTaFGQW Oven type (electricity or gas) - Page 34 Product information given in accordance with Commission Regulation (EU) No 66/2014 supplementing Directive of the European Parliament and Council Directive 2009/125/EC with regard to eco-design requirements for household ovens, hobs and range hoods Household electric hobs 608EE2TAW/1 Model identifier 6017EE2.37eEHTaFGQW Hob type (electric / gas / gas-electric)
- Page 36 Amica S.A. ul.Mickiewicza 52, 64-510 Wronki, Poland tel. +48 67 25 46 100, fax +48 67 25 40 320 www.amica.pl...
Need help?
Do you have a question about the 608EE2TAW/1 and is the answer not in the manual?
Questions and answers