Table of Contents
Advertisement
Quick Links
English
OUTDOOR COOKERS
CS2016
ASSEMBLY INSTRUCTIONS
AND
USE AND CARE MANUAL
__________
MODEL/SERIAL #
THE INSTRUCTION MANUAL CONTAINS IMPORTANT INFORMATION NECESSARY
FOR THE PROPER ASSEMBLY AND SAFE USE OF THE APPLIANCE.
READ AND FOLLOW ALL WARNINGS AND INSTRUCTIONS BEFORE ASSEMBLING
AND USING THE APPLIANCE. FOLLOW ALL WARNINGS AND INSTRUCTIONS WHEN
USING THE APPLIANCE.
KEEP THIS MANUAL FOR FUTURE REFERENCE.
METAL FUSION, INC.
712 St. George Avenue.
Jefferson, LA 70121
If you have any problems or questions
Call Us Toll Free at
1-800-783-3885
7:30 A.M. to 3:30 P.M. CST • Monday through Friday
(504) 736-0201
www.kingkooker.com
FAILURE TO FOLLOW THESE INSTRUCTIONS
AND WARNINGS COULD RESULT IN FIRE, EXPLOSION, BURN HAZARD OR CARBON
MONOXIDE POISONING WHICH COULD CAUSE PROPERTY DAMAGE,
PERSONAL INJURY OR DEATH.
Advertisement
Table of Contents

Related Manuals for King Kooker CS2016


Summary of Contents for King Kooker CS2016
- Page 1 English OUTDOOR COOKERS CS2016 ASSEMBLY INSTRUCTIONS USE AND CARE MANUAL __________ MODEL/SERIAL # THE INSTRUCTION MANUAL CONTAINS IMPORTANT INFORMATION NECESSARY FOR THE PROPER ASSEMBLY AND SAFE USE OF THE APPLIANCE. READ AND FOLLOW ALL WARNINGS AND INSTRUCTIONS BEFORE ASSEMBLING AND USING THE APPLIANCE. FOLLOW ALL WARNINGS AND INSTRUCTIONS WHEN USING THE APPLIANCE.
-
Page 2: Warnings
DANGER FOR YOUR SAFETY If you smell gas: 1. Shut off gas to the appliance. 2. Extinguish any open flame. 3. If odor continues, keep away from the appliance and immediately call your Fire Department. FAILURE TO FOLLOW THESE INSTRUCTIONS COULD RESULT IN FIRE OR EXPLOSION WHICH COULD CAUSE PROPERTY DAMAGE, PERSONAL INJURY OR DEATH. - Page 3 READ AND UNDERSTAND BEFORE USING THIS PRODUCT Throughout this manual the words appliance, cooker, fryer/boiler, burner and stove will be used interchangeably to refer to the King Kooker Outdoor Cooker. ® This is an ATTENDED appliance. Do NOT leave this appliance unattended while the burner is lit or while heating oil, grease, water or cooking food.
- Page 4 21) This appliance is not intended for commercial use. 22) Use King Kooker® appliances only in accordance with state and local ordinances, or in the absence of local codes, with the National Fuel Gas Code, ANSIZ223.1/NFPA 54, Storage and Handling of Liquefied Petroleum Gases,...
-
Page 5: Table Of Contents
READ AND UNDERSTAND ALL INSTRUCTIONS BEFORE USING YOUR KING KOOKER® PRODUCT TABLE OF CONTENTS Warnings ..........................2-4 Table of Contents . -
Page 6: Warranty
METAL FUSION, INC. LIMITED ONE-YEAR WARRANTY WHAT THIS WARRANTY COVERS This warranty covers all components of this outdoor cooker to be free from defects in materials and workmanship, with the exceptions stated below. HOW LONG COVERAGE LASTS This warranty runs for one year from the date of purchase. Please keep your receipt with this manual for future reference. -
Page 7: Owner's Registration
OWNER’S REGISTRATION Dear Customer, Thank you for purchasing a King Kooker ! Please take a moment to fill ® out your registration form and return it to us. We are always happy to hear suggestions and comments from our customers about our products. Completion of this registration allows us to contact you if the need arises. - Page 8 TAPE HERE FOLD ________________________ ________________________ Place Stamp ________________________ Here METAL FUSION, INC. 712 St. George Avenue Jefferson, LA 70121 FOLD...
-
Page 9: Section I - King Kooker® Outdoor Cooker Assembly
THE USE AND CARE MANUAL MUST BE READ AND UNDERSTOOD BEFORE USING THE APPLIANCE Throughout this manual the words appliance, cooker, fryer/boiler, burner and stove will be used interchangeably to refer to the King Kooker® Outdoor Cooker. TOOLS REQUIRED: SCREWDRIVER, TORQUE WRENCH or ADJUSTABLE WRENCH, LEAK TESTING SOLUTION Before assembling, check that all cooker components are included in the shipping carton. -
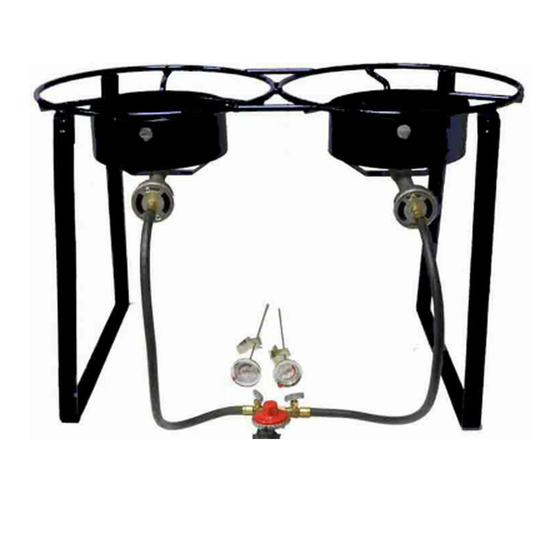
Page 10: Outdoor Cooker Assembly Instructions
ASSEMBLY INSTRUCTIONS CONTENTS (1) Top Frame With Attached Windshroud (2) Legs (8) Bolts, Lockwashers and Nuts Flat Bar (2) Castings/Air Shutters Steel Tab (1) Hose/Regulator TOOLS NEEDED Adjustable Wrench Screwdriver * Model May Vary From Picture 1. Attach the two legs to the cooker frame by aligning the bolt holes of the legs against the bolt holes on the outside of the flat bar steel tabs that extend from the cooker frame as shown in the above picture. -
Page 11: Hose Assembly Instructions
HOSE ASSEMBLY INSTRUCTIONS 1/8 MALE PIPE THREAD WITH ORIFICE NON-ADJUSTABLE REGULATOR VENTURI TUBE 1/8 MALE PIPE THREAD WITH ORIFICE TYPE 1 CONNECTION * Model May Vary From Picture 1. Tighten the hose fittings into the venturis with a torque wrench, up to a torque of 95 to 105 lb./in. Alternatively, hand tighten securely and then, using a wrench, tighten an additional 1-1 1/2 turns. -
Page 12: Section Ii - Use And Care Of King Kooker® Outdoor Cookers And Accessories
212°F(100°C). The temperature of hot oil should never be allowed to exceed 350°F(177°C). IMPORTANT: Oil can ignite at high temperatures. Most King Kooker® thermometers have a Red Zone above 350°F(177°C) to signify Danger. Never allow the temperature to exceed 350°F(177°C). If the temperature goes above 350°F(177°C) immediately turn the burner and gas supply OFF and wait... -
Page 13: Determining Proper Fill Levels For Cooking Vessels
This is the amount of cooking liquid the vessel is to be filled with to cook the food product. LP GAS CYLINDER INFORMATION King Kooker® Outdoor Cookers are manufactured for use with 20lb. (9 kg) LP Gas Cylinders. Important information to remember about LP Gas cylinders include: Always read and follow the cylinder manufacturer’s instructions. -
Page 14: Connection Instructions
CONNECTION INSTRUCTIONS Check that your hose assembly valve is set to not allow gas flow. Turn the manual valve(s) clockwise until it stops. This is the OFF position. Attach the regulator to the cylinder valve by turning the Type 1 fitting clockwise. Hand tighten with the regulator positioned upright. -
Page 15: Placement Instructions
5. Center the pot over the burner on the cooker. Do NOT use any pot larger than the recommended size for your cooker as listed below: Model # Maximum Pot Size Pot - Height/Width CS2016 30 qt. (28.39 L) pot 15”X 13” (38.1 cm X 33 cm) * Model May Vary From Picture CLEAR OVERHEAD WIND DIRECTION (3.05m) -
Page 16: Lighting And Operating Instructions
LIGHTING AND OPERATING INSTRUCTIONS THE COOKER MUST NOT BE LIT UNTIL THE PRECEDING PLACEMENT INSTRUCTIONS HAVE BEEN COMPLETELY FOLLOWED. 1. Check the cooker to make sure that it is set up as per the diagram (Figure 1). 2. Make certain the manual valve(s) is turned to the “OFF” position by turning it clockwise until it reaches the stop position. 3. -
Page 17: Turning Off And Storing The Cooker After Use
NEVER MOVE THE COOKER OR POT WHILE IN USE OR STILL HOT [ABOVE 100°F (38°C)]. After each use turn OFF the King Kooker® at the manual valve(s) first, then at the gas cylinder valve. Check to make sure there is no flame and all valves are off. Do not leave the cooker until it has cooled completely. -
Page 18: Maintenance Of Outdoor Cookers And Accessories
MAINTENANCE OF OUTDOOR COOKERS AND ACCESSORIES The area where the cooker will be used must be kept clear and free from combustible materials, gasoline and other flammable vapors and liquids. Before each use of the cooker inspect and remove any combustible items. The flow of combustion and ventilation of air must not be obstructed. -
Page 19: Caring For Aluminum And Cast Iron Cookware
TIPS FOR CARING FOR ALUMINUM FRY PANS AND BOILING POTS It is not necessary to season aluminum pots before cooking with them. Wash with a liquid dish washing detergent and towel dry. After cooking, wash aluminum pots and fry pans in hot, sudsy detergent. If grease or black soot has cooked to the outside of the pot while cooking with your outdoor cooker, scrub the outside of the pot with a steel wool scouring pad. -
Page 20: Section Iii - Recipes
Cut, wash and drain chicken pieces. Dip pieces into a mixture of beaten egg and milk. Coat with King Kooker® Seasoned Fish Fry. Heat oil to 350°F (177°C). Place chicken into oil and cook until done. Cooking outdoors with a large skillet allows for larger quantities to be prepared in less time. -
Page 21: Fried Onion Rings
Fried Onion Rings Ingredients: Colossal onions (if available), 2 beaten eggs, 1/2 cup milk, flour, King Kooker® Seasoned Fish Fry. Cut onions into rings, wash and drain. Blend eggs and milk in a bowl for dipping. Dip each onion ring into egg and milk mixture, then into flour. Dip onion ring again in the egg and milk mixture, then coat with King Kooker®... -
Page 22: Section Iv - Frequently Asked Questions
SECTION IV READ AND UNDERSTAND ALL INSTRUCTIONS BEFORE USING YOUR KING KOOKER® PRODUCT FREQUENTLY ASKED QUESTIONS AND ANSWERS What is the problem if the cooker takes too long or will not heat oil or cooking ingredients to desired temperature? My cooker’s flame appearance is very weak. - Page 23 NOTES...
- Page 24 KING GRILLERDINE ® , KING KOOKER ® , the KING KOOKER ® logo, THE KING ® THE KING OF OUTDOOR COOKING ® , MR. OUTDOORS ®...
Need help?
Do you have a question about the CS2016 and is the answer not in the manual?
Questions and answers