Table of Contents
Advertisement
english
outdoor cooKers
cAst cooKer
Assembly InstructIons
And
use And cAre mAnuAl
__________
model/serIAl #
tHe InstructIon mAnuAl contAIns ImPortAnt InFormAtIon necessAry
For tHe ProPer Assembly And sAFe use oF tHe APPlIAnce.
reAd And FolloW All WArnInGs And InstructIons beFore AssemblInG
And usInG tHe APPlIAnce. FolloW All WArnInGs And InstructIons WHen
usInG tHe APPlIAnce.
KeeP tHIs mAnuAl For Future reFerence.
Metal Fusion, inc.
712 St. George Avenue.
Jefferson, LA 70121
If you have any problems or questions
call us toll Free at
1-800-783-3885
7:30 A.M. to 3:30 P.M. CST • Monday through Friday
(504) 736-0201
www.kingkooker.com
FAIlure to FolloW tHese InstructIons
And WArnInGs could result In FIre, exPlosIon, burn HAzArd or cArbon
monoxIde PoIsonInG WHIcH could cAuse ProPerty dAmAGe,
PersonAl Injury or deAtH.
Advertisement
Table of Contents

Subscribe to Our Youtube Channel
Related Manuals for King Kooker 1803PKP


Summary of Contents for King Kooker 1803PKP
- Page 1 english outdoor cooKers cAst cooKer Assembly InstructIons use And cAre mAnuAl __________ model/serIAl # tHe InstructIon mAnuAl contAIns ImPortAnt InFormAtIon necessAry For tHe ProPer Assembly And sAFe use oF tHe APPlIAnce. reAd And FolloW All WArnInGs And InstructIons beFore AssemblInG And usInG tHe APPlIAnce.
- Page 2 dAnGer for your safety If you smell gas: 1. shut off gas to the appliance. 2. extinguish any open flame. 3. If odor continues, keep away from the appliance and immediately call your Fire department. FAIlure to FolloW tHese InstructIons could result In FIre or exPlosIon WHIcH could cAuse ProPerty dAmAGe, PersonAl Injury or deAtH.
- Page 3 And understAnd beFore usInG tHIs Product Throughout this manual the words appliance, cooker, fryer/boiler, burner and stove will be used interchangeably to refer to the King Kooker Outdoor Cooker. ® this is an Attended appliance. do not leave this appliance unattended while the burner is lit or while heating oil, grease, water or cooking food.
- Page 4 Failure to follow these instructions and warnings could result in fire or explosion which could cause property damage, personal injury or death. 21) this appliance is not intended for commercial use. 22) use King Kooker appliances only in accordance with state and local ordinances, ®...
-
Page 5: Table Of Contents
And understAnd All InstructIons beFore usInG your KInG KooKer ® Product tAble oF contents Warnings........................2-4 table of contents . - Page 6 metAl FusIon, Inc. lImIted one-yeAr WArrAnty WHAt tHIs WArrAnty coVers This warranty covers all components of this outdoor cooker to be free from defects in materials and workmanship, with the exceptions stated below. HoW lonG coVerAGe lAsts This warranty runs for one year from the date of purchase. Please keep your receipt with this manual for future reference.
-
Page 7: Owner's Registration
Dear Customer, Thank you for purchasing a King Kooker ! Please take a moment to fill ® out your registration form and return it to us. We are always happy to hear suggestions and comments from our customers about our products. Completion of this registration allows us to contact you if the need arises. - Page 8 TAPE HERE FOLD ________________________ ________________________ Place Stamp ________________________ Here metAl FusIon, Inc. 712 St. George Avenue Jefferson, LA 70121 FOLD...
-
Page 9: Section I - King Kooker ® Outdoor Cooker Assembly
And cAre mAnuAl must be reAd And understood beFore usInG tHe APPlIAnce Throughout this manual the words appliance, cooker, fryer/boiler, burner and stove will be used interchangeably to refer to the King Kooker Outdoor Cooker. ® tools reQuIred: torQue WrencH or AdjustAble WrencH, leAK testInG solutIon Before assembling, check that all cooker components are included in the shipping carton. - Page 10 NOTE: The hose to burner connection will be one of the following: Figure 1) Hose with male fitting and adjustable regulator. Figure 2) Hose with female fitting and adjustable regulator. Figure 3) Hose with male or female fitting and manual valve with non-adjustable pressure regulator.
- Page 11 Figure 3 Hose WItH mAle or FemAle FIttInG And mAnuAl VAlVe WItH non-AdjustAble Pressure reGulAtor. mAnuAl VAlVe 20 lb. LP Gas Cylinder If your cooker has a manual valve and a non-adjustable pressure regulator as above with a 1/8 male pipe thread, refer to directions in Figure 1. If your cooker has a manual valve and a non-adjustable pressure regulator as above, but a 3/8 female flare swivel, refer to the directions for Figure 2.
-
Page 12: Kkdff30T / 8005 / 82-82Tkd Assembly Instructions
KKdFF30t / 8005 / 82-82tKd Assembly InstructIons tools reQuIred: AdjustAble WrencH 1. Place top half of unit on bottom half of unit as pictured. 2. Insert four bolts through holes in top and bottom of unit. Wrench tighten with supplied lock washers and nuts. Top Half 3. -
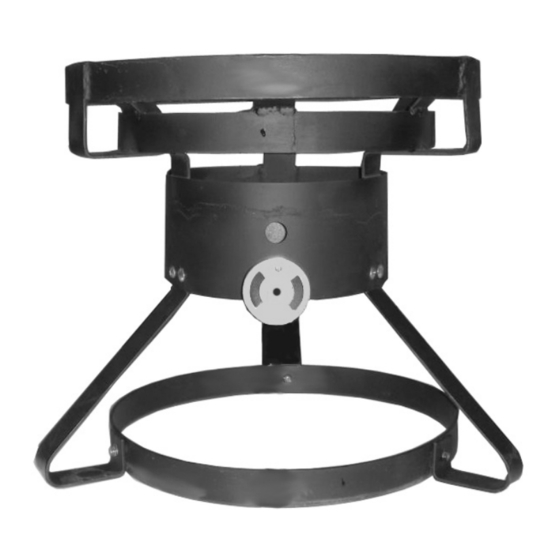
Page 13: 18Kd, 21Kd, Ss21Pkd And 24Wc Assembly Instructions
18Kd, 21Kd, ss21PKd And 24Wc Assembly InstructIons * model may Vary From Picture lock Washer bolt contents (1) top ring (3 holes for leg attachment) (1) bottom ring (6 holes for leg and foot extension attachment) (3) legs (1) shroud (1) casting/Air shutter (1) Hose/regulator (3) Foot extensions... -
Page 14: 5012, 5212 And 1015 Assembly Instructions
5012, 5212 And 1015 Assembly InstructIons * model may Vary From Picture shroud with Welded contents top ring (1) bottom ring (3) legs (1) Flat bar casting support bracket Flat bar casting (1) shroud with Welded top ring support bracket (1) casting/Air shutter (1) Heat Plate bottom... -
Page 15: 1700, 1720 And 1740 Assembly Instructions
1700, 1720 And 1740 Assembly InstructIons contents (1) bottom ring (3) legs (1) shroud with Welded top rings (1) casting/ Air shutter (1) lP Hose/regulator (9) bolts/nuts (1) Heat Plate (1) 12” deep Fry thermometer (1) cast Iron Pot (5 or 10 Gallon) and lid (If Applicable) (2) lifting Hooks tools needed:... -
Page 16: High Pressure Units With Snap On Legs Assembly Instructions
High Pressure units with snap on legs Assembly Instructions Figure 1 required tools: Adjustable Wrench Windguard Parts List: (1) Cooker Frame (1,2 or 3) Castings/Air Shutters Manifold Assembly (1) LP Hose/Regulator (4) Legs *Model May (1) Windguard Shield (if provided) Vary From (1,2 or 3) Deep Fry Thermometers Picture... -
Page 17: Baffle Plate Assembly
8) For storage purposes a locking bracket and bolt are provided with double and triple burner units. After the cooker has completely cooled, remove the windguard shield (if applicable) and legs. Lay the cooker upside down on a flat surface. Wrench tighten locking bolt into the nut on center support. Fold windguard, if provided with your unit, and place it long side up across the center of the cooker with the locking bolt through the center hole. -
Page 18: Cs01 Assembly Instructions
6) Refer to Figure 1 pg. 10 for hose assembly instructions. Then go to the use and care Section of this manual for further instructions. 1803PKP Work table Assembly Instructions Work Table 1) Place edge of work table into U-clip receivers...
Need help?
Do you have a question about the 1803PKP and is the answer not in the manual?
Questions and answers