Table of Contents
Advertisement
english
outdoor cooKers
cAst cooKer WItH tImer
Assembly InstructIons
And
use And cAre mAnuAl
__________
model/serIAl #
tHe InstructIon mAnuAl contAIns ImPortAnt InFormAtIon necessAry
For tHe ProPer Assembly And sAFe use oF tHe APPlIAnce.
reAd And FolloW All WArnInGs And InstructIons beFore AssemblInG
And usInG tHe APPlIAnce. FolloW All WArnInGs And InstructIons WHen
usInG tHe APPlIAnce.
KeeP tHIs mAnuAl For Future reFerence.
Metal Fusion, inc.
712 St. George Avenue.
Jefferson, LA 70121
If you have any problems or questions
call us toll Free at
1-800-783-3885
7:30 AM to 3:30 P.M. CST • Monday through Friday
(504) 736-0201
www.kingkooker.com
FAIlure to FolloW tHese InstructIons
And WArnInGs could result In FIre, exPlosIon, burn HAzArd or cArbon
monoxIde PoIsonInG WHIcH could cAuse ProPerty dAmAGe, PersonAl
Injury or deAtH.
Advertisement
Table of Contents

Related Manuals for King Kooker cast cooker With timer


Summary of Contents for King Kooker cast cooker With timer
- Page 1 WItH tImer Assembly InstructIons use And cAre mAnuAl __________ model/serIAl # tHe InstructIon mAnuAl contAIns ImPortAnt InFormAtIon necessAry For tHe ProPer Assembly And sAFe use oF tHe APPlIAnce. reAd And FolloW All WArnInGs And InstructIons beFore AssemblInG And usInG tHe APPlIAnce.
-
Page 2: Warnings
dAnGer for your safety If you smell gas: 1. shut off gas to the appliance. 2. extinguish any open flame. 3. If odor continues, keep away from the appliance and immediately call your Fire department. FAIlure to FolloW tHese InstructIons could result In FIre or exPlosIon WHIcH could cAuse ProPerty dAmAGe, PersonAl Injury or deAtH. - Page 3 And understAnd beFore usInG tHIs Product Throughout this manual the words appliance, cooker, fryer/boiler, burner and stove will be used interchangeably to refer to the King Kooker Outdoor Cooker. ® this is an Attended appliance. the timer located on the hose/regulator is not a replacement for proper monitoring.
-
Page 4: Warnings
22) this appliance is not intended for commercial use. 23) use King Kooker appliances only in accordance with state and local ordinances, ®... -
Page 5: Table Of Contents
And understAnd All InstructIons beFore usInG your KInG KooKer ® Product tAble oF contents Warnings........................2-4 table of contents . -
Page 6: Warranty
metAl FusIon, Inc. lImIted one-yeAr WArrAnty WHAt tHIs WArrAnty coVers This warranty covers all components of this outdoor cooker to be free from defects in materials and workmanship, with the exceptions stated below. HoW lonG coVerAGe lAsts This warranty runs for one year from the date of purchase. Please keep your receipt with this manual for future reference. -
Page 7: Owners Registration
Dear Customer, Thank you for purchasing a King Kooker ! Please take a moment to fill ® out your registration form and return it to us. We are always happy to hear suggestions and comments from our customers about our products. Completion of this registration allows us to contact you if the need arises. - Page 8 TAPE HERE FOLD ________________________ ________________________ Place Stamp ________________________ Here metAl FusIon, Inc. 712 St. George Avenue Jefferson, LA 70121 FOLD...
-
Page 9: Introduction
Product IntroductIon Your new King Kooker ® Outdoor Cooker is equipped with a timer located on the hose/regulator (see above picture). The timer is designed to shut-off the flow of gas after a pre-set time period (approximately a 15 minute operational cycle) unless manually reset by the user. -
Page 10: Battery Installation
bAttery InstAllAtIon the timer requires two “AAA” alkaline batteries (not included) for operation. Follow the below instructions for proper installation. Always disconnect regulator from the propane tank before installing or removing batteries. Locate battery cover on timer. Press and slide battery cover off as shown. Install two “AAA”... -
Page 11: Section I - King Kooker ® Outdoor Cooker Assembly
And cAre mAnuAl must be reAd And understood beFore usInG tHe APPlIAnce Throughout this manual the words appliance, cooker, fryer/boiler, burner and stove will be used interchangeably to refer to the King Kooker Outdoor Cooker. ® tools reQuIred: torQue WrencH or AdjustAble WrencH, leAK testInG solutIon Before assembling, check that all cooker components are included in the shipping carton. -
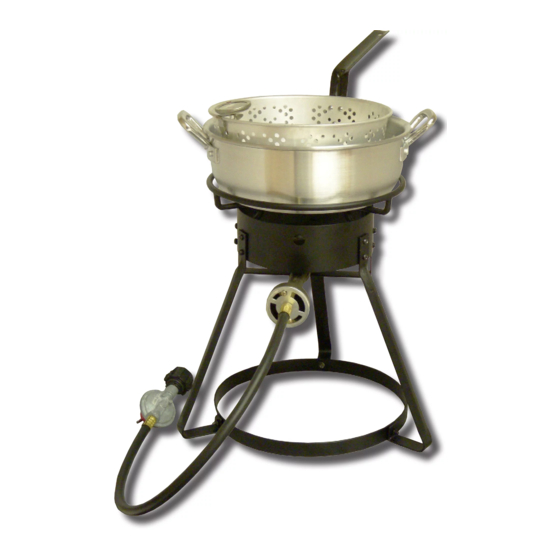
Page 12: Hose Assembly Instructions
Hose Assembly InstructIons * model may Vary From Picture cooKInG Pot 1/8 mAle PIPe tHreAd AdjustAble WItH orIFIce reGulAtor tImer burner 20 lb. LP VenturI Gas Cylinder tyPe 1 tube connectIon AIr sHutter 1. Tighten the hose fitting into the venturi with a torque wrench, up to a torque of 95 to 105 lb./in. Alternatively, hand tighten securely and then, using a wrench, tighten an additional 1-1 1/2 turns. -
Page 13: Assembly Instructions For Bolt Together Cooker
Assembly InstructIons For bolt toGetHer cooKer * model may Vary From Picture lock Washer bolt contents (2) rings (3) legs (1) shroud (1) casting/Air shutter (1) Hose/regulator with timer (1) Heat Plate (12) bolts, lockwashers and nuts tools needed Adjustable Wrench screwdriver 1) Assemble bolts, washers and nuts as per diagram. -
Page 14: Fry Basket Handle Assembly
Fry bAsKet HAndle Assembly Required Tools: Adjustable Wrench and Screwdriver Insert bolts in marks as instructed Attach handle by inserting bolts (round head to inside of pan) into holes indicated in black. Also insert bolt (round head to inside of pan) into hole indicated with an “X”. -
Page 15: Model #2054, #2064 And #2864 Outdoor Chef's Hot Tub ® Pot And Accessories Assembly Instructions
model# 2054, 2064, & 2864 outdoor cHeF’s Hot tub ® Pot And AccessorIes Assembly InstructIons reAd And understAnd All WArnInGs And InstructIons beFore usInG tHIs Product! oVerVIeW I. Parts List II. Placement of Thermometer III. Assembly of Rack IV. Assembly of Baskets I. - Page 16 III. Assembly oF rAcK The rack supplied with this appliance provides you with a wide array of cooking options. Please read and understand the following instructions for correct assembly of rack and accessories. A. Assembly of rack for turkey Frying: 1.
- Page 17 c. Assembly of rack with skewers 1. The rack can be configured to fry up to four whole chickens at once or any kind of poultry/meat using the skewer accessories. 2. Hand screw threaded ends of skewers into mounting holes along base of rack body as per Figure 3 below.
-
Page 18: Model #2064 Bolt Together Assembly Instructions
model# 2064 bolt toGetHer Assembly InstructIons reAd And understAnd All WArnInGs And InstructIons beFore usInG tHIs Product! PArts lIst: (1) Top Frame with Attached Wind Shroud (1) Bottom Frame (4) Legs (8) Lock Washer (8) Nuts (8) Philips Head Bolts (1) Casting/Air Shutter (1) Hose and Regulator with Timer (1) Deep Fry Thermometer... -
Page 19: Model#2835 And #2836 Pot And Accessories Assembly Instructions
model# 2835 And 2836 Pot And AccessorIes Assembly InstructIons reAd And understAnd All WArnInGs And InstructIons beFore usInG tHIs Product! oVerVIeW I. Parts List II. Assembly of Basket A. Assembly of Basket with Adjustable Lifting Hooks for Turkey Frying B. Assembly of Basket for Steaming C. - Page 20 b. Assembly of basket for steaming 1. Attach the two adjustable lifting hooks to each end of the basket by aligning the four “square” holes on each lifting hook to the bottom four “square” holes indicated with an “*” in Figure 3 below. Place the hooks on the inside of the basket making sure both adjustable lifting hooks are installed facing the same direction for correct use with two handed lifter.
-
Page 21: Section Ii - Use And Care Of King Kooker ® Outdoor Cookers And Accessories
212°F(100°C). The temperature of hot oil should never be allowed to exceed 350°F(177°C). ImPortAnt: Oil can ignite at high temperatures. Most King Kooker ® thermometers have a Red Zone above 350°F(177°C) to signify Danger. Never allow the temperature to exceed 350°F(177°C). -
Page 22: Determining Proper Fill Levels For Cooking Vessels
30-36 Quart Pot - Up To A 20 Pound Turkey lP GAs cylInder InFormAtIon King Kooker ® Outdoor Cookers are manufactured for use with 20lb. (9 kg) lP Gas cylinders. Important information to remember about LP Gas cylinders include: Always read and follow the cylinder manufacturer’s instructions. -
Page 23: Connection Instructions
connectIon InstructIons 1. Check that your hose assembly is set to not allow gas flow. Turn the regulator control counterclockwise until it stops. This is the OFF position. 2. Attach the regulator to the cylinder valve by turning the Type 1 fitting clockwise. Hand tighten with the regulator positioned upright. -
Page 24: Lighting And Operating Instructions
lIGHtInG And oPerAtInG InstructIons tHe cooKer must not be lIt untIl tHe PrecedInG PlAcement InstructIons HAVe been comPletely FolloWed. (ILLUSTRATIONS PAGE 25) Check the casting to make sure it is set up as per the illustration (Figure 1). Make certain that the regulator control is turned to OFF by turning it counterclockwise until it reaches the stop. -
Page 25: Lighting And Operating Instructions
lIGHtInG And oPerAtInG InstructIons continued) FIGure 1 timer AdjustAble reGulAtor turn cylinder Handle turn regulator control toward on next toward on (counterclockwise) (clockwise) 20lb. lP * Model may cylInder AIr sHutter vary from FIGure 2 picture. FIGure 5 FIGure 3 FIGure 4 neVer Put HAnds or FAce dIrectly oVer burner WHIle lIGHtInG or WHIle tHe APPlIAnce Is lIt. -
Page 26: Turning Off And Storing The Cooker After Use
Pot WHIle In use or stIll Hot [AboVe ® After each use turn OFF the King Kooker at the regulator first, then at the gas cylinder valve. check to make sure there is no flame and all valves are off. Do not leave the cooker until it has cooled completely. -
Page 27: Caring For Aluminum And Cast Iron Cookware
Cleaning of the appliance: cooker Frame, lP Hose/regulator and timer: If necessary, remove any oil or liquid which has spilled onto the unit during cooking with mild soapy water on a rag and towel dry. Do not let water enter or collect in housing of timer. Do not immerse the burner unit or hose/regulator as this will cause rust and damage components of the timer. -
Page 28: Section Iii - Cooking Specialties
sectIon III cooKInG sPecIAltIes the following warnings and directions apply particularly to cooking with oil and deep frying. read All of the warnings and directions in the manual before using your cooker. deeP FryInG cooKInG WItH oIl Is not sImIlAr to Any otHer cooKInG metHod. cooking oil is very combustible at high temperatures, and special precautions must be taken to avoid a dangerous grease fire. -
Page 29: Deep Fried Turkey Instructions
(turn counterclockwise to reduce the flame, clockwise to increase the flame.) neVer reset the timer without first reading the thermometer temperature. Thaw and towel dry the turkey completely. Coat the turkey inside and out with King Kooker ®... -
Page 30: Injecting Techniques
This gives even distribution of seasoning. (For best results, insert needle at different angles through the same hole when injecting tHIGH marinade.) Sprinkle outside of chicken generously with King Kooker® Cajun Seasoning, rubbing in well. Bake in conventional method. deeP FrIed Follow steps 1-4. -
Page 31: Model# 2054, #2064 And #2864 Outdoor Chef's Hot Tub ® Operation Instructions
model# 2054, 2064, & 2864 outdoor chef’s Hot tub ® operation Instructions FAIlure to FolloW tHese InstructIons And WArnInGs could result In FIre, exPlosIon, burn HAzArd or cArbon monoxIde PoIsonInG WHIcH could cAuse ProPerty dAmAGe, PersonAl Injury, or deAtH. reAd And understAnd All WArnInGs And InstructIons beFore usInG tHIs Product! Assembly And use InstructIons contAIned In sectIons I-III must be reAd And understood beFore oPerAtIon oF tHIs APPlIAnce... - Page 32 b. use of rack for steaming 1. Reference Figure 2, pg.16 for correct assembly of rack for steaming. 2. Arrange food product on steam plate as desired as per picture below. 3. Place water and seasoning mixture as desired into pot. Water level should be just below the steamer rack.
-
Page 33: Operation Of Spigot Pot
d. use of baskets 1. Once cooking is completed, the hanging clip at the base of the handle of each basket can be used to attach the basket to the rim of the pot to allow for drainage and cooling. See picture below. oPerAtIon oF sPIGot Pot some models of turkey pots include a spigot for draining the cooking liquid. -
Page 34: Model# 2835 And 2836 Operation Instructions
model# 2835 and 2836 operation Instructions FAIlure to FolloW tHese InstructIons And WArnInGs could result In FIre, exPlosIon, burn HAzArd or cArbon monoxIde PoIsonInG WHIcH could cAuse ProPerty dAmAGe, PersonAl Injury, or deAtH. reAd And understAnd All WArnInGs And InstructIons beFore usInG tHIs Product! Assembly And use InstructIons contAIned In sectIons I-III must be reAd And understood beFore oPerAtIon oF tHIs APPlIAnce The basket supplied with this appliance provides you with a wide array of cooking options. - Page 35 b. use of basket for steaming 1. Reference Section B, pg. 20 for correct assembly of basket and adjustable lifting hooks for steaming. 2. Locate the provided steamer support. Place the steamer support onto the center of the pot as pictured in Figure 1 below before adding water.
-
Page 36: Use Of King Kooker ® Drain Rack Model # Kk168
KInG KooKer drAIn rAcK ® model # KK168 (sold sePArAtely) reAd And understAnd All WArnInGs And InstructIons beFore usInG tHIs Product! directions: 1. Use the drain rack for draining a fried turkey on a stand which has a round disk type base as pictured below (not a wire formed base) or for draining food cooked within a strainer basket. -
Page 37: Section Iv - Recipes
King Kooker Way! ® For a 22 to 32 quart pot, fill 1/2 full of water. Add 2 to 4, 16 ounce King Kooker Complete Crab, ® Shrimp, Crawfish Boil (complete, nothing to add). Bring water to a rolling boil. Add seafood. Gently stir. -
Page 38: King Kooker ® Jambalaya
2 onions finely cut, 2 bell peppers finely cut, 2 lbs. smoked sausage, 1 lb. hot sausage or andouille, 8 small bags King Kooker ® (8 oz.) jambalaya mix, 1 lb. bacon, water. Fry off 1 lb. bacon (cubed) in small amount of cooking oil, then remove. Brown all meat, then remove. -
Page 39: Deep Fried Turkey Breast
® Fish Fry. Cut, wash and drain chicken pieces. Dip pieces into a mixture of beaten egg and milk. Coat with King Kooker Fish Fry. Heat oil to ® 350° F (177°C). Place chicken into oil and cook until done. Cooking outdoors with a large pot allows for larger quantities to be prepared in less time. -
Page 40: Deep Fried Boston Butt
(approximately 10-15 minutes), the meat will pull away from the shell when done. For extra flavor pour two ounces of King Kooker Liquid Crab Boil into the ® water/vinegar mixture. We recommend king kooker ® complete crab, shrimp, crawfish Boil to add flavor to all your steamed seafoods and vegetables. -
Page 41: Section V - Frequently Asked Questions
V reAd And understAnd All InstructIons beFore usInG your KInG KooKer ® Product FreQuently AsKed QuestIons And AnsWers What is the problem if the cooker takes too long or will not heat oil or cooking ingredients to desired temperature? my cooker’s flame appearance is very weak. - Page 42 notes...
- Page 43 notes...
- Page 44 KING GRILLERDINE ® , KING KOOKER ® , the KING KOOKER ® logo, THE KING ® , THE KING OF OUTDOOR COOKING ® , MR. OUTDOORS ® , and WATCHDOG OUTDOOR COOKER SERIES ® are trademarks of Metal Fusion, Inc., 712 St. George Avenue, Jefferson, LA 70121...
Need help?
Do you have a question about the cast cooker With timer and is the answer not in the manual?
Questions and answers