Table of Contents
Advertisement
Quick Links
english
outdoor cooKers
"V" bottom cooKer
Assembly InstructIons
And
use And cAre mAnuAl
__________
model/serIAl #
tHe InstructIon mAnuAl contAIns ImPortAnt InFormAtIon necessAry
For tHe ProPer Assembly And sAFe use oF tHe APPlIAnce.
reAd And FolloW All WArnInGs And InstructIons beFore AssemblInG
And usInG tHe APPlIAnce. FolloW All WArnInGs And InstructIons WHen
usInG tHe APPlIAnce.
KeeP tHIs mAnuAl For Future reFerence.
Metal Fusion, inc.
712 St. George Avenue.
Jefferson, LA 70121
If you have any problems or questions
call us toll Free at
1-800-783-3885
7:30 AM to 3:30 P.M. CST • Monday through Friday
(504) 736-0201
www.kingkooker.com
FAIlure to FolloW tHese InstructIons
And WArnInGs could result In FIre, exPlosIon, burn HAzArd or cArbon
monoxIde PoIsonInG WHIcH could cAuse ProPerty dAmAGe, PersonAl
Injury or deAtH.
Advertisement
Table of Contents

Subscribe to Our Youtube Channel
Related Manuals for King Kooker V


Summary of Contents for King Kooker V
- Page 1 “V” bottom cooKer Assembly InstructIons use And cAre mAnuAl __________ model/serIAl # tHe InstructIon mAnuAl contAIns ImPortAnt InFormAtIon necessAry For tHe ProPer Assembly And sAFe use oF tHe APPlIAnce. reAd And FolloW All WArnInGs And InstructIons beFore AssemblInG And usInG tHe APPlIAnce.
-
Page 2: For Your Safety
dAnGer For your sAFety If you smell gas: 1. shut off gas to the appliance. 2. extinguish any open flame. 3. If odor continues, keep away from the appliance and immediately call your Fire department. FAIlure to FolloW tHese InstructIons could result In FIre or exPlosIon WHIcH could cAuse ProPerty dAmAGe, PersonAl Injury or deAtH. - Page 3 And understAnd beFore usInG tHIs Product Throughout this manual the words appliance, cooker, fryer/boiler, burner and stove will be used interchangeably to refer to the King Kooker Outdoor Cooker. ® this is an Attended appliance. the timer located on the hose/regulator is not a replacement for proper monitoring.
- Page 4 20) this appliance is not intended for commercial use. 21) use King Kooker appliances only in accordance with state and local ordinances, ®...
- Page 5 And understAnd All InstructIons beFore usInG your KInG KooKer ® Product tAble oF contents Warnings........................2-4 table of contents .
-
Page 6: Limited One-Year Warranty
metAl FusIon, Inc. lImIted one-yeAr WArrAnty WHAt tHIs WArrAnty coVers This warranty covers all components of this outdoor cooker to be free from defects in materials and workmanship, with the exceptions stated below. HoW lonG coVerAGe lAsts This warranty runs for one year from the date of purchase. Please keep your receipt with this manual for future reference. - Page 7 Dear Customer, Thank you for purchasing a King Kooker ! Please take a moment to fill ® out your registration form and return it to us. We are always happy to hear suggestions and comments from our customers about our products. Completion of this registration allows us to contact you if the need arises.
- Page 8 TAPE HERE FOLD ________________________ ________________________ Place Stamp ________________________ Here metAl FusIon, Inc. 712 St. George Avenue Jefferson, LA 70121 FOLD...
- Page 9 Product IntroductIon Your new King Kooker ® Outdoor Cooker is equipped with a timer located on the hose/regulator (see above picture). The timer is designed to shut-off the flow of gas after a pre-set time period (approximately a 15 minute operational cycle) unless manually reset by the user.
-
Page 10: Battery Installation
bAttery InstAllAtIon the timer requires two “AAA” alkaline batteries (not included) for operation. Follow the below instructions for proper installation. Always disconnect regulator from the propane tank before installing or removing batteries. Locate battery cover on timer. Press and slide battery cover off as shown. Install two “AAA”... -
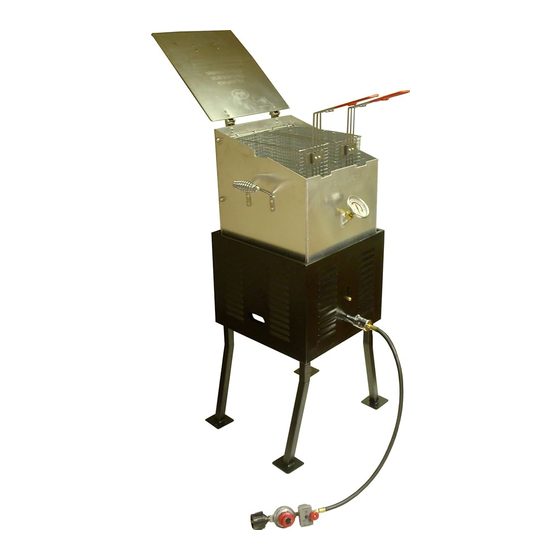
Page 11: Outdoor Cooker Assembly
And cAre mAnuAl must be reAd And understood beFore usInG tHe APPlIAnce Throughout this manual the words appliance, cooker, fryer/boiler, burner and stove will be used interchangeably to refer to the King Kooker Outdoor Cooker. ® tools reQuIred: torQue WrencH or AdjustAble WrencH, leAK testInG solutIon Before assembling, check that all cooker components are included in the shipping carton. - Page 12 Attachment Venturi Place the V-Bottom Pot onto the cooker body as pictured below in Figure 3. Check that the venturi tube is free of obstruction. Tighten the hose fitting into the venturi with a torque wrench, up to a torque of 95 to 105 lb.in. Alternatively, hand tighten securely and then, using a wrench, tighten an additional 1-1 1/2 turns.
- Page 13 Install the provided thermometer into the front of the V-Bottom pot by inserting stem of thermometer into the hole provided. Hand tighten brass nut to secure. See below Figure 4 for picture of correct assembly. Figure 4 Assembly of Baskets Required Tools: Adjustable Wrench and Screwdriver The baskets supplied with this appliance provides you with a wide array of cooking options.
Need help?
Do you have a question about the V and is the answer not in the manual?
Questions and answers