
Related Manuals for Hoshizaki HR15A-G


Summary of Contents for Hoshizaki HR15A-G
- Page 1 Instruction Manual Refrigerator Model HR15A Number: MAN-321-R hoshizakiamerica.com : 07-21-2018 SSUED : 11-04-2019 EVISED...
- Page 2 Product failure or property damage due to improper installation is not covered under warranty. Hoshizaki provides this manual primarily to assist qualified service technicians in the installation, maintenance, and service of the appliance. Should the reader have any questions or concerns which have not been satisfactorily addressed, please call, send an e-mail message, or write to the Hoshizaki Technical Support Department for assistance.
-
Page 3: Table Of Contents
IMPORTANT This manual should be read carefully before the appliance is installed and operated. Read the warnings and guidelines contained in this manual carefully as they provide essential information for the continued safe use and maintenance of the appliance. Retain this manual for any further reference that may be necessary. -
Page 4: Introduction
INTRODUCTION This manual contains instructions for installation, operation and general maintenance of your unit. Important Safety Information Throughout this manual, notices appear to bring your attention to situations which could result in death, serious injury, damage to the appliance, or damage to property. Indicates a hazardous situation that, if not avoided, DANGER will result in death or serious injury. - Page 5 WARNING This appliance should be destined only to the use for which it has been expressly conceived. Any other use should be considered improper and therefore dangerous. The manufacturer cannot be held responsible for injury or damage resulting from improper, incorrect, and unreasonable use. Failure to install, operate, and maintain the appliance in accordance with this manual will adversely affect safety, performance, component life, and warranty coverage.
- Page 6 WARNING, continued • This appliance is not intended for use by persons (including children) with reduced physical, sensory, or mental capabilities, or lack of experience and knowledge, unless they have been given supervision or instruction concerning use of the appliance by a person responsible for their safety. •...
-
Page 7: General Safety
WARNING, continued • Do not allow children to climb, step or hang onto the shelves inside the cooler. That could damage the unit and cause serious injuries to them. • Do not touch the cold surfaces of the cooler with your hands wet or moist. The skin can stick to these cold surfaces. -
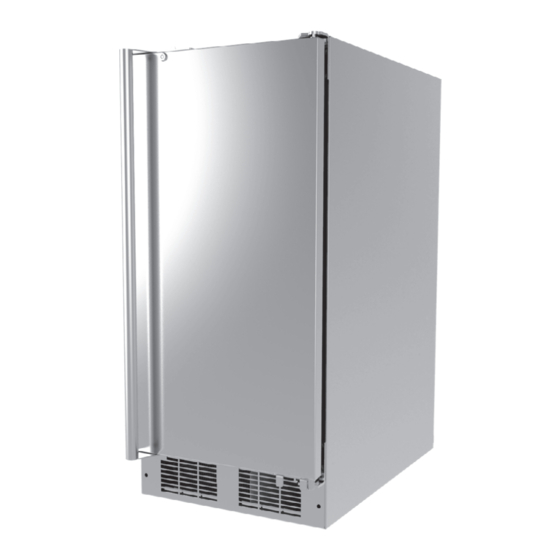
Page 8: Know Your Equipment
KNOW YOUR EQUIPMENT ACCESS COVER DOOR CONTROL MODULE POWER CORD SLIDE OUT SHELF LEVELING LEG FRONT GRILLE FIG. 1... -
Page 9: Check For Shipping Damage
CHECK FOR SHIPPING DAMAGE Prior to leaving the factory, each cabinet is throughly inspected and performance tested to assure proper operating temperatures. Check the crate thoroughly for signs of shipping damage. If external damage exists, internal damage is also probable. Uncrating should be done while the carrier´s representative is present. -
Page 10: Handling The Cabinet
HANDLING THE CABINET Always move the unit in an upright position. Do not set it on its side or upside down as you may damage the cabinet and cause the oil to migrate from the compressor. 2. If lifting the unit, hold it from its base. It is recommended to use a dolly. 3. -
Page 11: Remove The Crate And Skid
REMOVE THE CRATE AND SKID Cut the plastic straps. LEVEL THE CABINET The base of the refrigerator has heavy duty leveling legs underneath so the cabinet may be leveled appropriately and to allow room to clean beneath the cabinet. Level the cabinet front to back and side to side with a level by using the adjustable portion of the leveling legs. -
Page 12: Electrical Installation
ELECTRICAL INSTALLATION Electrical Connection WARNING • Electrical connection must meet national, state, and local electrical code requirements. Failure to meet these code requirements could result in death, electric shock, serious injury, fire, or severe damage to equipment. • This appliance requires an independent power supply of proper capacity. See the nameplate for electrical specifications. -
Page 13: Installing The Shelves
INSTALLING THE SHELVES Loading tips and suggestions Your appliance is equipped with a cantilever shelf system, composed of two perforated stainless steel slide out shelves, which provides maximum adjustability. WARNING Never try to move a loaded shelf, remove everything from the shelf before moving. -
Page 14: Door Reversal
DOOR REVERSAL If you would like to reverse the door swing, follow the steps below. Otherwise, skip to section “Controls and adjustments” . TOOLS PHILLIPS # 2 SCREWDRIVER 1/8” ALLEN WRENCH INSTRUCTIONS Step 1. Remove the SC-48-SS screws and the lock bracket. See figure 3. - Page 15 Step 2. While maintaining a hold on the door, remove the SC-541-SS upper screw and the SC-542-SS lower screw and remove the door. See figure 4. SC-541-SS U p p e r s c rew ( u s e A l l e n wrench) SC-542-SS Lower screw...
- Page 16 Step 4. Remove the Bushing and the Door Bracket from the door. See figure 6. Bushing Door Bracket FIG. 6 Step 5. Remove the SC-543-SS screw and the Plastic Cam B from the Door Bracket, then attach them to the opposite side. See figure 7. Door Bracket position Plastic Cam B...
- Page 17 Step 6. Next move the Bushing to the lower part of the door, and the Door Bracket to the upper part of the door. See figure 8. Bushing position Door Bracket FIG. 8 Step 7. Remove the SC-50-SS screws and the hinges from the cabinet.
- Page 18 Step 8. Remove the SC-543-SS screw and the Plastic Cam A from the Lower Hinge. Then place them on the Upper Hinge. See figure 10. Upper Hinge SC-543-SS screw (use screwdriver) position Plastic Cam A Lower Hinge FIG. 10 Step 9. Attach the Upper Right Hinge to the lower left corner, then attach the Lower Right Hinge to the upper left corner.
- Page 19 Step 10. Rotate the door 180° and attach it to the cabinet using the SC-541-SS upper screw and the SC-542-SS lower screw. See figure SC-541-SS Upper screw (use Allen wrench) SC-542-SS Lower screw (use screwdriver) FIG. 12 Step 11. Finally attach the Lock Bracket to the lower right corner using the SC-48-SS screws, removed in Step 1.
-
Page 20: Controls And Adjustments
CONTROLS AND ADJUSTMENTS DEFROST SELECTOR STEPS TO CHANGE SETPOINT 1. To access the menu press the “Set” button until the value “0” is displayed on the screen. 2. Release the “Set” button. 3. Press the “Up” button repeatedly until the value 22 is displayed on the screen. -
Page 21: Alarm Indicators
To obtain the name and phone number of your local Hoshizaki Certified Service Representative, visit www.hoshizaki.com ALARM INDICATORS CONTROLLER DISPLAY Sound alarms off DEFROST SELECTOR If the cabinet temperature is displayed, the cooler is working properly; if an alarm code is displayed, see the information below... -
Page 22: Final Checklist
FINAL CHECKLIST 1) Is the appliance level? 2) Have the casters been properly installed and have the front casters been locked? 3) Is the appliance in a site where the ambient temperature is constantly within 45°F to 100°F (7°C to 38°C)? 4) Have the shipping carton, tape, and packing material been removed from the appliance? Has the protective plastic film been removed from both the exterior panels and the interior door/... -
Page 23: Cleaning And Maintenance Instructions
2. Power Supply Connection: If the plug or power cord is damaged, contact your local Hoshizaki Certified Service Representative immediately and ask for repairs. All other service should be performed in accordance with the Hoshizaki Service Manual by a qualified service technician. -
Page 24: Important Notes About Usage
IMPORTANT NOTES ABOUT USAGE Risque De Feu Ou D'Explosion DANGER Le Frigorigène Est Inflammable Risk of Fire or Explosion • Ne pas utiliser d'appareils mécaniques Flammable Refrigerant Used pour dégivrer le réfrigérateur. • Do not use mechanical devices to • Ne pas perforer la tubulure contenant le defrost. - Page 25 • Open and close the doors with care. Doors opened too quickly or forcefully may cause injury or damage to the appliance or surrounding equipment. • Do not use combustible spray or place volatile or flammable substances near the appliance. They might catch fire. •...
-
Page 26: Preparing The Appliance For Periods Of Non-Use
PREPARING THE APPLIANCE FOR PERIODS OF NON-USE Shutdown and Long Storage When shutting down the appliance for more than one week, follow the instructions below. WARNING When preparing the appliance for long storage, prevent the door from closing to reduce the risk of children getting trapped. Leave the shelves in place so that children may not easily climb inside. -
Page 27: Disposal
DISPOSAL DANGER Risk of Fire or Explosion Flammable Refrigerant Used • Follow handling instructions carefully in compliance with U.S. government regulations. • Do not puncture refrigerant tubing. Risk of fire or explosion due to puncture of refrigerant tubing; follow handling instructions carefully. - Page 28 618 Hwy. 74 South, Peachtree City, GA 30269 USA (P) 770.487.2331 (F) 770.487.3360 hoshizakiamerica.com...
Need help?
Do you have a question about the HR15A-G and is the answer not in the manual?
Questions and answers