Table of Contents
Advertisement
Quick Links
Advertisement
Table of Contents

Related Manuals for Grizzly G0645


Summary of Contents for Grizzly G0645
- Page 1 MODEL G0645 BENCHTOP MORTISING MACHINE OWNER'S MANUAL COPYRIGHT © NOVEMBER, 2007 BY GRIZZLY INDUSTRIAL, INC. WARNING: NO PORTION OF THIS MANUAL MAY BE REPRODUCED IN ANY SHAPE OR FORM WITHOUT THE WRITTEN APPROVAL OF GRIZZLY INDUSTRIAL, INC. #BL10079 PRINTED IN CHINA...
- Page 2 ���� ������ �������� �������� ������ ������������ �� ��� ������ ������ ���������� ����������� ��� ������� �� ���� ������������������ ������� �� ����� ���������� ��� ������ ��� ������������ ����� �� ���� ������ ��� ������ �� ������� �������� ������� ��������� ����������� ������������� �� ������ ���...
-
Page 3: Table Of Contents
Machine Data Sheet ... 3 Identification ... 5 SECTION 1: SAFETY ... 6 Safety Instructions for Machinery ... 6 Additional Safety for Mortising Machines ... 8 SECTION 2: CIRCUIT REQUIREMENTS ... 9 110V Operation ... 9 SECTION 3: SETUP ... 10 Setup Safety ... -
Page 4: Introduction
INTRODUCTION Foreword We are proud to offer the Model G0645 Benchtop Mortising Machine. This machine is part of a grow- ing Grizzly family of fine woodworking machinery. When used according to the guidelines set forth in this manual, you can expect years of trouble-free, enjoyable operation and proof of Grizzly’s com-... -
Page 5: Machine Data Sheet
����������������������������������������������������������������������������������������������������������������������������������������������������������������������������� ������ � ����������������������������������������������������������������������������������������������������������������������������������������������������������������������� ����� ����������������� � ���������������������������������������������������������������������������������������������������������������������������������������������������������� ��������������� � ���������������������������������������������������������������������������������������������������������������������������������������������������������� ������������������������������������������������������������������������������������������������������������������������������ ������������������������������� ���� ��������������� ��������� ������������������������������������������������������������������������������������������������������������������������������������������������������������������������������ ���������������������� � ���������������������������������������������������������������������������������������������������������������������������������������������������� ���������������������������������������������������������������������������������������������������������������������������������������������������������������� ����� ����� G0645 Benchtop Mortising Machine ������� ���� ����� ����� ����� � ������� � � � ������ � �... - Page 6 � � �� � � �� � �� �� �� � � � � ������� � ���� � �� � G0645 Benchtop Mortising Machine � � � � � � � � � � � � � �� � �...
-
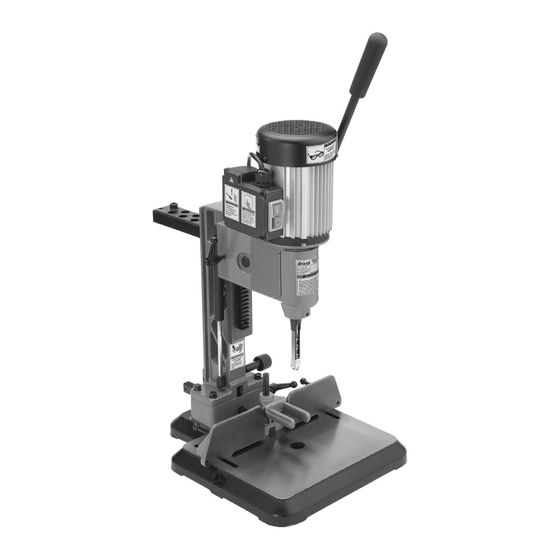
Page 7: Identification
G0645 Benchtop Mortising Machine Identification Figure 1. Model G0645 features. A. Tool Storage Rack B. Chuck Access Cover C. Chisel and Drill Bit Set D. Hold Down Lock Lever E. Fence Base G. Fence Lock Lever H. Extension Block Gas Spring Depth Stop Lock Lever K. -
Page 8: Section 1: Safety
�������� ���������������������������������������������� ��� �������� ����� ���� ������ ��� ������� ������� ����� ����������� ����� ��������� ��� �������� ������������������������������������� �� ����� ������� ��������� ���� ����� �� ����� ��� ��������� �� ��������� ����� �� �������� ������������������ ������������������������������������ ��������� ����������� G0645 Benchtop Mortising Machine... - Page 9 ��� �������� ��������� ���� ������ ����������������������������������������� �������������������������������������������� ������������������������������������� ��� ���� ���� ������ ��� �� ����� ��� ���� ��������� ������ ����� ���������� G0645 Benchtop Mortising Machine ��� ������ ��������������������������������������� ����� ���� ���������� ��������� ������� ����� ����������������� ��� ����� ������ ����� ���������������������...
-
Page 10: Additional Safety For Mortising Machines
Use this and other machinery with caution and respect. Failure to do so could result in serious per- sonal injury, damage to equipment, or poor work results. G0645 Benchtop Mortising Machine... -
Page 11: Section 2: Circuit Requirements
110V Circuit ... 15 Amps G0645 Benchtop Mortising Machine Power Connection Device The Model G0645 comes with a 5-15 plug, similar to Figure 2, to connect the machine to power. Figure 2. Typical 5-15 plug and receptacle. This machine MUST have a ground prong in the plug to help ensure that it is grounded. -
Page 12: Section 3: Setup
Save the containers and all packing materials for possible inspection by the carrier or its agent. Otherwise, filing a freight claim can be difficult. When you are completely satisfied with the condi- tion of your shipment, inventory the contents. G0645 Benchtop Mortising Machine... -
Page 13: Inventory
— Chuck Key/ Hex Wrench 4mm ... 1 — Hex Wrench 4mm ... 1 — Hex Bolts M8-1.25 x 80 (Extension) ... 4 G0645 Benchtop Mortising Machine Figure 3. G0645 inventory. If any nonproprietary parts are missing (e.g. a nut or a washer), we will gladly replace them; or for the sake of expediency, replacements can be obtained at your local hardware store. -
Page 14: Hardware Recognition Chart
Hardware Recognition Chart -12- G0645 Benchtop Mortising Machine... -
Page 15: Clean Up
The unpainted surfaces are coated with a waxy oil to prevent corrosion during shipment. Remove this protective coating with a solvent cleaner or citrus-based degreaser such as Grizzly’s G7895 Citrus Degreaser. To clean thoroughly, some parts must be removed. For optimum performance from your machine, clean all moving parts or sliding contact surfaces. -
Page 16: Mounting
If you do not want to install the extension block, skip Steps 6-8. To assemble the Model G0645: Secure the handle onto the hub using the spring and shoulder bolt already attached to the headstock, as shown in Figure 8. - Page 17 Ball Stud Figure 11. Gas spring attached to top of headstock. G0645 Benchtop Mortising Machine Ball Stud Figure 12. Gas spring attached to bottom of column. Install the tool storage rack, as shown in Figure 13, with the M6-1 x 15 Phillips head screws already attached to the headstock.
-
Page 18: Test Run
— Strange or unusual noises should be inves- tigated and corrected before operating the machine further. Always disconnect the machine from power when investigating or correcting potential problems. Turn the machine OFF. G0645 Benchtop Mortising Machine... -
Page 19: Section 4: Operations
OMMEND that you read books, trade maga- zines, or get formal training before begin- ning any projects. Regardless of the con- tent in this section, Grizzly Industrial will not be held liable for accidents caused by lack of training. Basic Operations This machine uses a hollow chisel with a drill bit to cut square holes called mortises. -
Page 20: Installing Mortising Chisel
⁄ " ⁄ " ⁄ " Figure 18. G0645 chisel and drill bit dimensions. To install a mortising chisel: DISCONNECT THE MORTISING MACHINE FROM POWER! Lock the headstock in the fully raised posi- tion. Put on a pair of leather gloves to protect your hands, or wrap a shop towel around the sharp end of the chisel. -
Page 21: Adjusting Depth Stop Rod
10. Close the chuck access door and carefully tighten the fence lock handles, making sure the fence does not move. — If the fence does move, repeat Steps 7 & G0645 Benchtop Mortising Machine Adjusting Depth Stop Rod When adjusted correctly, the depth stop rod ensures that the mortise is not cut too deep and repeated mortise depths are consistent. -
Page 22: Adjusting Fence
You can also flip the hold down to hold thicker workpieces, as shown in Figure 26. Figure 26. High hold down position. " above the Hold Down Lock Lever G0645 Benchtop Mortising Machine... -
Page 23: Basic Mortising Operations
Figure 27. Aligning chisel with outline. G0645 Benchtop Mortising Machine Pulling down on the handle can be diffi- cult on some woods. However, NEVER use a cheater pipe or handle extender on the handle. -
Page 24: Rotating Column
Figure 29. Column rotated 180° for larger workpiece. Place the workpiece flush against the fence and secure with a clamp, as shown in Figure Reverse Steps 1-7 to mount the column and headstock for normal operation. G0645 Benchtop Mortising Machine... -
Page 25: Section 5: Accessories
Use this simple jig on your table saw to make tenons for a mortise and tenon joint. Precision adjustments make it easy to create a perfect tenon every time. Figure 30. Table saw tenoning jig. G0645 Benchtop Mortising Machine G5562—SLIPIT 1 Qt. Gel ® G5563—SLIPIT 12 oz Spray ®... -
Page 26: Section 6: Maintenance
• Worn or damaged chisel or bits. Cleaning Cleaning the Model G0645 is relatively easy. Vacuum excess wood chips and sawdust, and wipe off the remaining dust with a dry cloth. If any resin has built up, use a resin dissolving cleaner to remove it. -
Page 27: Section 7: Service
3. Wood chips load up in the chisel and over- heat the drill bit. 4. Wood is too green, has high moisture con- tent, or is pressure treated. G0645 Benchtop Mortising Machine Troubleshooting Possible Solution 1. Repair for cause of tripped breaker and reset. -
Page 28: Adjusting Gibs
Adjusting Gibs Tools Needed: 6mm Hex Wrench ...1 The Model G0645 has a dovetail gib located on the side of the headstock (Figure 32). Adjustment Screws Figure 32. Adjustment screws for headstock gib. The gib controls the accuracy of the sliding parts and keeps them stable during operation. -
Page 29: Electrical Components & Wiring Diagram
Electrical Components & Wiring Diagram ������� ��� ��� ��� ���� ���� ������ ��� ������������ ��� ��������� ����� ������ ������ �� ������ �������� Figure 35. G0645 electrical components. ������������ � ��� ����� -27- G0645 Benchtop Mortising Machine... -
Page 30: Parts Breakdown
� �� �� �� �� �� �� �� �� �� �� �� �� �� �� �� �� �� �� �� �� �� �� ��� ��� �� �� �� �� �� �� �� �� �� Label Placement G0645 Benchtop Mortising Machine... -
Page 31: Parts List
MUST maintain the original location and readability of the labels on the machine. If any label is removed or becomes unreadable, REPLACE that label before using the machine again. Contact Grizzly at (800) 523-4777 or www.grizzly.com to order new labels. G0645 Benchtop Mortising Machine... - Page 33 ���������������������������������������������������������������������������������� � ������������������������������������������������������������������������������������ ����� ����������������������� ������ � ������������������������ ���� ��������������������� ���������������������������� ������ ������������������������ ���������� � ���������������� ���������������������������� ������������������������������� ��������������������������� ��� ��������� ����������� �� ����� �� � ��������� ������ �� ���� �� ���� ��� ��������� �������� �� ���� �� ������� ������ �������� ��� ��������� �� ������� ��� ����������� �� �������� ������������� ���...
- Page 34 ���������������������� ���������������������� ����������������������������������� ����������������������������������� ������������������������������������� �������������������������������������� ������� ����������� ���� ���� ��� ���� ����������� �� ���������� �������������������������������������� ����� ����� ����...
-
Page 35: Warranty And Returns
WARRANTY AND RETURNS Grizzly Industrial, Inc. warrants every product it sells for a period of 1 year to the original purchaser from the date of purchase. This warranty does not apply to defects due directly or indirectly to misuse, abuse, negligence, accidents, repairs or alterations or lack of maintenance. - Page 36 ��� ������ ��� ���� ���� ������� ����� ��� ������� ����� ��� �������� ��� ������� � � � ���� ����� ��� � � �������� ������ ��� � ����� ������ � �� ��� �������� ������� � ������ �������� ������ ������� ������ �� ����� ������...
Need help?
Do you have a question about the G0645 and is the answer not in the manual?
Questions and answers