Table of Contents
Advertisement
Quick Links
Advertisement
Table of Contents

Related Manuals for RASOR SW100SL


Summary of Contents for RASOR SW100SL
- Page 1 SW100 CUTTING UNIT USE MANUAL...
- Page 2 All the parts of the devices have been planned and produced to guarantee an optimum performance. In order to keep the high quality level and the long reliabilty of the Rasor ® products, it is recommended to use only original spare parts and to contact the head...
-
Page 3: General Safety Rules
1. GENERAL SAFETY RULES This manual is an integral part of cutting unit SW100SL and must be carefully read before using it since it gives important indications with regards to its safe installation, use and maintenance. Keep it with care. - Page 4 Moreover, they cannot work in case of rain. In case of damage or malfunction, cutting unit SW100SL must not be used until the Customer Care Technical Service has repaired them.
-
Page 5: Transport And Packaging
In such a case, the operator is the only person responsible. Class II double insulation Model Serial number SW100SL 220 230 50 60 Electric data Year of production R EAD... -
Page 6: Product Description
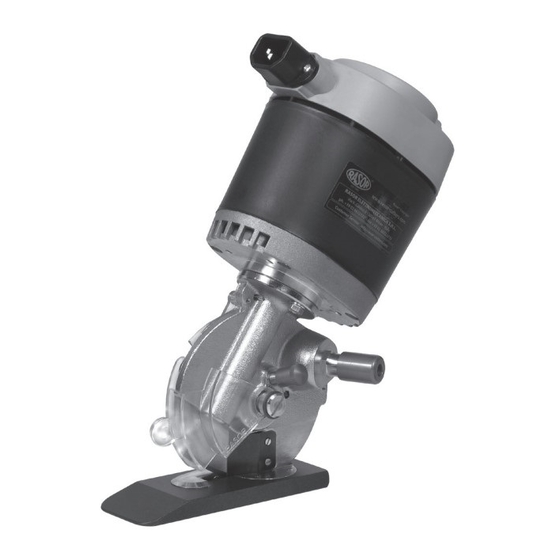
4. PRODUCT DESCRIPTION The fixture described in this manual is a cutting unit model SW100SL which can be assembled on automatic machines (e.g. spreaders, computerized cutting) by means of proper holes located in the motor support. SW100SL can operate continuously and it can cut at various widths by means of multiple installation. - Page 7 This technical data is only indicative and may be subject to change without notice. 6. NOISE LEVEL The maximum acoustic pressure level emitted by cutting unit SW100SL is about 60 dB (A). Noise tests have been carried out in compliance with Standard UNI EN ISO 11202:2010. The device noise levels, measured at different distances (without any sound wave filtering system), vary in the extent of few db (A).
-
Page 8: Use Warnings
Always pay attention to the electric cable position to prevent it from being cut or damaged by the blade. It is allowed to assemble cutting unit SW100SL on machines O.E.M. on condition that their original structure is not modified. Otherwise, the intervention must be certified by Rasor ®... -
Page 9: Residual Risks
6) Enable the switch; once it has been enabled, it lights up with a green light (see picture 8). NOTE Cutting unit SW100SL can work in a fixed position (the material moves) or it can move forward while the material is kept in the same position. Make sure the material to be cut is properly stretched, preventing it from curling. -
Page 10: Blade Sharpening
To carry out this operation, remove protective plug “A” located on the motor support of the cutting unit and fill it with lubricating grease Rasor. Screw plug “A” again few turns. Screw plug “A” some turns every 3-4 working days (see picture 11). -
Page 11: Blade Replacement
5) Replace the worn blade with the new one “2”, being careful to center the blade on the gear, in the correct position, and remember to assemble it, so that the Rasor writing can be seen by the operator. 6) Assemble all the components again and carry out... -
Page 12: Troubleshooting
16. TROUBLESHOOTING PROBLEM SOLUTION Check that the blade and the counterblade are in contact Check the kind of fabric Sharpen the blade Check the fabric thickness The fabric is not cut or it gets stuck between the blade and the counterblade Check the compatibility between blade and fabric Make sure that the motor turns correctly Reduce the speed of travel... - Page 13 ® dal 1946...
- Page 14 The warranty covers all manufacturing and material defects. Replacement and repair operations are covered only if carried out by our company and at our workshop. If in-warranty goods need to be repaired, the customer must always send the complete machine to Rasor ®...
- Page 15 RASOR ELETTROMECCANICA SRL Via Vincenzo Caldesi 6 20161 Milan ∙ Italy ph. +39 02 66 22 12 31 fax +39 02 66 22 12 93 info@rasor-cutters.com www.rasor-cutters.com FOLLOW US:...
Need help?
Do you have a question about the SW100SL and is the answer not in the manual?
Questions and answers