Table of Contents
Advertisement
Quick Links
Advertisement
Table of Contents

Subscribe to Our Youtube Channel
Related Manuals for Point Mobile HTK10


Summary of Contents for Point Mobile HTK10
-
Page 2: Table Of Contents
User manual HANDY TERMINAL CONTENTS 1. INTRODUCTION Trademarks ································································································ 5 About the HT-K10 Handy Terminal ······························································ 5 Accessories ································································································· 5 2. SAFETY REGULATIONS 2.1. General Safety Rules ········································································· 7 2.2. Power Supply ··················································································· 7 2.3. Laser Safety ····················································································· 7 2.4. LED Safety ·······················································································... - Page 3 User manual HANDY TERMINAL 4.15. USB ActiveSync Cable ······································································ 27 4.16. Li-ion Battery Packs ·········································································· 27 4.17. Battery Power ·················································································· 27 4.18. Main Battery Pack ············································································ 28 4.19. Managing Main Battery Power ···························································· 28 4.20. Storage Guidelines ··········································································· 29 4.21. Internal Backup Battery······································································...
- Page 4 User manual HANDY TERMINAL 9. USING CONTROL PANEL 9.1. System Properties ············································································ 44 9.2. General ·························································································· 44 9.3. Memory ·························································································· 44 9.4. Device name ··················································································· 44 9.5. Copyrights ······················································································· 45 9.6. Power properties ·············································································· 45 9.7. Battery tab ······················································································ 45 9.8.
- Page 5 User manual HANDY TERMINAL 12.4. Front Panel ····················································································· 60 12.5. Back Panel ······················································································ 60 12.6. Powering the Single Slot Docking Cradle or Single Slot Ethernet Cradle Device ····· 61 12.7. Charging the Main Battery ·································································· 62 12.8. Inserting a Terminal ·········································································· 62 12.9.
-
Page 6: Introduction
User manual HANDY TERMINAL 1. Introduction Thank you for purchasing HT-K10 handy terminal. This manual generally provides you with the safety information and basic features and operations of the HT-K10 device. Please read all safety precautions and this manual carefully before using your handy terminals and peripherals to ensure safe and proper use. -
Page 7: Safety Regulations
User manual HANDY TERMINAL Others HT-K10-CL-QM-R Belt Clip HT-K10-HS-QM-R Hand Strap HT-K10-SP-QM-R Stylus Pen HT-K10 handy terminal contains the following items: • Handy terminal • USB ActiveSync Cable with WEEE sleeve • Battery Pack • Stylus Pen with Hand Strap •... -
Page 8: General Safety Rules
User manual HANDY TERMINAL ☞ ☞ ☞ ☞ NOTE: HK-K10 handy terminals meet or exceed the requirements of all applicable standards organizations for safe operation. However, as with any electrical equipment, the best way to ensure safe operation is to read this manual carefully before performing any type of connection to the handy terminal and operate them according to the agency guidelines described in the manual. -
Page 9: Led Safety
User manual HANDY TERMINAL Laser Light Label If the above laser light label is attached to your device, it indicates the product contains a laser engine or laser aimer that emits the laser light. The following information is provided to comply with the rules imposed by international authorities and refers to the correct use of HT-K10 handy terminal. -
Page 10: Cb Scheme
User manual HANDY TERMINAL 2.6. CB Scheme This device complies with CB Scheme IEC 60950-1 2.7. FCC Part 15 Regulation Pursuant to part 15 of the FCC Rules, you are cautioned that changes or modifications not expressly approved by Toshiba Tec could void your authority to operate the HT-K10 handy terminal. This device complies with part 15 of the FCC Rules. -
Page 11: Radio Compliance
User manual HANDY TERMINAL Le présent émetteur radio a été approuvé par Industrie Canada pour fonctionner avec les types d'antenne énumérés ci-dessous et ayant un gain admissible maximal et l'impédance requise pour chaque type d'antenne. Les types d'antenne non inclus dans cette liste, ou dont le gain est supérieur au gain maximal indiqué, sont strictement interdits pour l'exploitation de l'émetteur. -
Page 12: China Compliance
User manual HANDY TERMINAL For more detailed information about disposal, reuse, and recycle system, contact your local or regional waste administration. 2.11. China Compliance This device complies with Highland and Tropical environment requirements of the CCC GB4943.1 (2011). This device is marked with in accordance with the Highland product requirements specified in the CCC GB4943.1(2011) and complies with the followings: 仅适用于海拔2000m及以下地区安全使用... -
Page 13: Charge The Batteries
User manual HANDY TERMINAL ☞ ☞ ☞ ☞ NOTE: The battery door must be installed prior to booting the unit. 5. Tighten the hand strap. WARNING: Use only Toshiba Tec-approved Li-Ion battery packs. Unauthorized battery may result in damage not covered by the warranty. -
Page 14: Led Indicators
User manual HANDY TERMINAL them. ☞ ☞ ☞ ☞ NOTE: If you remove the battery pack or it completely discharges, you have 30 minute window of time to insert a charged battery pack before the backup battery completely discharges. If your backup battery completely discharges, the contents of the RAM memory will be lost. -
Page 15: Turn Your Device On
User manual HANDY TERMINAL The battery pack may get hot, explode, ignite, and/or cause serious injury if exposed to abusive conditions. If the battery pack is replaced with an improper type, there is risk of explosion. Do not place the battery pack in or near a fire or heat; do not place the battery pack in direct sunlight, or use or store the battery pack inside unventilated areas in hot weather;... -
Page 16: Indicator Icons
User manual HANDY TERMINAL Tab to change views 3.7. Indicator Icons The command bar, located at the bottom of application screens, provides access to many system functions and programs. Left and right arrows are used to scroll through additional icons Icon Meaning Opens the Start menu. -
Page 17: Using The Stylus
User manual HANDY TERMINAL modes. Icon Meaning The up arrow allows you to turn the Wireless LAN and Bluetooth connection on or off. It also allows you to toggle between the Keypad and Transcriber. When Keypad is selected, a keypad is displayed so you can tap text and number keys. -
Page 18: Get To Know Your Device
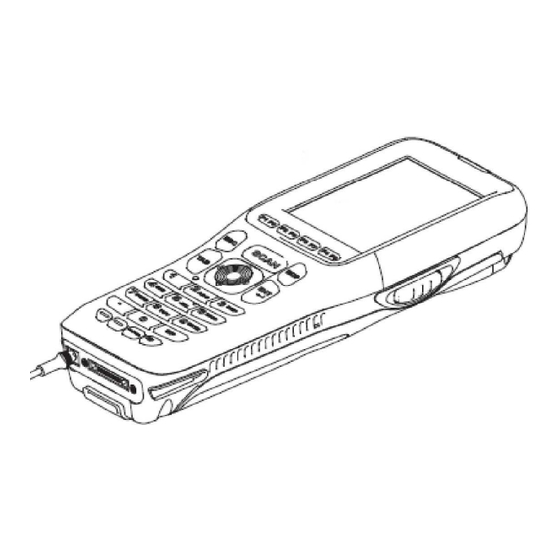
User manual HANDY TERMINAL Move files by tapping and holding on the file, then tapping Cut, Copy or Paste on the pop-up menus that appear. 4. Get to Know Your Device 4.1. Feature of Your Device The following list outlines a few of the feature included in your device. 4.2. -
Page 19: Front Panel Layout
User manual HANDY TERMINAL 4.3. Front Panel Layout LED Indicator Shows the information needed to operate your device as follows: Note: The LED is user-programmable. LED Color Meaning Lights when a scan fails. Lights when main battery is charging. Green Lights when scanned bar code is successfully decoded. -
Page 20: Display Backlight
User manual HANDY TERMINAL the stylus for buttons or icons that are close together. WARNING: Use of objects, such as paper clips, pencils, or ink pens on the touch screen can damage the input panel and may cause damage not covered by the warranty. 4.4. -
Page 21: Using Screen Protectors
User manual HANDY TERMINAL 4.6. Using Screen Protectors Toshiba Tec defines proper use of the terminal touch panel display as using a screen protector and proper stylus. Screen protectors maintain the ongoing integrity (i.e., prevent scratching) of the touch panel, which is why their use is recommended for applications that require a high to medium level of interface with the touch panel. - Page 22 User manual HANDY TERMINAL ☞ ☞ ☞ ☞ NOTE: To reposition the screen protector, lift up gently and reapply. Yellow tag with cover film: “Please peel off this mask after application completed. 6. Press gently but firmly. Use the card a necessary to smooth out any air pockets or bumps after allocation Press the Power key to weak the terminal and check the touch panel with the stylus.
-
Page 23: Back Panel Layout
User manual HANDY TERMINAL Verify that the screen accepts input from the stylus as usual. If not, re-apply the screen protector. Press the Power key to put the terminal back in suspend mode. 10. Clean the surface of the screen protector with a clean, non-abrasive, lint-free cloth. 11. - Page 24 User manual HANDY TERMINAL Hand Strap The HANDY TERMINAL comes with an adjustable, elastic hand strap. You can attach it to the device. Keep in mind that the hand strap covers the battery. When you want to replace the battery, you will need to adjust the hand strap accordingly.
-
Page 25: Left Side Panel Layout
User manual HANDY TERMINAL 4.9. Left Side Panel Layout Side Button There is a button like this on both side panels. You can use the Programs Buttons option in the Control Panel to change the functionality of the side buttons. Scan function is assigned by default. -
Page 26: Right Side Panel Layout
User manual HANDY TERMINAL WARNING: Follow proper ESD precautions to avoid damaging the SD. Proper ESD precautions include, but are not limited to, working on an ESD mat and ensuring that the operator is properly grounded. Do not force the card. If you feel resistance, remove the card, check the orientation, and reinsert it. Do not use the Micro SD card slot for any other accessories. -
Page 27: Bottom Panel Layout
User manual HANDY TERMINAL 4.13. Bottom Panel Layout DC Power Jack The DC power jack receives external power from the Handy Terminal power cable that is included with the terminal. When connected to the Handy Terminal power cable, the terminal is powered and the main battery pack is charging. I/O Connector The I/O mechanical connector is designed to work exclusively with HANDY TERMINAL peripherals and cables. -
Page 28: Peripherals And Accessories
User manual HANDY TERMINAL ☞ ☞ ☞ ☞ NOTE: Signals referenced are for a DTE device. 4.14. Peripherals and Accessories The following items are sold separately and enhance your HANDY TERMINAL’s capabilities. Single Slot Docking Cradle This charging and communication cradle supports USB and RS-232 communication, enabling your terminal to interface with the majority of enterprise systems. -
Page 29: Main Battery Pack
User manual HANDY TERMINAL 4.18. Main Battery Pack There are two Li-ion battery packs available for the HANDY TERMINAL: Standard Capacity: Li-ion 3.7V/2200mAh/8.1Wh High Capacity: Li-ion 3.7V/3300mAh/12.2Wh The Li-ion battery pack is the primary power source for the Handy Terminal as well as for the internal backup battery. -
Page 30: Storage Guidelines
User manual HANDY TERMINAL insert another charged battery pack in the Handy Terminal. If the main battery pack is low, insert the terminal into a charging peripheral to power the terminal and begin recharging the battery. ☞ ☞ ☞ ☞ Power NOTE: If the main battery is low and the terminal is in Suspend Mode, pressing the... -
Page 31: Resetting The Terminal
User manual HANDY TERMINAL Charging The internal backup battery charges off the main battery pack and requires 2 hours charge time to backup RAM data for 24 hours. You can begin using the Handy Terminal after charging the main battery for four or six hours (depending upon your battery); however, the internal backup battery will continue to charge off the main battery. -
Page 32: Memory Allocation
User manual HANDY TERMINAL ☞ ☞ ☞ ☞ NOTE: You should always put the terminal in Suspend Mode when you change the battery pack; see Changing the Power Main Battery Pack on paragraph 4.18. When you replace the battery door, press the button to wake the replaced. - Page 33 User manual HANDY TERMINAL 1D Laser : N4313 Scan Engine 2D Imager : IT5300SR Keypad 29-key shifted alpha numeric Audio Built-in microphone and speaker Full speed USB 2.0 from cradle (or I/O cable); RS232 (115 Kbps) from cradle Standard Li-ion battery 3.7V / 2200 mAh / 8.1 Wh Battery High capacity Li-ion battery 3.7V / 3300 mAh / 12.2 Wh (optional) Expected Hours of...
-
Page 34: Using The Keypad
User manual HANDY TERMINAL 5. Using the Keypad 5.1. Numeric Keypad Layout 5.2. Navigation Keys Located in the center of the keypad for easy access with either hand, the navigation keys enable you to move the cursor up and down lines and from character to character. 5.3. -
Page 35: Alpha/Numeric Modes
User manual HANDY TERMINAL 5.4. Alpha/Numeric Modes The keypad defaults to numeric mode. Use the ALPHA key to toggle between numeric and alpha modes. Pressing the ALPHA key once locks the keypad in numeric mode, alpha mode (lowercase), or alpha mode (uppercase). -
Page 36: Red Key Combinations
User manual HANDY TERMINAL BLUE + 5 Increase screen brightness BLUE + 6 Increase volume BLUE + 8 Decrease screen brightness BLUE + 9 Decrease volume BLUE + 0 Delete Align the screen BLUE + SP (Press ESC to exit) BLUE + Start Enter suspend mode The keypad is color-coded in blue to indicate these key combinations. -
Page 37: Using The Image Engine
User manual HANDY TERMINAL Key Combination Function F1 ~ F11 Not assigned any function by default 6. Using the Image Engine 6.1. Overview The HANDY TERMINAL contains an IT5300SR 2D image engine that instantly reads all popular 1D and 2D bar codes and supports omni-directional aiming and decoding or a N4313 1D laser engine that reads all popular 1D bar codes. -
Page 38: Available Image Engines
User manual HANDY TERMINAL away from the direct sunlight. Try again after adjusting the brightness of the surrounding if indoors. ☞ ☞ ☞ ☞ NOTE: It may not read the barcode if it is blue on white background. Try again after changing angle or adjusting the brightness of the surrounding. -
Page 39: Supported Bar Code Symbologies
User manual HANDY TERMINAL Code 39 15 mil 2.2in / 5.6cm 12.2in / 30.9cm Code 39 10 mil 3.4in / 8.5cm 8.7in / 22.2cm Code 39 8 mil 3.7in / 9.3cm 7.2in / 18.3cm UPC 13 mil, 100% 2.2in / 5.6cm 12.2in / 31cm Postnet 4.2in / 10.7cm... -
Page 40: Activating The Engine
User manual HANDY TERMINAL Postnet Postal Codes British Post(BPO) Canadian Post Australian Post Japanese Post Planet Code KIX (Netherlands) Post China Post Korea Post 4-CB(4-State Customer Barcode) ID-Tag(UPU 4-State) 6.5. Activating the Engine When a scanning application is open, press the Scan key to activate the image engine. 6.6. -
Page 41: Omni-Directional Scanning Positions
User manual HANDY TERMINAL 6.10. Omni-Directional Scanning Positions The high-vis aiming pattern frames the bar code to provide you with the best scanning performance. ☞ ☞ ☞ ☞ NOTE: To achieve the best read, the aiming beam should be centered horizontally across the bar code. The aiming pattern is smaller when the terminal is held closer to the code and larger when the terminal is held farther from the code. -
Page 42: Depth Of Field
User manual HANDY TERMINAL 7.3. Depth of Field Depth of Field for N4313 Reference Range Near Code Size Distance Distance (in/cm) (in/cm) Code 39 4 mil 5in / 12.7cm 5.4in / 13.8cm Code 39 5 mil 4.1in / 11.7cm 7.2in / 18.4cm Code 39 7.5 mil 4.1in / 10.4cm 10.7in / 27.4cm... -
Page 43: Using Demos
User manual HANDY TERMINAL 7.6. Using Demos Handy Terminal Demos are software utilities loaded on Handy Terminals that demonstrate the advanced features of the terminal. To access these demos, tap Start > Programs > Demos. • Select Scan Demo to verify decoding 7.7. -
Page 44: Enabling Scanwedge
User manual HANDY TERMINAL application as keystrokes or clipboard. The foreground application is the open software application whose window is currently active on the display. As a result, you can check decoded bar code data with Microsoft WordPad. 8.2. Enabling ScanWedge ScanWedge is enabled by default in Handy Terminal Tap the ScanWedge icon once . -
Page 45: Using Control Panel
User manual HANDY TERMINAL 9. Using Control Panel 9.1. System Properties Refer to the System control panel for information related to the system. 9.2. General 1. Select 2. Start > Settings > Control Panel > System Properties > General tab to determine the following information about your PDA: •... -
Page 46: Copyrights
User manual HANDY TERMINAL Terminal Serial Number will be in Device Name section by default. You can modify it 9.5. Copyrights 9.6. Power properties 9.7. Battery tab To see main and backup battery level indicators open Start > Settings > Control panel > Battery or double tap on Battery icon in taskbar. -
Page 47: Cpu Power Setting Tab
User manual HANDY TERMINAL 1. Select Start > Settings > Control Panel > Power off. 2. Set idle time when on battery power before device suspends. 3. Set idle time when on external power before device suspends. 4. To exit, press OK from the command bar, or press the < ENT > key on the keypad. ☞... -
Page 48: Program Button Properties
User manual HANDY TERMINAL 9.12. Program Button properties 9.13. Program Buttons Tab Select Start > Settings > Control Panel > Program buttons Chose its type: • Default – button will be assigned default function. • No function – button does not have any functions. •... -
Page 49: Backlight Properties
User manual HANDY TERMINAL 9.15. Backlight Properties Modify display and keyboard backlight brightness. Also set backlight options (i.e. turn off time). To modify backlight settings open: Start > Settings > Control Panel > Backlight 9.16. Battery power Tab Modify display backlight settings when device runs on batteries. -
Page 50: Keyboard Backlight Tab
User manual HANDY TERMINAL • Enable to turn on backlight when a button is pressed or the screen is tapped 9.18. Keyboard backlight Tab Enable Keyboard backlight when button is pressed By default this is turned off. 9.19. Scanner Settings To change the Scanner configuration parameter as follows: Tap the Scanwedge icon in the System Tray to open the menu shown in image on the right and select Settings to open the... -
Page 51: Scanner Settings Applet
User manual HANDY TERMINAL 9.20. Scanner Settings Applet Section Option Description Specifies the trigger time out in seconds. If a barcode is not Trigger timeout (sec) decoded within the specified timeout, the default Notifier indicates that decoding is failed Enable Auto Scan with specified Enable Auto Scan interval. - Page 52 User manual HANDY TERMINAL Volume Set sounds volume. Beep Good read Set sound to indicate good read. If enabled – plays audio sound Bad read Set sound to indicate bad read. Notification Enable Enable visual scan indicators. Vibrator Set vibration time after Good read good read.
-
Page 53: Communication
User manual HANDY TERMINAL 10. Communication Communication Options 10.1. Handy Terminal offers several communication options including Microsoft ActiveSync and wireless radios. I/O Connector (Wired Communication) The mechanical connector on the bottom panel connects the terminal to various Handy Terminal communication peripherals that connect to a host workstation via USB (1.1 or higher), thus enabling ActiveSync communication. -
Page 54: Activesync Communication
User manual HANDY TERMINAL ActiveSync Communication 10.4. To synchronize, ActiveSync 4.1 or higher must be installed and configured for the appropriate communication type on the host workstation and the Handy Terminal. Handy Terminals ship with ActiveSync already installed. Therefore, if ActiveSync is already installed on the host workstation, you just need to connect the Handy Terminal to the host workstation (via Handy Terminal peripheral) to initiate communication. -
Page 55: Setting Up The Host Workstation
User manual HANDY TERMINAL To sync successfully, ActiveSync must be configured for the same communication type on both the host workstation and the Handy Terminal. ActiveSync must be setup on your workstation before you initiate synchronization from the terminal for the first time. Setting Up the Host Workstation 10.8. -
Page 56: Adding Programs Via Activesync
User manual HANDY TERMINAL desktop), and click Explore. The Mobile Device folder opens in Windows Explorer. The Handy Terminal is now treated as a mass storage device, and transferring files is as simple as dragging and dropping or copying and pasting as you would for moving files between folders on your hard drive. -
Page 57: Wireless Radios
User manual HANDY TERMINAL If the File is an Installer An installer program is one that installs to the workstation and the terminal simultaneously; one process installs to both devices. 1. On the workstation, double-click the *.exe or *.setup.exe file. The installation wizard begins. 2. -
Page 58: Wlan (802.11B/G/N Radio)
User manual HANDY TERMINAL ☞ ☞ ☞ ☞ NOTE: 802.11 b/g/n radio module is off by default, in order to avoid wasting energy, you can switch it off using the Wireless Communications applet ☞ ☞ ☞ ☞ NOTE: Suspending the terminal powers off the 802.11 b/g/n radio and drops the radio connection. When the terminal resumes, depending on the radio power mode and security protocol selected, it may take up to 30 seconds for the 802.11 b/g/n radio driver to re-associate the radio to the network. -
Page 59: Bluetooth Handler
User manual HANDY TERMINAL 5. On the terminal, double tap the installer file; e.g., the *.exe file. 6. The installation wizard for the program begins. 7. Follow the directions on the screen to complete installation. 11. Bluetooth Handler Bluetooth wireless technology is a short-range communications technology to connect portable and/or fixed devices while maintaining high levels of security. -
Page 60: Setting Up A Bluetooth Printer
User manual HANDY TERMINAL 5. Enter the same digits on the other device when prompted. 6. After pairing, double tap on the selected device / profile and select Active. Setting Up a Bluetooth Printer 11.4. 1. Make sure that the Bluetooth printer is on and activated. 2. -
Page 61: Front Panel
User manual HANDY TERMINAL We recommend use of Toshiba Tec Li-Ion battery packs. Use of any non-Toshiba battery may damage not covered by warranty. WARNING: DO NOT attempt to charge damp/wet handy terminals or batteries. All components must be dry before connecting to an external power source. -
Page 62: Powering The Single Slot Docking Cradle Or Single Slot Ethernet Cradle Device
User manual HANDY TERMINAL compliant device to facilitate USB communication to and from the terminal. USB communication occurs through Microsoft ActiveSync (v.4.1 or higher). For more information about ActiveSync setup, see ActiveSync Communication on paragraph 10.4. Serial Port The serial port supports serial communication between the terminal and another device. Note that the connector is a DB9 Male connector, requiring a female connector on the serial cable. -
Page 63: Charging The Main Battery
User manual HANDY TERMINAL 3. Plug the connector into the DC power jack on the back panel. The base is now powered. When a terminal is properly seated, the base powers the terminal, charges the terminal’s main battery pack, and lasunches ActiveSync (see ActiveSync Communication on paragraph 10.4). Toshiba Tec recommends that you leave the base connected to its power source at all times, so that it is always ready to use. -
Page 64: Charging Backup Battery
User manual HANDY TERMINAL Charging Backup Battery 12.10. To check battery power while the terminal is operating, tap Start -> Settings -> Control Panel - > double tap Power. Technical Specifications 12.11. HT-K10-SC (Single Slot Docking Cradle) Model HT-K10-SE (Single Slot Ethernet Cradle) Structural Dimensions 135.7mm(D) x 116.4mm(W) x 81mm(H) - Page 65 User manual HANDY TERMINAL Humidity 90% relative humidity (non-condensing) Power Supply AC 100–240 V, 0.4 A Input (Universal) 50/60Hz (from the power source) Included with Handy Terminal Output (to the cradle) DC 5V , 2.0 A Charging Main battery Standard Capacity: 2200mAh – Approx. 4 hours High Capacity: 3300mAh –...
- Page 66 User manual HANDY TERMINAL...
Need help?
Do you have a question about the HTK10 and is the answer not in the manual?
Questions and answers