Advertisement
Quick Links
Advertisement

Related Manuals for Little Folks Furniture HSP003


Summary of Contents for Little Folks Furniture HSP003
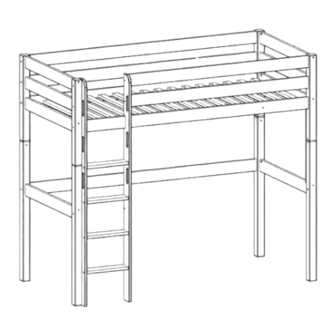
- Page 1 Classic Hi Sleeper Bed Code: HSP003...
-
Page 2: Product Safety
Thank you for buying a piece of furniture Treated properly it should be a faithful servant for years - and we hope you get the same amount of pleasure from it. Before you do please take a few minutes to read these instructions we suggest you carefully unpack everything, lay it out on a clean, flat floor and identify everything on the parts list in these instructions. - Page 3 Parts Fittings M6x100 M6x75 M6x60 M6x60 M6x35 O7x50 O10x40 O8x32 M6x15 O10x12 O3.0x30 Key 4 mm...
- Page 4 Making the upper bed frame. (Two People) 44 x 35mm wooden dowels / 16 x 100mm bolts / 16 x barrel nuts. Make end frames Fit the two middle end rails and four top / bottom end rails with the small wooden dowels (28) blind holes only (not the holes that have a side hole next to it) Carefully position the four small legs using the numbers on the base of each leg to orientate.
- Page 5 Fit the mattres base (Two People) 34 wood screws Gently roll out the mattress base (webbing side down) and lift it onto the mattress rails supports (wooden pieces fitted to the inside of the mattress rails). Spread the bed slats out to each end of the bed. Now screw each bed slat down using a screw in each end, making sure the the end slats are tight to the bed legs at each end, and that the bed remains parallel.
- Page 6 Making the lower bed frame. (Two People) 8 x Large wooden dowels /12 small wooden dowels, 6 x 100mm bolts, 6 x barrel nuts Fit the two cross rails and rear long rail with the small dowels (blind holes only). Carefully identify the large legs by using the letters on the base of the part.
- Page 7 Making the Hi bed frame. (Two People) 8 x wood screws Carefully lift the upper bed onto the lower frame, aligning the projecting wooden dowels into the holes on the base of small bed legs. Once firmly pressed down secure the joint by screwing them together, 2 screws per leg.
- Page 8 Make the ladder 8 x screw bolts, 16 x small wooden dowels Fit the ladder treads (4) with the wooden dowels (4 per tread) using the outer holes. lay one ladder string down with the inside facing upwards (side with more holes = inner face) and push the four treads into the matching holes.
- Page 9 Fit the ladder (two people) 3 x 75mm bolts, 3 x sleeve nuts, 1 x screw bolt 2 x 60mm bolts + 2 barrel nuts, 2 x 100m bolts + 2 barrel nuts, 8 x small wooden dowels. At this point in the assembly you will need to decide which side the ladder is fitted, left or right side of the bed.
- Page 10 Fit the leg stabilzer 2 x 35mm bolts This “leg stabilizer” is designed to be fitted to the inside of bed between the upper and lower bed frames and on the opposite side to that of the ladder (see image) Push the part into position and secure using the two bolts.
- Page 11 Connect the bed to a solid structure / wall The bed is designed to be connected to a solid structure for extra stability. Lift the bed into it`s final position. Using the two holes pre-drilled in the rear bed legs mark out the drilling positions on the wall.
- Page 12 Edit Desk Code: DSK007...
- Page 13 Thank you for buying a piece of furniture Treated properly it should be a faithful servant for years - and we hope you get the same amount of pleasure from it. Before you do please take a few minutes to read these instructions we suggest you carefully unpack everything, lay it out on a clean, flat floor and identify everything on the parts list in these instructions.
- Page 14 Parts Desk frame Desk frame Right-hand Left-hand Cross rail Fittings 4 x Dowels 4 x Counter sunk Bolts 2 x Cam Pins 2 x Cams inserts 1 x Wall strap Kit 2 x Cam grub screw Tools Req 1 x Allen Key Screwdriver supplied...
- Page 15 Fit the cross rail 4 x dowels and 2 cam inserts Insert 2 dowels into the two outer holes at each end of the cross rail. Now fit the cam insert into the hole on the side of the cross rail making sure that the accepting hole is clear of wood chippings/detritus, carefully aligning the holes on the insert with the central end hole.
- Page 16 Make the frame (ideally with two people) Carefully align and connect the cross rail to the desk frames (can be done one at a time). Once fully connected, insert the cam grub screw and rotate to tighten. View from the rear of the desk frame. Make the desk.
- Page 17 If you wish to “hide” the strap you can fix to the desk from the underside. Little Folks Furniture do not supply wall fixings due to the wide ranging differences of wall construction. This work should only be carried out by a competent person or a professional.
- Page 18 Final check Please ensure that the wall strap is connected to both the desk and a suitable wall structure. Check that all the fittings used to assemble the desk are fitted correctly and securely tightened. Check that the desk is positioned on a level floor and is secure and stable.
- Page 19 Storage Bookcase with Beech Feet Code: STO005...
- Page 20 Thank you for buying a piece of furniture Treated properly it should be a faithful servant for years - and we hope you get the same amount of pleasure from it. Before you do please take a few minutes to read these instructions we suggest you carefully unpack everything, lay it out on a clean, flat floor and identify everything on the parts list in these instructions.
-
Page 21: Parts List
Parts list Base 1 x Folding back Universal Side Universal Side 1 x Middle panel 2 x Shelves Fittings 8 x Long Pan head screws 45mm 2 x Long Dowels 8 x Dowels 2 x Long cam Pins 4 x Beech Feet 8 x Cam Pins 12 x Large Cams 8 x Special screws... - Page 22 Assembly Fit top and base. 4x Cam Pins, 8 x special screws,1 wall connector and 1 x bracket screw + Screwdriver Fit the Cam Pins into the small holes at the centre of the panels. Now screw the special screws along the outer edges of the panels. Now fit the wall connector to the inside of the top, final positioning will be explained later.
- Page 23 Make the centre “cross” frame 2 x long wooden dowels, 2 x cams and 2 x long cam pins Orientate the parts as shown (raw timber edge facing down). Push the two long dowels through the middle panel so they project evenly on both sides. Now push one shelf onto the dowels.
- Page 24 Connect the top and bottom 4 x Large Cams (two people / keep the parts resting on the floor) Insert the cams into the middle piece (Arrow pointing towards the edge). Now carefully push the top and bottom panel onto the middle panel, locating the parts together on the fixings aready fitted.
- Page 25 Fit the sides Important = The press in fitting must be OPEN as to accept the special pin head when sliding the side onto the carcass. Working with the carcass still on it`s back gently slide one side onto the carcass parts, aligning the central shelf and top and bottom panels on to the pins.
- Page 26 Beech Feet fitting 4 x Beech feet and 8 Long pan head screws 45mm Lay the carcass on its top (ensure that you have a protective layer between the floor and top). Align each beech foot (larger holes uppermost in foot)picking up on two of the four holes in each corner of the base panel (diagonal), screw the foot down using two 45mm screws.
- Page 27 Re-position the bookcase and physically connect the unit to the wall. Little Folks Furniture do not supply wall fixings due to the wide ranging differences of wall construction. This work should only be carried out by a competent person or a professional.
- Page 28 Final check If used away from an furniture structure (e.g bed or desk), please ensure that the wall bracket is connected to both the storage bookcase and a suitable wall structure. If used under an upper furniture structure please check that the unit is neatly aligned and does not create ledges of foot holds for the upper bed.
- Page 29 FUTON Code: FUT002...
- Page 30 Thank you for buying a piece of furniture Treated properly it should be a faithful servant for years - and we hope you get the same amount of pleasure from it. Before you do please take a few minutes to read these instructions we suggest you carefully unpack everything, lay it out on a clean, flat floor and identify everything on the parts list in these instructions.
- Page 31 Parts list 2 x Lower Arms 4 x Outer Base Board small holes 2 x Rear Arms 2 x Middle Arms 2 x Inner Base Board small holes 2 x Front Legs Fittings 1 x Felt Pad 2 x Bolts 5.5cm 28 x Bolts 3.5cm 4 x Ring Washers 6 x sleeve nuts...
- Page 32 Assembly of the Left-hand side 2 x 35mm Bolts, 1 x 55mm bolt, 2 x washers, 3 x Sleeve nuts and 2 x Allen keys. Orientate the parts carefully as shown making sure to position the middle arm with the smaller gap between the arm end and first edge hole upwards. The rear arm must connect to the middle arm with the edge holes facing outwards.
- Page 33 Assembly of the Right-hand side 2 x 35mm Bolts, 1 x 55mm bolt, 2 x washers, 3 x Sleeve nuts and 2 x Allen keys. Orientate the parts carefully as shown making sure to position the middle arm with the smaller gap between the arm end and first edge hole upwards. The rear arm must connect to the middle arm with the edge holes facing outwards.
- Page 34 Fix the outer base boards 16 x 35mm bolts and 1 x allen key. (two people) You will find it easier to lay the two side frames out as a bed for the connection of the boards. Carefully hold the two assembled frames as shown, align and connect the 4 outer base boards to the frames using the bolts provided.
- Page 35 Bed configuration Lay the frame out with the elevated part (front legs) used for the head end of the bed. Lay the loose fabric mattress onto the bed, centrally positioned. Head end Fabric Mattress...
- Page 36 Convert from Bed to Chair Remove the fabric mattress. Now very carefully lift the middle section of the frame (use the hand-holds in the base boards) upwards and forwards. Care must be taken not to place hands and fingers into the closing gaps as this could cause injury.
- Page 37 Fit the fabric mattress Fold the fabric mattress to create a lovely deep seating area on the chair as shown in the picture below. Mattress Fold the mattress as shown...
-
Page 38: Product Label
Important THIS IS NOT A TOY. Please check the tightness of the fittings periodically as they could loosen over time and through use. Rotating the base boards (top surface to bottom ) should increase the life of the bed. Fitting the Product Label. We suggest that the product label is fitted to the inside of the chair / bed frame once the assembly has taken place.
Need help?
Do you have a question about the HSP003 and is the answer not in the manual?
Questions and answers