Advertisement
Quick Links
Advertisement

Related Manuals for Little Folks Furniture SBD008


Summary of Contents for Little Folks Furniture SBD008
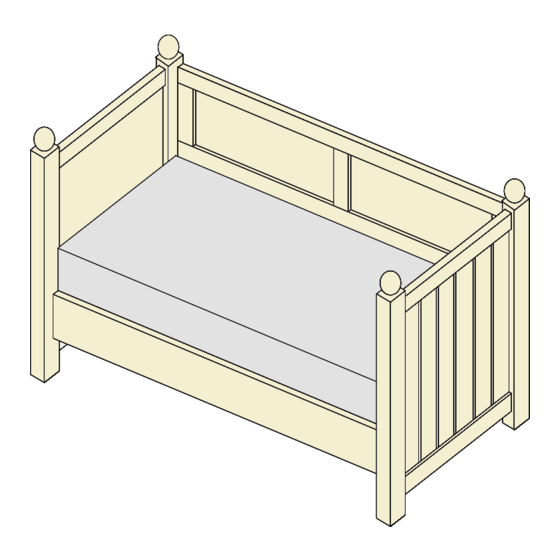
- Page 1 Fargo Day Bed Code: SBD008...
-
Page 2: Product Safety
Thank you for buying a piece of furniture Treated properly it should be a faithful servant for years - and we hope you get the same amount of pleasure from it. Before you do please take a few minutes to read these instructions we suggest you carefully unpack everything, lay it out on a clean, flat floor and identify everything on the parts list in these instructions. - Page 3 Parts 1x bed End (Left) 1x bed End (Right) 2 x Mattress Rails 1x Rear Panel 1x Mattress Base Fittings 6 x nuts 32 x Screws 6 x washers 4 x 9cm Threaded Bar 6 x Lunar Washers 2 x 6cm Threaded Bar 12 x Dowels Spanner Tools Req...
- Page 4 Making ready the bed ends. Lay both bed ends down on a soft carpet or use the internal packaging from the cartons as protection. Right-hand end Left-hand end Fitting the bed ends. 4 threaded bars 9 cm, 2 threaded bars 6cm and 12 wooden dowels Insert and rotate fully each threaded bar into the centre holes (metal inserts) on each bed leg (see images).
- Page 5 Making the bed. (Two people required) Starting from the rear, slide the mattress rail and rear panel onto the threaded bars and wooden dowels fitted in the bed legs on one bed end. Secure these two parts by carefully sliding the lunar washer onto the threaded bar as it passes through the large holes, adding the washer and finally the nuts.
- Page 6 Fix the base 32 x Wood screws Lift the slatted base onto the bed, slide out and screw each slat down at each end. Note: Fit both end slats tight against the bed ends. X 32 Position the bed and fit the mattress (Two people) Carefully lift the bed into position taking care not to drag.
- Page 7 Fit the trundle bed Assembly the trundle bed as explained in the trundle bed instruction leaflet. Now slide the trundle under the Day bed observing the gaps around the beds. Please take a few minutes to look over the bed to ensure that the fittings are securely fastened and the product is stable.
- Page 8 Code: TDL002...
- Page 9 Thank you for buying a piece of furniture Treated properly it should be a faithful servant for years - and we hope you get the same amount of pleasure from it. Before you do please take a few minutes to read these instructions we suggest you carefully unpack everything, lay it out on a clean, flat floor and identify everything on the parts list in these instructions.
-
Page 10: Parts List
Parts list 1x Front Panel 1x Rear Panel 2 x Sides 3 x bases Fittings 16 x Fat Screws 8 x Short Bolts 4x Brackets 12 x Screws 4 x Rubber buffers 4x Castor Pins 4x Castors 4x Castors Tools Req Screwdriver Spanner (supplied) - Page 11 Fit the Castors 4 x castor pins, 4 x castors and the spanner. Screw the castor pins into the metal bushes that are fitted to the parts as shown. Once fully rotated into the bush, tighten with the spanner supplied. Now carefully push the wheeled castor onto the castor pin, you should hear a “click”...
- Page 12 Make the bed 8 x short bolts Insert the short bolts into the 8 metal fittings in both the front panel and rear panel, rotating them in about halfway. Orientate the the parts so that the front is opposite the rear and with an end panel at each side. Start at one corner, slip one end part over the two short bolts fitted in the front panel, once over the heads, let the bracket drop down onto the shaft and tighten both bolts onto the bracket.
-
Page 13: Fixing The Base
Fixing the base 12 x Wood screws Drop the 3 x base boards into the bed and arrange so that the gaps between these parts are roughly equal. Now simply screw down each board until secure. x 12 Screws Rubber buffer X 2 Fit 2 x rubber buffers to the inside of the trundle front, this will help protect the paintwork of your products.
Need help?
Do you have a question about the SBD008 and is the answer not in the manual?
Questions and answers