Table of Contents
Advertisement
Quick Links
Advertisement
Table of Contents

Related Manuals for Atag VA6611RT


Summary of Contents for Atag VA6611RT
- Page 1 Use & Care Guide Dishwasher VA6611RTUU/A01...
- Page 2 Dear ATAG customer, Thank you for choosing this quality product. We want you to feel assured that the inside of your new machine is just as good as the outside and that the ethics and standards that went into the production of this machine are just as high as the quality and performance that you will receive from it.
-
Page 3: Table Of Contents
Contents Page Before doing your first wash Troubleshooting Safety Performance information Child safety Installation instructions Parts of the dishwasher Service & guarantee Technical information Own comments Baskets Quick Guide Control panel Dispenser Basic Course Eco-dishwashing Fragile dishes Program description Status light Cleaning Rinse aid Salt Settings Fault indications... -
Page 4: Before Doing Your First Wash
Before doing your first wash Read the directions of use Read the directions of use before starting to use your machine, especially the Safety, Child Safety and Basic Course sections. Take care with certain materials Read the section ‘Fragile dishes’ before wash ing china with unglazed decoration or other household goods made of plastic, wood or crys... -
Page 5: Safety
Safety General Packaging materials Winter storage/Transport Sort at source in accordance with the re commendations of your local authority. • Read and keep the directions for use! • Installation of water, drainage and electricity Scrapping must be carried out by a qualified professional. •... -
Page 6: Child Safety
Child Safety! Child-safe button lock Child-safe dishwashing To prevent children starting the machine, you • Use the knife basket, or knife holder, for all can activate a button lock. long/sharp items. Proceed as follows: 1. Switch off the dishwasher with the main • Always close the door and start the program switch. -
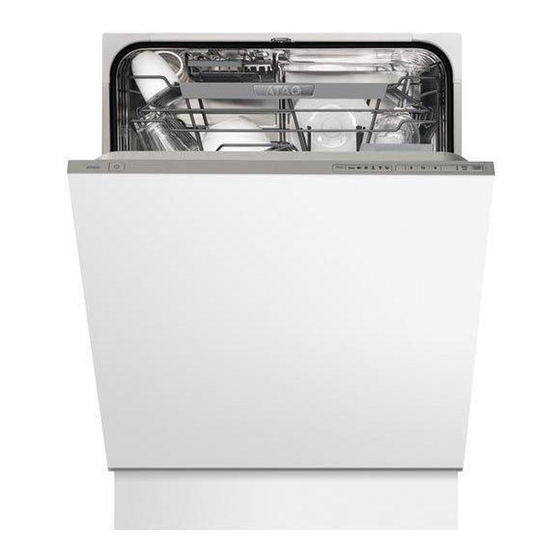
Page 7: Parts Of The Dishwasher
Parts of the dishwasher* 1. Knife basket 8. Main switch 2. Upper basket 9. Program panel 3. Spray arms 10. Filter 4. Cutlery basket 11. Type plate 5. Lower basket 12. Status light 6. Rinse aid dispenser 7. Dishwasher detergent compartment * Details may differ depending on model and market! Technical information Height 820870 mm... -
Page 8: Baskets
Baskets* Upper basket 1. Wine glass shelf 2. Knife stop 3. Upper spray arm 4. Locking handle for upper basket 5. Catch Raising/lowering the upper basket 1. Pull out the upper basket. 2. Pull out the catches (5) on either side of the upper basket and lower the upper basket at the same time. - Page 9 Baskets* Cutlery basket Cutlery basket with cover *Details may differ depending on the model and market!
- Page 10 Baskets* Positioning the cutlery basket cover The cover for the cutlery basket can be removed and used, for example, as an extra cutlery basket in the upper basket (see illustrations below). *Details may differ depending on the model and market!
-
Page 11: Control Panel
Control panel 1. Program selector 9. Higher temperature 2. Auto wash 10. Delayed start 3. Heavy wash 11. Extra dry 4. Normal wash 12. Time saver 5. Delicate wash 13. Salt indicator 6. Quick wash 14. Rinse aid indicator 7. Rinse & Hold 15. -
Page 12: Basic Course
Basic Course Check that the spray arms are able to move Below are step by step instructions to help you achieve the best possible dishwashing results. freely. See Fragile dishes, if you want to wash articles that may be fragile. Load the baskets correctly! Thanks to Super Cleaning System™, you do Detergent dosage not need to rinse the dishes under running... - Page 13 Basic Course Press the main power switch Rinse & Hold For rinsing the dishes while waiting for the ma chine to be illd. Select program If you wish to use additional options, Select a program by pressing the program continue to point 5. Otherwise you can selector one or more times until the required now start the machine, see pint 6. program is displayed. Auto wash The dishwasher detects how soiled the dishes are and adjusts water consumption and tem...
- Page 14 Basic Course Select options Time saver An option that shortens the program time To select an option, press one of the option ut tons. but uses more water and energy to clean the dishes. Can be used with Heavy Wash and Normal Wash. temperature Higher With the temperature option button you can...
- Page 15 Basic Course Press Start/Stop After dishwashing The dishwasher will now start. It manages the Once the machine has finished, it only draws entire wash automatically. Ensure that the door standby current. Turn off the water faucet if the is properly closed or the machine will not start. machine is not to be used for an extended pe...
-
Page 16: Eco-Dishwashing
Eco-dishwashing Only wash with a full load Waiting to run the wash until the machine is full saves energy. Wash at a lower temperature If the load is only lightly soiled, you can lower the temperature. Select program with Eco drying To save energy, select Economy dry. You will get a better drying result if you leave the door slightly open after the end of the program. -
Page 17: Fragile Dishes
Fragile dishes Aluminium A number of household goods are not suitable for machine washing. There can be many rea Aluminium can be dulled by machine washing. sons for this. Certain materials cannot withstand However, good quality aluminium saucepans intense heat, others can be damaged by the can be machine washed, although a reduction in dishwasher detergent. -
Page 18: Program Description
Program Description Programs Auto Heavy Normal Delicate Quick Rinse & Hold Options Prewashes with 2 prewashes 2 prewashes SCS* Mainwash *** 55°C 65°C 50°C 60°C Number of last rinse 3, last 3, last 2, last 2, last 1 rinse rinses... -
Page 19: Status Light
Status light The status light at the bottom on the machine provides information by means of 3 different colours. Indications Indications Blue indicates that the program has started and it is still possible to load more dishes indicates that there is detergent in the machine and it is not recommended to load more dishes (risk of poor dishwashing result) Flashing Red... -
Page 20: Cleaning
Cleaning The dishwasher tub is made of stainless steel and is kept clean through normal use.However, if you have hard water, limescale deposits may form in the machine. If this happens, run a normal wash program with two tablespoons of citric acid in the dishwasher detergent compartment. - Page 21 Cleaning Drain pump NOTE! Do not forget to reinstall the fitted piece. The pump can be accessed from inside the machine. 1. Cut the power to the machine by pulling out the plug! 2. Remove the coarse filter and pipe section. 3.
- Page 22 Cleaning To release the upper spray arm, the upper basket must be removed. 1. Pull out the basket. 2. Remove the upper spray arm by unscrewing it counterclockwise from the basket and clean it. 3. Screw the spray arm back into place. Spray arm Door When cleaning the edge around the door, use...
-
Page 23: Rinse Aid
Rinse aid Pour in rinse aid Select dosage Rinse aid, helps quicken the drying process. The dispenser is usually set at 1= soft water. However, depending on the water hardness, it Machines with indicator on the may be necessary to change the dosage. panel Open the rinse aid cover . Here you will find the When the rinse aid has run out and more is dispenser’s adjustment dial. -
Page 24: Salt
Salt Add salt Before using a dishwasher with a water soft ening filter, you must fill the salt compartment with salt. Use coarse salt or special salt for dishwashers. It is best to fill with salt when you are about to do a wash, as the dishwasher needs to be rinsed out immediately after filling. -
Page 25: Settings
Settings Reprogramming Some of the machine’s functions can be reprogrammed. You get into the machine’s change program using the machine’s ordinary buttons as per the instructions below. The selection will be retained until the next time you reset this function. Even if the machine is turned off at the main switch or loses power for any other reason, all selections registered before the interruption of power will be retained. - Page 26 Settings Setting a signal If you want the machine to signal when the wash is complete, you can program it to do this. The machine is set without a signal by default. Switch off the dishwasher at the main switch. Hold in the Delayed start button at the same time as you press the main switch.
- Page 27 Settings Super rinse Super rinse means that two extra rinses will be addes at the end of the main dish. Cannot be used in the Quick wash and Rinse & Hold programs. Switch off the dishwasher with the main switch. Hold in the Time server button while pressing the main switch. The Time server button and Start will flash.
- Page 28 Settings Setting water hardness If you have a dishwasher with a water softener, you may need to change the setting, depending on the degree of hardness of the water. Phone your local Water Board to check the water hard ness in your area. The dishwasher is set for low water hardness on delivery. Switch off the dishwasher with the main switch.
-
Page 29: Fault Indications
Fault indications Display Type of fault Action flashes Too much water Phone service in the dishwasher flashes Fault with water inlet Check that the water tap is open flashes Valve leakage Shut off the water tap and contact service flashes Blocked drain See ‘Possible causes’... -
Page 30: Troubleshooting
Troubleshooting Problems Possible causes Action The dishes are not clean • Lift off the arms and clean. • The spray arms are not rotat ing. • Avoid large packs. • Old dishwasher detergent. NB! Detergent is a perishable. • Dispense according to the • Incorrect dosage of deter level of water hardness. - Page 31 Troubleshooting Problems Possible causes Action Stains on stainless steel • Certain food remnants such as • Rinse off food residue of this or silver mustard, mayonnaise, lemon, type if you do not intend to vinegar, salt and dressings can start the dishwasher immedi cause stains on stainless steel ately.
- Page 32 Troubleshooting Problems Possible causes Action Water remains in the • Obstruction in the drain hose. • Disconnect the drain hose where it is connected to the machine sink’s water trap. Check that no debris has become stuck. Is the coneshaped part of the pipe cut so that the diameter is at least 16 mm? •...
-
Page 33: Performance Information
Performance information Test dosage Normal wash Main wash 25 gram Standard detergent. Rinse aid dosage 3. Energy labelling Europa: EN50242 Dishwasher program: Normal wash, Eco wash, Economy drying. Program time: 2:50 hours:minutes Connection: Cold water Test method noise measurement: IEC7043 Loading of performance test minced spinach meat Lower basket with 12 place settings EN50242 Upper basket with 12 place settings EN50242 Cutlery basket EN50242... -
Page 34: Installation Instructions
Installation instructions FULLY INTEGRATED MODELS SEMI-INTEGRATED MODELS SAFETY INSTRUCTIONS: BEFORE STARTING THE INSTALLATION: 1. It is important that you closely follow the 1. Connection to water supply: instructions provided here. • There must be a shut off valve on the water There must be a shut off valve on the water 2. - Page 35 Installation and connection information DISHWASHER CAvITY MEASUREMENTS Make sure the edges of the cable hole are even so as not to damage the drainage and sup Cable hole ply hoses and the electric cable. 38 mm 50-105 mm W = 600 mm WATER CONNECTION DISHWASHER MEASUREMENTS • The machine can be connected to a cold or hot water supply (maximum 85°C).
- Page 36 Step 1. Fitting the dishwasher in place 1. Loosen the locking nuts on the dishwasher’s two front steel feet using a 16 mm openen ded spanner. Screw the locking nuts down as close to the floor as possible. 2. Adjust the height of the dishwasher by turning the front steel feet with your hands.
- Page 37 Fitting the dishwasher in place 4. Push the plastic feet into place on all three steel feet (included in document bag). Note: Do not attach the plastic feet if the installation space is of minimum height. 5. Push the dishwasher into the cavity. At the same time, pull the electric cable and draina...
- Page 38 Fitting the dishwasher in place 7. Check that there is a space of 3 mm between 3 mm the top of the dishwasher door and the under side of the worktop. Do not attach the locking nuts. This will be done later. 8. Adjust the back foot by turning the adjustment screw at the front clockwise.
- Page 39 Step 2. Attaching cover or wooden door Follow the separate instructions supplied with the dishwasher to attach the chosen cover or wooden door to the front of the machine. Note: Once you have fitted the cover or wooden door to the dishwasher, the door springs may need adjusting.
- Page 40 Step 3. Adjusting the door springs The door springs are on the sides of the dishwash er. If necessary, pull out the dishwasher and adjust the tension of the door springs. A good idea is to try adjusting one side only first. 1. Make sure the door is closed. 2.
- Page 41 Adjusting the door springs 4. Adjust the spring tension using one of the following methods depending on how much adjustment is needed. If you need to adjust the spring a lot, place the rear mount in another hole. Place the spring further forward to reduce the tension and further back to increase the tension.
- Page 42 Step 4. Connecting electricity, water and drain 1. Connect Connect drain hose The drain hose runs to an inlet plug on the ink unit’s water trap. Connection pipe Clamp Note:! The hose must be fastened on a level with the underside of the sink unit. Cut the drain hose adapter to the appropriate size for connection to the undersink drain or garbage disposer.
- Page 43 Step 5. Checking dishwasher function and fit Test the dishwasher with the rinse program. Check that the dishwasher takes in water and drains. Also check that none of the connections leak. Also check that adjacent drawers and cupboards can be opened when the dishwasher door is open.
- Page 44 Step 6. Securing the dishwasher 1. Pull out the upper basket, and the centre basket if present, and turn the basket stop on the run ner outwards. 2. Remove the upper basket, and the centre basket if present, by pulling the basket(s) out as far as possible.
- Page 45 Securing the dishwasher 5. Cover the screw holes on the sides with the supplied plastic plugs. Push in the plugs diago nally to fit them in place. 6. Check that the dishwasher’s two front steel feet are solidly placed on the floor, that is, the dishwasher is not hanging in the air.
- Page 46 Securing the dishwasher Also adjust the rear foot if necessary so that the dishwasher is level. 7. Tighten the lock nuts on the front feet with 16mm openended wrench.
- Page 47 Step 7. Attaching the toe kick (if applicable) When fitting the kickboard, choose a size best suited to the installation. Start by testing the high kickboard. If the dishwasher door hits the kickboard when opened, change to the lower kickboard. For installations with a worktop height of 900 mm, the higher kickboard is recommended.
- Page 48 Attaching the toe kick (if applicable) 4. Lock the holders in place by pushing each catch into a suitable notch in the holder. 5. Hang the toe kick on the holders. 6. Check that the toe kick is in line with the sur rounding kitchen kick, that is, at the same depth.
- Page 49 Step 8. Status Light adjustment...
-
Page 50: Service & Guarantee
Service & guarantee Service Guarantee Before calling for service, check to see whether For guarantee details, see the guarantee card. the faults is due to something that you can rec tify yourself. See Trouble shooting. -
Page 51: Own Comments
Own comments... -
Page 52: Quick Guide
Quick Guide 1. Loading baskets Scrape off large food particleas before loading the machine. 2. Dispensing dishwasher detergent The detergent compartment has a small compartment for prewash and one for main wash. 3. Ensure that the spray arms can rotate freely 4. Turn on the main switch 5. Select program and press start For washing normally soiled dishes use the Normal wash program with normal temper- and normal drying ature To save more water and energy use economy temperature and economy drying.
Need help?
Do you have a question about the VA6611RT and is the answer not in the manual?
Questions and answers