
Related Manuals for Citizen CMP-40L


Summary of Contents for Citizen CMP-40L
- Page 1 MOBILE THERMAL PRINTER MODEL CMP-40 series User’s Manual V10 CONSUMIBLES S.L. alle Llanos de Jerez 18 Nave 9 Coslada https://v10consumibles.com Tel: 910 269 30...
- Page 2 WEEE MARK If you want to dispose of this product, do not mix it with general household waste. There is a separate collection systems for used electronics products in accordance with legislation under the WEEE Directive (Directive 2002/96/ EC) and is effective only within European Union. Wenn Sie dieses Produkt entsorgen wollen, dann tun Sie dies bitte nicht zusammen mit dem Haushaltsmüll.
- Page 3 Declaration of Conformity This printer conforms to the following Standards: The Low Voltage Directive 2006/95/EC, the EC/R&TTE Directive, the RoHS Directive 2002/95/EC, and the WEEE Directive 2002/96/EC. LVD : EN60950-1 EC/R&TTE: EN55022 Class B EN301 489-1 EN301 489-17 EN300 328 EN55024 FCC Compliance Statement for American Users This equipment has been tested and found to comply with the limits for a Class...
- Page 4 • Reproduction or transfer of part or all of this document in any means is prohibited without permission from CITIZEN SYSTEMS. • Note that CITIZEN SYSTEMS is not responsible for any operation results regardless of missing, error, or misprinting in this manual.
- Page 5 SAFETY PRECAUTIONS What the Icons Mean Precautions and notices necessary to follow for preventing hazards to the user or other person or their properties are defined as shown below. Hazards and degrees of damage that may be caused by ignoring the instructions are categorized as shown below. Please be familiar with the content of these definitions before reading this manual.
- Page 6 Precautions in Handling Printer WARNING z If the product continues to be used when heat or smoke is generated or an abnormal odor is produced, a fire may occur. Immediately turn the printer power off, and carefully but quickly remove the battery, then contact our service agent. z If any foreign matter (metal tip, water, liquid) enters the product, immediately turn the printer power OFF, and carefully but quickly remove the battery, then contact our service agent. Ignoring this instruction may result in a fire.
- Page 7 Precautions on Using Printer WARNING z Do not touch the print head or paper cutter while replacing print paper. Heated print head may cause burn. The cutter may cause injury to the hand. CAUTION z Use of print paper other than specified may result in not only deteriorated print quality but shortened life of print head (printing portion).
- Page 8 Precautions on Using Battery DANGER z Leaked liquid from the battery may result in loss of eyesight if it enters the eye. Immediately wash eyes with fresh water and get medical care. z If liquid from the battery is ingested, immediately seek medical attention.
- Page 9 CAUTION z Do not dip battery in water or sea water. Wet battery may generate heat or may be subject to corrosion. z Do not use or leave battery at high temperature. Using or leaving battery in a place of high temperature may result in liquid leakage, deteriorated performance, or shortened lifetime.
- Page 10 Precautions on Using Thermal Paper CAUTION z Print density may change with different kinds of paper. z Observe the following when using thermal paper. Thermal paper is not resistant to discoloration, deterioration in quality, and thin printing. • Do not leave printed thermal paper exposed to light for a long time.
- Page 11 Precautions on Using Special Serial Cable WARNING z With one side of the connector connected to this product, do not touch the metal part of the other connector. CAUTION z Static electricity may cause breakdown of internal circuit of this product. z Do not leave this product with a cable wound around it for a long time.
-
Page 12: Table Of Contents
THE TABLE OF CONTENTS GENERAL OUTLINE ........... 14 1.1 Unpacking ...............14 1.2 Basic Specifications ............15 1.3 Model Classifications .............17 1.4 Explanation of Printer Parts ...........18 2. OPERATION ............21 2.1 Installing and Using Battery ..........21 2.2 Removing Battery ............22 2.3 Charging the Battery ............23 2.4 Using Battery Charger ...........24 2.5 Using Cigarette Jack Charger ........25 2.6 Installing Belt Clip ............26... - Page 13 Bluetooth-SIG Inc. • Wi-Fi is a registered trademark of Wi-Fi Alliance. CITIZEN is a registered trade mark of Citizen Holdings Co., Japan CITIZEN es una marca registrada de Citizen Holdings Co., Japón Copyright © 2015 by CITIZEN SYSTEMS JAPAN CO., LTD.
-
Page 14: General Outline
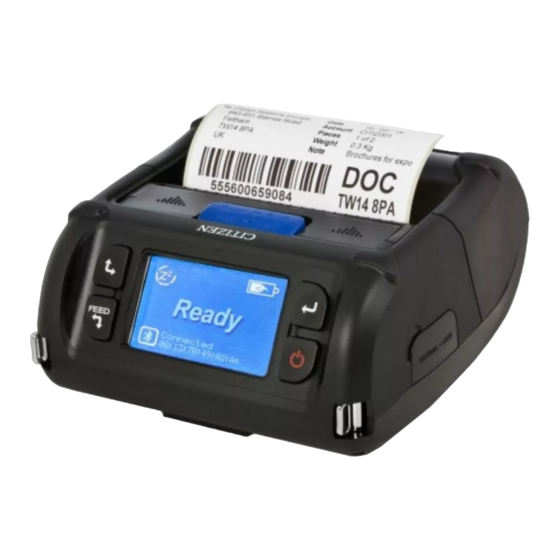
1. GENERAL OUTLINE CMP-40 is a full featured portable line thermal printer, which can be used in a large variety of job environments. Bluetooth/Wi-Fi communication with a PDA or similar device is useful for business activities at the point of sale or service. 1.1 Unpacking Standard Printer... -
Page 15: Basic Specifications
1.2 Basic Specifications Printing Method Direct Thermal Printing Speed 80 mm/sec. Resolution 203 DPI x 203 DPI Character ALPHA NUMERIC Character, Extension Character Barcode One-Dimensional UPCA +2/+5, UPCE +2/+5, EAN8 +2/+5, Barcodes EAN13 +2/+5, EAN 128, Interleaved 2 of 5, Extended Code 39, Codabar (NW7), Code 128, Code 93, PostNet Two-Dimensional... - Page 16 Battery Battery Type Li-ion Output STANDARD : 7.4 V, 2600 mAh/19.24 Wh OPTION : 7.4 V, 5200 mAh/38.48 Wh Charging Time 3.3 Hrs Charging Size W x D x H 166 mm x 174 mm x 82 mm 6.5 inch x 6.8 inch x 3.2 inch Weight 1 kg (With battery) Environment Sealing...
-
Page 17: Model Classifications
1.3 Model Classifications Classified by the following designation. CMP-40BTi U C Emulation (Default) : CPCL : ZPL2 Destination (AC cord) : North Americas : Europe Interface BTi : USB, Serial and Bluetooth (iAP supported) * WF : USB, Serial and WiFi * iAP is necessary to connect to Apple iOS device. NOTE There are no products available for some of the combination of symbols. -
Page 18: Explanation Of Printer Parts
1.4 Explanation of Printer Parts 1.4.1 Printer Appearance Front PEELER WING PEELER BODY COVER OPEN DISPLAY BUTTON USB PORT (Mini B connector) SERIAL PORT Bottom BATTERY BELT CLIP CONNECTOR STRAP RING CHARGER CONNECTOR V10 CONSUMIBLES S.L. alle Llanos de Jerez 18 Nave 9 Coslada https://v10consumibles.com Tel: 910 269 30... - Page 19 1.4.2 Operation Panel Button Name Function Paper can be fed manually by pressing this button. Clears error message. Paper Feed / Moves down through menu options. Down Button During printing multiple sheets, press this button to pause printing. Press the button again to print remaining sheets. Enter Button Selects the highlighted menu option.
- Page 20 1.4.3 Ready Screen (initial screen) Ready Connecting Connected Bluetooth module-embedded model Wi-Fi module-embedded model 1 Indicates that the Power Save mode is on. The circular icon section disappears one by one in a timely manner until it all disappears and the backlight turns off. 2 Indicates that the printer is in Ready mode to send and receive data.
-
Page 21: Operation
2. OPERATION 2.1 Installing and Using Battery Align the battery hooks as shown in the picture. Push the battery into the holder until it locks in place. NOTE You must fully charge the battery when you receive the printer. Batteries can be charged in the printer or in an optional external cradle. V10 CONSUMIBLES S.L. -
Page 22: Removing Battery
2.2 Removing Battery Gently release the battery catch for the battery holder and lift out the battery from the printer. NOTE Lithium Button Cell is equipped on the PCB (Printed Circuit Board). When disposal, the proper separation for Lithium Button Cell is needed. V10 CONSUMIBLES S.L. -
Page 23: Charging The Battery
When the battery cannot be charged properly, the charger indicator blinks green. If this happens, try disconnecting and reconnecting the charger. If charging does not resume, please contact your CITIZEN SYSTEMS dealer. V10 CONSUMIBLES S.L. alle Llanos de Jerez 18 Nave 9 Coslada https://v10consumibles.com Tel: 910 269 30... -
Page 24: Using Battery Charger
2.4 Using Battery Charger Optional Lamp Insert the battery into the battery cradle as shown above. (2) Connect the DC plug to the battery cradle. (3) Plug the AC cord into the electrical outlet. (4) Once the charging is completed, remove the battery from the cradle. -
Page 25: Using Cigarette Jack Charger
2.5 Using Cigarette Jack Charger Optional Connect the vehicle charger to the printer. Input 12 V to 24 V Output 9.5 V / 3 A Plug the vehicle charger to the cigarette socket on your vehicle. V10 CONSUMIBLES S.L. alle Llanos de Jerez 18 Nave 9 Coslada https://v10consumibles.com Tel: 910 269 30... -
Page 26: Installing Belt Clip
2.6 Installing Belt Clip Insert screw into belt clip. (2) Tighten the screw with driver as shown. NOTE Install the belt clip if it is required. V10 CONSUMIBLES S.L. alle Llanos de Jerez 18 Nave 9 Coslada https://v10consumibles.com Tel: 910 269 30... -
Page 27: Installing Interface Cap
2.7 Installing Interface Cap When Interface Cap separated from the printer, try to array the Cap Hook in horizontal direction as shown in the image. (2) Using a sharp tool, insert the Cap Hook to the hole which is located in the right side of Interface Cap. -
Page 28: Setting/Replacing The Paper Roll
2.8 Setting/Replacing the Paper Roll Open the Paper cover by pressing the Open button and set the width of paper guide by turning the knob with finger. (2) Put the stock in so it unrolls from the bottom. Remove the stock core when it is empty. - Page 29 (4) Close the Paper cover with both hands and run the paper line up by pressing the Paper Feed/Down ( ) button. NOTE Use both hands to close the cover properly. CAUTION Use caution when handling the product when the Printer Cover is in an open position.
-
Page 30: Installing/Uninstalling The External Paper Guides
2.9 Installing/Uninstalling the External Paper Guides Uninstall the External Paper Guides Using sharp tool, push External Paper Guides in order to detach from the printer. Press circle on the middle of external paper guide with tool. External Paper Guides (2) The outer cover of External Paper Guides will be separated. V10 CONSUMIBLES S.L. - Page 31 Install the External Paper Guides Assemble two (inner and outer) External Paper Guides as shown in figure and press three points to fix firmly inner guide with outer guide. (2) Two external paper guides will be installed to printer. V10 CONSUMIBLES S.L. alle Llanos de Jerez 18 Nave 9 Coslada https://v10consumibles.com Tel: 910 269 30...
- Page 32 CAUTION When using an external paper supply, set the printer 20 mm higher than the ground. Then insert the paper correctly to the paper slot on the backside of the printer and adjust the paper guide to fit the paper properly. Recommendation Please set apart the printer and paper at least twice of the paper length. 300 mm or more 20 mm or more V10 CONSUMIBLES S.L.
-
Page 33: Peel Mode
2.10 Peel Mode Peel Mode With a roll of stock (2) Push the peeler body until installed, slide the peeler you see two complete body towards the back of triangles. the printer. Press the Paper Feed/Down ( ) button. Non-Peel Mode Pull down the Peeler Wing (2) Press the Paper Feed/Down while pressing the Cover... - Page 34 CAUTION When using the peeler like the images below that has engraved lines on the label (1) and the perforated label (2), it may cause an error in the peeler function. Paper (1) Label Paper Engraved Line Paper (2) Label Paper V10 CONSUMIBLES S.L.
-
Page 35: Strap Installation
2.11 Strap Installation Optional Insert the strap into the (2) Insert the end of the strap hook of the printer. into the buckle. (3) After pulling out the end of the strap tightly, put it into the clip to be fastened. V10 CONSUMIBLES S.L. -
Page 36: Self Test And Hex-Dump Mode
2.12 Self Test and HEX-DUMP mode Self Test Press the Power ( ) button (2) While pressing the Paper for approximately 3 seconds Feed/Down ( ) button, to turn off the printer. press the Power ( ) button and hold both until the beep sounds. - Page 37 The Sample of Self-test Printout When Self-test is implemented, the model name, firmware version, emulation, sensor setting, interface setting, etc. will be printed. NOTE Printed contents may differ depending on the firmware version. V10 CONSUMIBLES S.L. alle Llanos de Jerez 18 Nave 9 Coslada https://v10consumibles.com Tel: 910 269 30...
- Page 38 HEX-DUMP mode Implement the Self-test and print out the information label. (2) Within 3 seconds after the printing completes, briefly press the Paper Feed/Down ( ) button once more to switch to HEX-DUMP mode. If the Paper Feed/Down ( ) button is not pressed within 3 seconds, it will switch to standard mode. (3) In HEX-DUMP mode, data received will be printed in HEX format.
-
Page 39: Wireless Communication
2.13 Wireless Communication Bluetooth Connection Printer can be connected to the PDA and PC which can do Bluetooth communication. (2) Use the Bluetooth function supported by the connecting device to ensure Bluetooth connection. Wi-Fi (802.11b/g/n) Connection The Printer can be connected to devices equipped with Wi-Fi (802.11b/g/n) communication capacity (PDAs, PCs, etc.). -
Page 40: Interface Cable Connection
2.14 Interface Cable Connection Serial Connect the USB or Serial cable to the cable connector on the printer. NOTE Use cable only offered by the printer manufacturer. (2) Connect the interface cable into the USB or Serial port of the device (PDA, PC, etc.). -
Page 41: Printer Settings
3. PRINTER SETTINGS 3.1 How to Use the Menu 3.1.1 Using the Buttons 1 Shows the menu and to select the highlighted option. 2 Moves the Menu screen to the previous screen or moves the cursor to a position where you can change it. 3 Moves the Menu screen to the next screen. - Page 42 3.1.2 Menu operation examples Here we explain how to adjust the display brightness as an example. Press the Enter ( ) button to enter the Menu. Ready (2) Press the Up ( ) or Paper Feed/Down ( ) button to select SETUP. SETUP UTILITIES LANGUAGE...
- Page 43 (5) Press the Up ( ) or Paper Feed/Down ( ) button to select Printer, and press the Enter ( ) button. SETUP Media Sensors Printer (6) Press the Up ( ) or Paper Feed/Down ( ) button to select Backlight Brightness, and press the Enter ( ) button.
- Page 44 Display Guides Possible operations are briefly displayed at the bottom of the screen when the buttons are pressed. Use keys to adjust contrast Displays the operation by pressing the Up ( ) button. Displays the operation by pressing the Paper Feed/Down ( ) button. Displays the operation by pressing the Enter ( ) button. Increasing or decreasing the value Use keys to adjust contrast...
- Page 45 Entering characters and numbers This example describes using the screen of Bluetooth module- embedded model. Local Name Mobile Printer Moves the cursor to right. Displays the next character or number. 3 Confirms entered characters or numbers and returns to the previous screen. V10 CONSUMIBLES S.L. alle Llanos de Jerez 18 Nave 9 Coslada https://v10consumibles.com Tel: 910 269 30...
-
Page 46: Menu Setting Table
3.2 Menu Setting Table This section describes the details on how to set each item. NOTE • The previous screen appears when Exit is selected on each menu. • Settings marked with an asterisk (*) show that they are default or factory settings. - Page 47 Sub Menu Menu items Options Description Printer Backlight 1 to 10 (7 is default.) You can adjust the display brightness. Brightness Menu Password Enabled* You can set a password for this Disabled printer. When “Enabled” is selected, the system will prompt for the password each time you display the SETUP menu.
- Page 48 Sub Menu Menu items Options Description Bluetooth Security Enabled If “Enabled” is selected, printer name Interface Disabled* becomes visible from other Bluetooth devices. If “Disabled” is selected, printer name becomes invisible from other Bluetooth devices. Change PIN code 0000* to 9999 The PIN code can be changed.
- Page 49 Sub Menu Menu items Options Description DHCP DHCP makes it possible to Enabled*/Disabled automatically receive networking information, such as IP address. Power Mode This option sets the power mode. Continuous Awake If you want to save battery Mode*/Power Save consumption, select “Power Save Protocol Protocol”...
- Page 50 When you select this menu by pressing the Enter ( ) button, RAM test process will start immediately. Note: If “RAM test failed” is displayed, please contact your CITIZEN SYSTEMS dealer. About This — You can check the model name of the Printer printer and hardware revision and software version with this menu.
-
Page 51: Using The Web Interface
3.3 Using the Web Interface Each setting can be done on the web browser. (Wi-Fi model only) Boot the web browser. (2) Enter the IP address for the printer into the address input column and press Enter ( ) button (example: http://192.168.100.1/) Confirm the IP address on the Ready screen on the printer. - Page 52 Sub Menu Menu items Options Description When WLAN Security Open You can select a WLAN Security “Adhoc” is Type Type from “Open” and “WEP” . selected for Network Type WEP64 You can select an encryption Connection WEP128 method from “WEP64” and Type “WEP128”...
- Page 53 Sub Menu Menu items Options Description Network DHCP You can set whether to enable or disable the DHCP function. If DHCP is enabled, the IP address of the specified SSID Gateway will be applied. Note: This settting can be set when “Infrastructure”...
-
Page 54: Printer Adjustments
4. PRINTER ADJUSTMENTS 4.1 Setting the Sensor Mode This menu sets sensor according to presently loaded paper stock (Gap, Black Mark). Set the sensor mode according to your supply as follows: Sensor Mode Intended Use Label Gap Use for die cut (no black mark) supplies. Note: If your supply is die cut with black marks, select Black Mark Upper. - Page 55 If you selected any of the four sensor modes, the following screen (e.g. Label Gap) will be displayed. Gap mode Enabled Press any key to exit (4) Press any key to exit the screen. The set value is saved. NOTE Our supplies are usually black mark on the back (non-printing side), so select Black Mark Upper.
-
Page 56: Setting The Stock Sensor
4.2 Setting the Stock Sensor This menu sets sensor level value for each sensor (Gap, Black Mark). Display the SETUP menu. For details, refer to Menu operation examples on page 42. (2) Press the Up ( ) or Paper Feed/Down ( ) button to select the items in the following order. - Page 57 (2) When the following message is displayed, press the Enter ( ) button to continue. Insert Media... OK to calibrate, POWER to abort To cancel the calibration process, press the Power ( ) button. When you press the Enter ( ) button, the information label will start printing.
- Page 58 4.2.2 Testing the Black Mark Lower Mode Cover the lower black mark with a label. (2) When the following message is displayed, press the Enter ( ) button to continue. Insert Media... OK to calibrate, POWER to abort To cancel the calibration process, press the Power ( ) button. When you press the Enter ( ) button, the information label will start printing.
- Page 59 4.2.3 Testing the Black Mark Upper Mode Cover the upper black mark with a label. Black Mark Upper is recommended for use as supply. (2) When the following message is displayed, press the Enter ( ) button to continue. Insert Media... OK to calibrate, POWER to abort To cancel the calibration process, press the Power ( ) button.
-
Page 60: Printer Cleaning
5. PRINTER CLEANING If the interior of the printer is dusty, printing quality can be lowered. In this case, follow the instructions below to clean the printer. 5.1 Print-Head Cleaning Use an applicator swab moistened with an isopropyl alcohol to clean the print-head and remove any dust. -
Page 61: Platen Roller Cleaning
5.2 Platen Roller Cleaning Clean the platen roller with a clean soft cloth moistened with isopropyl alcohol or a cleaning pen. (2) Turn the platen roller with your finger to clean the entire surface. Platen Roller V10 CONSUMIBLES S.L. alle Llanos de Jerez 18 Nave 9 Coslada https://v10consumibles.com Tel: 910 269 30... - Page 62 6-1-12, Tanashi-cho, Nishi-Tokyo-shi Tokyo, 188-8511, Japan Tel: +81 (0) 42 468 4608 Fax: +81 (0) 42 468 4687 http://www.citizen-systems.co.jp CMP-40_UM_100EN September 2015 PMC-1509 V10 CONSUMIBLES S.L. alle Llanos de Jerez 18 Nave 9 Coslada https://v10consumibles.com Tel: 910 269 30...
Need help?
Do you have a question about the CMP-40L and is the answer not in the manual?
Questions and answers