Table of Contents
Advertisement
Advertisement
Table of Contents

Related Manuals for Citizen CMP-25 series


Summary of Contents for Citizen CMP-25 series
- Page 1 MOBILE THERMAL PRINTER MODEL CMP-25 User’s Manual...
- Page 2 WEEE MARK If you want to dispose of this product, do not mix it with general household waste. There is a separate collection systems for used electronics products in accordance with legislation under the WEEE Directive (Directive 2002/96/ EC) and is effective only within European Union. Wenn Sie dieses Produkt entsorgen wollen, dann tun Sie dies bitte nicht zusammen mit dem Haushaltsmüll.
- Page 3 (2011/65/EU) Full text of the EU declaration of conformity is available at the following internet address: http://www.citizen-systems.co.jp/english/support/download/printer/others/eu_doc/ FCC Compliance Statement for American Users This equipment has been tested and found to comply with the limits for a Class B digital device, pursuant to Part 15 of the FCC Rules. These limits are designed to provide reasonable protection against harmful interference in a residential installation.
- Page 4 • Reproduction or transfer of part or all of this document in any means is prohibited without permission from CITIZEN SYSTEMS. • Note that CITIZEN SYSTEMS is not responsible for any operation results regardless of missing, error, or misprinting in this manual.
- Page 5 SAFETY PRECAUTIONS What the Icons Mean Precautions and notices necessary to follow for preventing hazards to the user or other person or their properties are defined as shown below. Hazards and degrees of damage that may be caused by ignoring the instructions are categorized as shown below. Please be familiar with the content of these definitions before reading this manual.
- Page 6 Precautions in Handling Printer WARNING z If the product continues to be used when heat or smoke is generated or an abnormal odor is produced, a fire may occur. Immediately turn the printer power off, and carefully but quickly remove the battery, then contact our service agent. z If any foreign matter (metal tip, water, liquid) enters the product, immediately turn the printer power OFF, and carefully but quickly remove the battery, then contact our service agent. Ignoring this instruction may result in a fire.
- Page 7 Precautions on Using Printer WARNING z Do not touch the print head or paper cutter while replacing print paper. Heated print head may cause burn. The cutter may cause injury to the hand. CAUTION z Use of print paper other than specified may result in not only deteriorated print quality but shortened life of print head (printing portion).
- Page 8 Precautions on Using Battery DANGER z Leaked liquid from the battery may result in loss of eyesight if it enters the eye. Immediately wash eyes with fresh water and get medical care. z If liquid from the battery is ingested, immediately seek medical attention.
- Page 9 CAUTION z Do not dip battery in water or sea water. Wet battery may generate heat or may be subject to corrosion. z Do not use or leave battery at high temperature. Using or leaving battery in a place of high temperature may result in liquid leakage, deteriorated performance, or shortened lifetime.
- Page 10 Precautions on Using Thermal Paper CAUTION z Print density may change with different kind of paper and atmosphere temperature. z Observe the following when using thermal paper. Thermal paper is not resistant to discoloration, deterioration in quality, and thin printing. • Do not leave printed thermal paper exposed to light for a long time.
- Page 11 Precautions on Using Special Serial Cable WARNING z With one side of the connector connected to this product, do not touch the metal part of the other connector. CAUTION z Static electricity may cause breakdown of internal circuit of this product. z Do not leave this product with a cable wound around it for a long time.
-
Page 12: Table Of Contents
THE TABLE OF CONTENTS GENERAL OUTLINE ........... 14 1.1 Unpacking ...............14 1.2 Basic Specifications ............15 1.3 Model Classifications .............17 1.4 Explanation of Printer Parts ...........18 2. OPERATION ............24 2.1 Installing the Battery ............24 2.2 Removing Battery ............25 2.3 Charging the Battery ............26 2.4 Using Cigarette Jack Charger ........27 2.5 Belt Clip Usage ..............28 2.6 Shoulder Strap Installation ..........29... - Page 13 Bluetooth-SIG Inc. • Wi-Fi is a registered trademark of Wi-Fi Alliance. CITIZEN is a registered trademark of Citizen Watch Co., Ltd. CITIZEN est une marque enregistrée de Citizen Watch Co. Ltd. Copyright © 2017 by CITIZEN SYSTEMS JAPAN CO., LTD.
-
Page 14: General Outline
1. GENERAL OUTLINE CMP-25 is a full featured portable line thermal printer, which can be used in a large variety of job environments. Bluetooth/Wi-Fi communication with a PDA or similar device is useful for business activities at the point of sale or service. 1.1 Unpacking Standard Printer... -
Page 15: Basic Specifications
1.2 Basic Specifications Printing Method Direct Thermal Speed 127 mm/sec. Width 48 mm, 384 Dots/line Resolution 203 DPI Dot Pitch 8 Dot/mm, 0.125 Pitch Character FontA to H, FontGS,Resident TTF (Font0), Downloadable TTF Barcode 1D : Code11, ITF , Code39, Planet, EAN-8, UPC-E, Code93, Code128 etc. - Page 16 Size WxDxH (mm) 166 mm x 174 mm x 82 mm WxDxH” 6.5 inch x 6.8 inch x 3.2 inch Weight 590 g (including battery) Environment Sealing IP42 Temperature Operation −10 to 50 °C Storage −20 to 60 °C Humidity Operation 35 to 80% Storage 10 to 90% *1 This does not guarantee printing quality at low temperature.
-
Page 17: Model Classifications
1.3 Model Classifications Classified by the following designation. CMP-25BT U Z L Emulation (Default) : ZPL2 Destination (AC cord) : North Americas and European Interface None : USB and Serial BT : USB, Serial and Bluetooth (iAP supported) * WF : USB, Serial and WiFi * iAP is necessary to connect to Apple iOS device. -
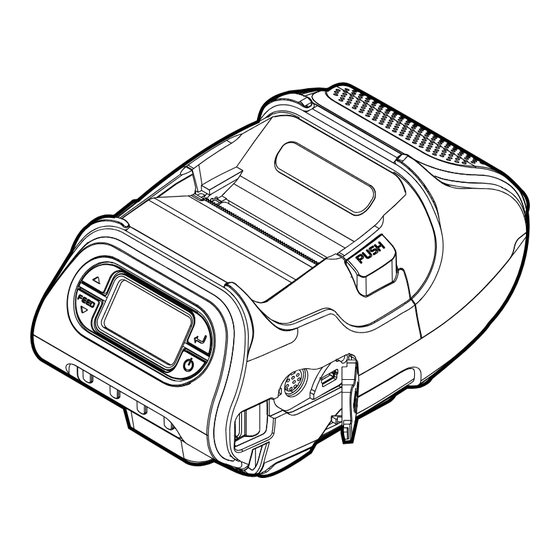
Page 18: Explanation Of Printer Parts
1.4 Explanation of Printer Parts 1.4.1 Printer Appearance Front COVER OPEN BUTTON DISPLAY SERIAL Bottom BATTERY BELT CLIP CONNECTOR CHARGER CONNECTOR SHOULDER STRAP RING... - Page 19 1.4.2 Operation Panel Button Name Function Advances the supply. Clears error message. Moves down through menu options. Paper Feed / 1. Refer to “2-8” for Diagnostic Test information. Down Button 2. Refer to the service manual regarding Hexadecimal Dumping. Enter Button Selects the highlighted menu option.
- Page 20 1.4.3 Ready Screen (initial screen) Printer recognizes Bluetooth module It flashes until connected Printer doesn't recognize Bluetooth Remaining electricity module Connected with of battery access point (Wi-Fi model) Printer recognizes (7.8v above) Wi-Fi module (7.5v above) Not connected (7.2v above) Printer doesn't with access point recognize Wi-Fi module...
- Page 21 1.4.4 Menu operation Here we explain how to adjust the display brightness as an example. Press the Enter ( ) button to enter the Menu. (2) Press the Up ( ) or Paper Feed/Down ( ) button to select Tool Box.
- Page 22 1.4.5 Menu displayed on the LCD / Operation Panel Choices Tool Box (Password1) Diagnostic Printer Test Label Test Print/Grey Scale/ Exit Sensors Black Mark/Peeler/Gap/ Peel Switch/Exit Printhead Head Temp/Exit Battery View Total Print Inch/Service In/ Exit Exit Display Backlight Pixel Exit Keyboard Data Dump...
- Page 23 Choices Tool Box (Password1) Setup Wireless Status Configure IP Address SubnetMask Gateway Power Mode CAM/PSP/Exit SSID Exit Print Info Reset Exit Bluetooth Security Enable/Disable/Exit Change PIN Local Name Address Print Info Exit Exit Service (Password2) Totals View Print Inch/Service In/ Exit Modify Print Inch/Service In/...
-
Page 24: Operation
2. OPERATION 2.1 Installing the Battery Remove the battery. Insert the battery as shown. (2) Replace the battery. NOTE You must fully charge the battery when you receive the printer. Batteries can be charged in the printer or in an optional external cradle. -
Page 25: Removing Battery
2.2 Removing Battery Remove the battery. Lift out the battery. -
Page 26: Charging The Battery
2.3 Charging the Battery Be sure that the printer is turned off. (2) After open the DC JACK cover, insert DC JACK into the printer. (3) Plug the power cord to electrical outlet. The status of lamp in charging Status Charging Charging Completed Charging Lamp... -
Page 27: Using Cigarette Jack Charger
2.4 Using Cigarette Jack Charger Optional Printer Connect the vehicle charger to the printer. Input 12 V to 24 V Output 8.4 V / 0.8 V to 1.2 A Plug the vehicle charger to the cigarette socket on your vehicle. NOTE Connect the vehicle charger to the printer. -
Page 28: Belt Clip Usage
2.5 Belt Clip Usage Insert screw into belt clip. (2) Tighten the screw with driver as shown. NOTE The belt clip is included with the printer but is not required to be used or installed! -
Page 29: Shoulder Strap Installation
2.6 Shoulder Strap Installation Optional Insert the strap into the hook of the printer. (2) Place the end of the strap into the hook of shoulder strap. (3) After pulling out the end of the strap tightly, put it into the clip to be fastened. -
Page 30: Roll Paper Installation
2.7 Roll Paper installation Open the Paper cover by pressing the Open button and set the width of paper guide by turning the knob with finger. (2) Put the stock in so it unrolls from the bottom. Remove the stock core when it is empty. -
Page 31: Diagnostic Test
2.8 Diagnostic Test Turn off the printer. (2) Press and hold the feed button and power button. The information label prints. NOTE 1. For Hex Dump mode, do steps 1 to 2 then press the feed button. 2. After printing ASCII pattern, the diagnostic test is complete. 3. -
Page 32: Interface
3. INTERFACE 3.1 Interface Cable Connection Serial Connect the USB or Serial cable to the cable connector on the printer. NOTE Use only the cables offered by the printer manufacturer. (2) Connect the interface cable into the USB or Serial port of the device (PDA, PC, etc.). -
Page 33: Bluetooth Communication
This product can communicate with other devices via Bluetooth or Wi- Fi communication and cable. 3.2 Bluetooth Communication Optional Printer can be connected to the PDA and PC which can do wireless communication. (2) By using Bluetooth function supported in PC, printer can be connected. -
Page 34: Printer Cleaning
4. PRINTER CLEANING If the interior of the printer is dusty, printing quality can be lowered. In this case, follow the instructions below to clean the printer. 4.1 Printer Head Cleaning Use an applicator swab moistened with an isopropyl alcohol to clean the printer head and remove any dust. -
Page 35: Platen Roller Cleaning
4.2 Platen Roller Cleaning Clean the platen roller with a clean soft cloth moistened with isopropyl alcohol or a cleaning pen. (2) Turn the platen roller with your finger to clean the entire surface. Platen Roller... -
Page 36: Roll Paper
5. ROLL PAPER Core Diameter (A) 12.5 mm +/ 0.5 mm − Roll Max.diameter (B) Max. 56 mm Max.media width (C) 58±0.5 mm Min.media width (C) 12.7 mm Max.media thickness 0.16 mm Min.media thickness 0.06 mm CAUTION Protect the media against sand, grit, and other hard particles during printing and storage. -
Page 37: Label
6. LABEL <-- a --> Media width (liner) Maximum 58±0.5 mm Minimum 8.7±0.5 mm <-- b --> Label length Minimum 12.7 to 300 mm <-- c --> Label gap height Maximum 8.3 mm Minimum 1.8 mm Liner Opacity 50 to 75%... - Page 38 363 Van Ness Way, Suite 404 Torrance, CA 90501. USA Tel: (310) 781-1460 Fax: (310) 781-9152 http://www.citizen-systems.com Otto-Hirsch-Brücken 17 Elizabeth House, 56-60 London Road 70329 Stuttgart Staines-Upon-Thames, TW18 4HF Germany United Kingdom Tel: +49 (0) 711 49032-0 Tel: +44 (0) 20 8893 1900...
Need help?
Do you have a question about the CMP-25 series and is the answer not in the manual?
Questions and answers