Table of Contents
Advertisement
Available languages
Available languages
Quick Links
Advertisement
Chapters
Table of Contents

Related Manuals for Weller WX1012


Summary of Contents for Weller WX1012
- Page 1 WX 1 Betriebsanleitung...
-
Page 2: Table Of Contents
Garantie ..................18 1 Zu dieser Anleitung Wir danken Ihnen für das mit dem Kauf der Weller WX 1 Lötstation erwiesene Vertrauen. Bei der Fertigung wurden strengste Qualitätsanforderungen zugrunde gelegt, die eine einwandfreie Funktion des Gerätes sicherstellen. Diese Anleitung enthält wichtige Informationen, um die Lötstation WX 1 sicher und sachgerecht in Betrieb zu nehmen, zu bedienen, zu warten und einfache Störungen selbst zu beseitigen. -
Page 3: Zu Dieser Anleitung
4-18 WX 1 2 Zu Ihrer Sicherheit Die Lötstation WX 1 wurde entsprechend dem heutigen Stand der Technik und den anerkannten sicherheitstechnischen Regeln hergestellt. Trotzdem besteht die Gefahr von Personen- und Sachschäden, wenn Sie die Sicherheitshinweise im beiliegenden Sicherheitsheft sowie die Warnhinweise in dieser Anleitung nicht beachten. - Page 4 WX 1 5-18 Hinweis An die Lötstation WX 1 können nur WX Lötwerkzeuge mit geeigneten Anschlusssteckern angeschlossen werden. Die an das WX 1 anschließbaren WX Werkzeuge entnehmen Sie bitte der Zubehörliste auf Seite 17. 1. Das Gerät sorgfältig auspacken. 2. Die WX kompatiblen Lötwerkzeuge (Abb. 1) wie folgt anschließen: Das Lötwerkzeug mit Anschlussstecker in die Abb.
-
Page 5: Gerätebeschreibung
Die gewünschte Temperaturtaste 1 oder 2 drücken. Werkzeug regelt auf die gewünschte Temperatur. 5 Gerätebeschreibung Die Weller WX 1 ist eine vielseitig verwendbare Lötstation für professionelle Reparaturarbeiten an elektronischen Baugruppen neuester Technologie in der industriellen Fertigungstechnik sowie im Reparatur- und Laborbereich. - Page 6 WX 1 7-18 Technische Daten WX 1 Abmessungen L x B x H (mm): 170 x 151 x 130 L x B x H (inch): 6,69 x 5,94 x 5,12 Gewicht ca. 3,2 kg Netzspannung 230 V, 50 Hz Leistungsaufnahme 200 W Schutzklasse I, Gehäuse antistatisch...
-
Page 7: Geräteübersicht
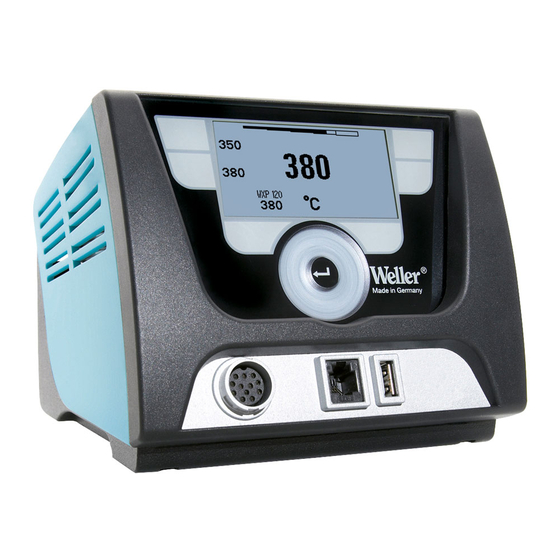
8-18 WX 1 6 Geräteübersicht Bedienungsprinzip Bedien-Taste Bedien-Taste Display Auswahl-Taste (Solltemperatur, verlassen Parametermenü, Parameter Zusatzgerät hinten) Dreh-Klick-Rad Eingabe-Taste (Enter-Taste) USB-Schnittstelle RS232-Schnittstelle Anschlussbuchse für das Lötwerkzeug 10 Auswahl-Taste (Solltemperatur, Parameter Zusatzgerät vorn) 11 Potentialausgleichbuchse 12 RS232-Schnittstelle Abb. 7 13 Netzanschluss 14 Netzsicherung 15 Netzschalter Übersicht Display 16 AUTO-OFF... - Page 8 WX 1 9-18 Tasten Bedienung Funktion Festtemperatur (24/25)* wird als aktive Bedien-Taste 1, 2 Taste 1 oder 2 einmal kurz Solltemperatur (22)* übernommen. drücken - Blättern im Parametermenü − Aktive Solltemperatur wird als Taste 1 oder 2 Festtemperatur unter der gedrückten 3 sec.
- Page 9 Daumenregel: ca. so groß wie das Lötpad. − Sorgen Sie für einen großflächigen Wärmeübergang zwischen Lötspitze und Lötstelle, indem Sie die Lötspitze gut verzinnen. − Schalten Sie bei längeren Arbeitspausen das Lötsystem aus oder verwenden Sie die Weller Funktion zur Temperaturabsenkung bei Nichtgebrauch.
-
Page 10: Parameter Über Parametermenü Einstellen
WX 1 11-18 − Benetzen Sie die Spitze mit Lot, bevor Sie den Lötkolben für längere Zeit ablegen. − Geben Sie das Lot direkt auf die Lötstelle, nicht auf die Lötspitze. − Wechseln Sie die Lötspitzen mit dem dazugehörigen Werkzeug. −... - Page 11 12-18 WX 1 Parameter einstellen Beachten Sie die Übersichtabbildungen (Abb. 7 / Abb. 8, Seite 10). Standby Temperatur einstellen Hinweis Die Lötwerkzeuge haben eine Nutzungserkennung (Sensor) im Griff, welche bei Nichtbenutzung des Lötwerkzeugs den Abkühlvorgang automatisch einleitet. Nähere Informationen zum intelligenten Werkzeug finden Sie in den jeweiligen Betriebsanleitungen.
- Page 12 WX 1 13-18 Automatische Abschaltzeit (AUTO-OFF) einstellen Bei Nichtgebrauch des Lötwerkzeugs wird nach Ablauf der AUTO-OFF Zeit die Heizung des Lötwerkzeuges abgeschaltet. Die Temperaturabschaltung wird unabhängig von der eingestellten Standby-Funktion ausgeführt. Die Isttemperatur wird blinkend angezeigt und dient als Restwärmeanzeige. Im Display erscheint Abb.
- Page 13 14-18 WX 1 Prozessfenster einstellen Der im Prozessfenster eingestellte Temperaturbereich bestimmt das Signalverhalten des potentialfreien Schaltausgangs. 1. Parametermenü aufrufen. 2. Menüpunkt Prozessfenster auswählen und bestätigen. Abb. 23 3. Den gewünschten Temperaturbereich des Prozessfensters mit dem Dreh-Klick-Rad (5) einstellen. 4. Wert mit der Eingabe-Taste (6) bestätigen. Weiteren Einstellparameter im Menü...
- Page 14 WX 1 15-18 Verriegelungsfunktion ein-/ausschalten Nach Einschalten der Verriegelung sind an der Lötstation nur noch die Festtemperatur-Tasten (= Bedien-Tasten 1 und 2) bedienbar. Alle anderen Einstellungen können bis zur Entriegelung nicht mehr verstellt werden. Hinweis Soll es wirklich nur einen Temperaturwert zur Auswahl geben, müssen die Bedien-Tasten 1 und/oder 2 (Festtemperatur-Tasten) auf den gleichen Temperaturwert eingestellt werden.
-
Page 15: Wx 1 Pflegen Und Warten
16-18 WX 1 Bildschirmschoner einstellen 1. Parametermenü aufrufen. 2. Menüpunkt Bildschirmschoner auswählen und bestätigen. 3. Bildschirmschoner mit dem Dreh-Klick-Rad (7) aus- oder einstellen. Abb. 32 4. Wert mit der Eingabe-Taste (6) bestätigen. Abb. 33 Firmware update durchführen 1. WX 1 Lötstation ausschalten. 2. -
Page 16: Fehlermeldungen Und Fehlerbehebung
WX 1 17-18 9 Fehlermeldungen und Fehlerbehebung Meldung/Symptom Mögliche Ursache Maßnahmen zur Abhilfe − Werkzeug wurde nicht − Anschluss des Werkzeugs am Anzeige „- - -“ erkannt Gerät überprüfen − Werkzeug defekt − Angeschlossenes Werkzeug überprüfen − Keine Netzspannung − Netzschalter einschalten Keine Displayfunktion vorhanden (Display aus) -
Page 17: Garantie
Käufers nach §§ 478, 479 BGB. Aus einer von uns abgegebenen Garantie haften wir nur, wenn die Beschaffenheits- oder Haltbarkeitsgarantie von uns schriftlich und unter Verwendung des Begriffs „Garantie“ abgegeben worden ist. Technische Änderungen vorbehalten! Beachten aktualisierten Betriebsanleitungen unter www.weller-tools.com. - Page 18 WX 1 Operating Instructions...
- Page 19 About these instructions Thank you for placing your trust in our company by purchasing the Weller WX 1 Soldering Station. The device has been manufactured in accordance with the most rigorous quality standards, which ensure that it operates perfectly.
-
Page 20: For Your Safety
WX 1 3-18 2 For your safety The WX 1 Soldering Station repair system has been manufactured in accordance with state-of-the-art technology and acknowledged regulations concerning safety. There is nevertheless the risk of personal injury and damage to property if you fail to observe the safety information set out in the accompanying booklet and the warnings given in these instructions. - Page 21 4-18 WX 1 1. Carefully unpack the device. 2. Connect the WX compatible soldering tools (Fig. 1) as follows: Insert the soldering tool with connector into the connecting socket (9) on the control unit and turn clockwise to lock. Fig. 1 3.
-
Page 22: Device Description
WX 1 5-18 5 Device description The Weller WX 1 is a versatile repair station for professional repair work on state-of-the-art electronic modules in industrial manufacturing, repair workshops and laboratories. The digital control electronics in combination with superior sensor and heat-transfer technology guarantee precise temperature control at the soldering tip. - Page 23 6-18 WX 1 Technical data of WX 1 Dimensions L x W x H (mm): 170 x 151 x 130 L x W x H (inches): 6.69 x 5.94 x 5.12 Weight approx. 3.2 kg Mains supply voltage 230 V, 50 Hz Power consumption 200 W Safety class...
-
Page 24: Operating The Device
WX 1 7-18 6 Operating the device Operating principle Control button Control button Display Selection key (set-point temperature, exit parameter menu, rear auxiliary device parameters) Turn-and-click wheel Enter button USB port RS232 port Receptacle for soldering tool 10 Selection key (set-point temperature, front auxiliary device parameters) 11 Equipotential bonding bush... - Page 25 8-18 WX 1 Keys Operation Function The fixed temperature (24/25)* becomes the Control key 1, 2 Briefly press key 1, or 2 once active set-point temperature (22)*. - Scroll within the Parameter menu − The active set-point temperature is saved as Press and hold down key 1, 2 the fixed temperature under the key being for 3 sec.
- Page 26 − Coat the soldering tip well to ensure efficient heat transfer between the soldering tip and soldering point. − Switch off the system if you do not intend to use the soldering iron for lengthy periods or activate the Weller temperature reduction function.
-
Page 27: Setting Parameters Via The Parameter Menu
10-18 WX 1 − Wet the tip with solder if you do not intend to use the soldering iron for a lengthy period of time. − Apply the solder directly at the soldering point, not on the soldering tip. − Change the soldering tip using an appropriate tool. −... - Page 28 WX 1 11-18 Set parameters Please observe the overview diagrams (Fig. 7 and Fig. 8, page 10). Setting the standby temperature Note The soldering tools have a usage detector (sensor) in the handle which automatically starts the cooling cycle when the soldering tool is not in use.
- Page 29 12-18 WX 1 1. Call up the parameter menu. 2. Select and confirm the menu option AUTO-OFF time. 3. Set the required AUTO-OFF time with the turn-and-click wheel (5). The following AUTO-OFF time settings are possible: − "OFF" = "0 min": AUTO OFF function is deactivated (factory setting) −...
- Page 30 WX 1 13-18 Note On tools with an LED ring light (e.g. WXP 120), the process window defines the illumination characteristics of the LED ring light. − If the LED is continuously illuminated, this means that the preselected temperature has been reached or that the temperature is within the predetermined process window.
- Page 31 14-18 WX 1 Switching touchtones on/off 1. Call up the parameter menu. 2. Select and confirm the menu option Touchtones. 3. Switch touchtones on or off with the turn-and-click wheel (5). 4. Confirm the setting with the Enter key (6). Fig.
-
Page 32: Care And Maintenance Of The Wx 1
WX 1 15-18 Connecting auxiliary devices Please observe the overview diagrams (Fig. 7 and Fig. 8, page 10). Auxiliary devices can be connected either to the port on the front panel (23) and/or to the port on the back (18) of the WX 1 Soldering Station. -
Page 33: Accessories
Use of non- Weller Tools components will void this warranty if a non- Weller Tools component is defective (or is the source of the defect). Weller Tools will repair or replace products found to be defective not caused by a part, component or accessory manufactured by another company, during the warranty period. - Page 34 WX 1 17-18 IN NO EVENT SHALL WELLER TOOLS BE LIABLE FOR INCIDENTAL OR CONSEQUENTIAL DAMAGES. WELLER TOOLS LIABILITY FOR ANY CLAIMS ARISING OUT OF THIS WARRANTY SHALL NOT EXCEED THE PURCHASE PRICE OF THE PRODUCT. THE PERIOD OF ALL IMPLIED WARRANTIES APPLICABLE TO...
- Page 35 WX 1 Manual de uso...
- Page 36 WX 1 3-17 Inhalt Sobre estas instrucciones ............3 Por su propia seguridad ............. 4 Piezas suministradas ..............4 Puesta en servicio del aparato ..........4 Descripción del aparato ............. 6 ...
-
Page 37: Por Su Propia Seguridad
4-17 WX 1 2 Por su propia seguridad La estación de soldar WX 1 ha sido fabricada según los últimos avances tecnológicos y la normativa de seguridad homologada. No obstante, existe riesgo de que se produzcan daños personales o materiales si no se respetan las instrucciones de seguridad que figuran en el folleto de seguridad adjunto, así... - Page 38 WX 1 5-17 1. Desembalar el aparato cuidadosamente. 2. Conectar de la siguiente manera las herramientas compatibles con WX (Fig. 1): Fig. 1 Introducir el conector macho del soldador en el conector hembra (9) de la unidad de control y fijar su posición girándolo ligeramente hacia la derecha.
-
Page 39: Descripción Del Aparato
6-17 WX 1 5 Descripción del aparato La Weller WX 1 es una estación de soldar muy versátil para trabajos de reparación profesionales de componentes electrónicos de última generación, tanto para la fabricación industrial como para el sector de reparación y laboratorio. - Page 40 WX 1 7-17 Datos técnicos WX 1 Dimensiones L x An x Al (mm): 170 x 151 x 130 L x An x Al (pulgadas): 6,69 x 5,94 x 5,12 Peso aproximadamente 3,2 kg Tensión de red 230 V, 50 Hz Consumo de potencia 200 W Clase de protección...
-
Page 41: Manejo Del Aparato
8-17 WX 1 6 Manejo del aparato Manejo Tecla de mando izquierda Tecla de mando izquierda Pantalla Selector (temperatura de referencia, salir del menú de parámetros, parámetros equipo adicional trasero) Selector giratorio Tecla Enter Interfaz USB Interface RS232 Conector hembra izquierdo para el soldador 10 Selector (temperatura de referencia, parámetros... - Page 42 WX 1 9-17 Teclas Manejo Función La temperatura fija (24/25)* queda guardada Tecla de mando 1, 2 Pulsar brevemente la tecla 1 ó 2 como temperatura de referencia activa (22)*. - Avanzar/retroceder en el menú de parámetros − La temperatura de referencia activa queda Mantener pulsada la tecla 1 ó...
- Page 43 10-17 WX 1 Ejemplo de manejo 2: Acceso al menú de parámetros y selección del punto de menú 1. Mantener pulsadas al mismo tiempo las teclas 4 y 1 ó 4 y 2. Mientras que el aparato pasa al menú de parámetros aparecerá en la pantalla el siguiente mensaje de texto (véase también la Fig.
-
Page 44: Ajuste De Los Parámetros A Través Del Menú De Parámetros
11-17 − En caso de pausas prolongadas desconectar el equipo y utilizar la función de reducción de la temperatura de la estación Weller. − Aplicar estaño a la punta de soldar antes de depositar el soldador durante un espacio de tiempo prolongado. - Page 45 12-17 WX 1 Ajuste de los parámetros Consulte los componentes del aparato (Fig. 7 y Fig. 8, página 10). Ajuste de la temperatura standby Nota Los soldadores disponen de un detector de uso (sensor) en el mango que en caso de inactividad se encarga de iniciar automáticamente la operación de enfriamiento.
- Page 46 WX 1 13-17 3. Ajustar el tiempo AUTO-OFF deseado mediante el selector giratorio (5). En tiempo AUTO-OFF están disponibles los siguientes ajustes: − "OFF" = "0 min": la función AUTO-OFF está desconectada (configuración de fábrica) − "ON" = "1-999 min": tiempo AUTO-OFF, ajustable individualmente.
- Page 47 14-17 WX 1 Seleccionar otro parámetro ajustable en el menú o salir del menú de parámetros pulsando la tecla (4). Nota En soldadores con iluminación LED (p. ej. WXP 120) el margen de proceso determina el comportamiento de la iluminación LED. −...
- Page 48 WX 1 15-17 Desbloqueo de la estación de soldar 1. Acceder al menú de parámetros. Si el bloqueo está activado se abrirá automáticamente el punto del menú Contraseña. En la pantalla aparecerán tres asteriscos (***). Fig. 28 2. Introducir el código de bloqueo mediante el selector giratorio (5). 3.
-
Page 49: Cuidado Y Mantenimiento De La Estación Wx 1
16-17 WX 1 Conexión de equipos adicionales Consulte los componentes del aparato (Fig. 7 y Fig. 8, página 10). Los equipos adicionales se pueden conectar en la interfaz de la parte delantera (23) y/o en la interfaz de la parte trasera (18) de la estación de soldar WX 1. -
Page 50: Accesorios
Únicamente nos responsabilizamos de los derechos de garantía cuando la garantía de compra y vida útil del aparato haya sido entregada por nosotros por escrito y utilizando el término "Garantía". ¡Reservado el derecho a realizar modificaciones técnicas! Encontrará los manuales de instrucciones actualizados en www.weller-tools.com. - Page 51 WX 1 Alternative configurations Alternative configurations T 005 87 647 10 T 005 87 647 12 T 005 87 647 12 T 005 87 647 10 T 005 87 647 12 T 005 87 647 10 T 005 87 647 12 T 005 87 647 10 T 005 87 647 11 T 005 87 647 10...
- Page 52 WX 1 Exploded Drawing Exploded-view diagram Note Components must be fitted and replaced by the authorised Repair Service, otherwise the warranty will be void.
- Page 53 G E R M A N Y G R E A T B R I T A I N F R A N C E Weller Tools GmbH Apex Tool UK Limited Apex Tool Group S.A.S. Carl-Benz-Str. 2 Floor Pennine House...
Need help?
Do you have a question about the WX1012 and is the answer not in the manual?
Questions and answers