Table of Contents
Advertisement
Quick Links
Advertisement
Table of Contents

Related Manuals for Hach BioTector B3500dw


Summary of Contents for Hach BioTector B3500dw
- Page 1 Catalog Number: 10-MAT-1152 BioTector B3500dw Online TOC Analyzer USER MANUAL October 2017, Edition 1 BS5AX 2.11a Original Instructions in English © Copyright BioTector 2017. All rights reserved. Printed by BioTector. Printed in the Republic of Ireland.
-
Page 2: Table Of Contents
Table of Contents SECTION 1 SAFETY PRECAUTIONS ................5 ............5 NFORMATION AND AFETY IGNS USED IN THE ANUAL ............ 6 RECAUTIONARY ABELS TTACHED TO THE NSTRUMENT ............7 ERTIFICATION ARKS TTACHED TO THE NSTRUMENT ................8 OTENTIAL YSTEM AFETY AZARDS 1.4.1 Ozone and Toxicity .........................9... - Page 3 4.2.4.3 VOC (POC) Analysis ......................... 47 SECTION 5 INSTALLATION ..................48 ..................48 ASIC YSTEM EQUIREMENTS ..................49 NPACKING AND NSTALLATION 5.2.1 Analyzer Dimensions and Mounting .................... 50 5.2.2 Wiring Power and Signal Terminals .................... 52 5.2.3 Wiring External Power Disconnection Switches ................54 5.2.4 System Fuse Specifications ......................
- Page 4 8.3.5.1 System Outputs ..........................122 8.3.5.2 Programmable Outputs ........................124 8.3.6 Reaction Check ......................... 125 8.3.7 Result Integration ........................126 8.3.8 Fault Setup ..........................127 8.3.9 Fault Status ..........................130 8.3.10 Analyzer ........................131 8.3.11 Cooler Program ........................132 8.3.12 Ozone Destructor Program ....................
-
Page 5: Safety Precautions
Section 1 Safety Precautions Please read this manual before unpacking, setting up, or operating the BioTector. BioTector should only be used by qualified trained staff and for the purpose it is intended for. Do not use or install this equipment in any way other than the methods specified in this manual. The procedures and methods described in this manual are based on assuming the user have basic, fundamental background on electronics, chemistry and analyzer equipment. -
Page 6: Precautionary Labels Attached To The Instrument
Precautionary Labels Attached to the Instrument The labels and tags attached to the instrument are summarized below. Please read all labels and tags attached to the instrument. If not observed, personal injury or damage to the instrument could occur. This symbol, when displayed on the instrument, indicates that the user must gather the necessary operation and/or safety information given in the instruction manual. -
Page 7: Certification Marks Attached To The Instrument
Electrical equipment marked with this symbol may not be disposed of in European domestic or public disposal systems. Return old or end-of-life equipment to the manufacturer for disposal at no charge to the user. Certification Marks Attached to the Instrument The standard certification marks attached to the instrument and their meanings are summarized below. -
Page 8: Potential System Safety Hazards
Potential System Safety Hazards The potential safety hazards, which are associated with a running BioTector system, are as follows: • Electrical hazards • Potentially hazardous chemicals • Oxygen gas and components generating Ozone gas Maintenance and operation should not be carried out unless personnel have been fully trained in the operation of the BioTector. -
Page 9: Ozone And Toxicity
Ozone and Toxicity 1.4.1 Ozone is found in gaseous form as a natural ingredient of the earth's atmosphere. Some of the chemical and physical properties of ozone are as follows: Terms Properties of Ozone (O Molecule Weight 47.9982 g/g-mol -119 0.3 °C Boiling Point -192.7 ... -
Page 10: General Safety Precautions
General Safety Precautions Please pay attention to all caution, warning and danger statements at all times. Non-observance of the safety instructions can result in serious personal injury, death or damage to the equipment. Therefore observe the following: ▪ Only engineers trained by the manufacturer should carry out maintenance on the BioTector. ▪... -
Page 11: Electrical And Burn Precautions
1.5.1 Electrical and Burn Precautions BioTector contains electrical components operating under high voltages. Contact may result in electric shock and severe or fatal injury. DANGER During system installation, maintenance or servicing: • Isolate the system power lines before starting any work in the electronic enclosure. •... -
Page 12: Carrier Gas And Exhaust Gas Precautions
1.5.2 Carrier Gas and Exhaust Gas Precautions BioTector uses oxygen (O ) gas as the carrier gas during its operation. The oxygen gas must be free of carbon dioxide (CO ) and nitrogen (N ) gases. The average rate of oxygen consumption in BioTector is 29 l/h (483 ml/min). -
Page 13: Chemical Precautions
1.5.3 Chemical Precautions A number of chemicals and compounds to be used with BioTector are listed in Section 6 Reagents and Calibration Standards. Some of these compounds are harmful, corrosive, acidic and oxidizing. Appropriate precautions must be taken when handling these chemicals or solutions prepared from these chemicals. -
Page 14: Sample Stream Precautions
1.5.4 Sample Stream Precautions The user is responsible to establish the potential hazard associated with each sample stream. Necessary precautions must be taken, to avoid physical contact with any harmful sample stream, which may contain chemical or biological hazards. System components and their composition, which come in contact with the sample liquid and possible volatile gases from the sample, are tabulated in table 1 below. -
Page 15: Précautions Relatives Aux Échantillons
1.5.4 Précautions relatives aux échantillons L’usager assume la responsabilité d’établir le danger possible que représente chaque échantillon. Il est essentiel de prendre les précautions voulues afin d’éviter le contact physique avec tout échantillon nocif qui pourrait présenter un danger chimique ou biologique. Le tableau 1 ci-dessous présente les composants de l’analyseur (et leur composition) qui entrent en contact avec l’échantillon liquide et les éventuels gaz volatiles émanant de l’échantillon. -
Page 16: Operator's Manual
Operator’s Manual Section 2 2.1 Software Screens and Software Menu Diagram The BioTector is equipped with a built-in microprocessor, which has been programmed to enable the user to control the instrument using just six buttons of its membrane keypad. By pressing the appropriate button, the user can move through the various levels of the software menu. - Page 17 Software Menu Diagram Page 17...
-
Page 18: Startup State
2.1.1 Startup State When the BioTector is powered up, its LCD screen will automatically display the Analysis Data screen after a delay of 60 seconds. By pressing the ESCAPE key the user moves from the Analysis Data screen to the Analysis Graph screen. Pressing the ENTER key on the Analysis Graph screens brings the user back to the Analysis Data screen. -
Page 19: Analysis Data Screen
2.1.3 Analysis Data Screen B I O T E C T O R R U N N I N G 0 9 : 1 7 : 2 8 1 2 - 0 9 - 0 2 0 9 : 1 3 : 0 2 1 2 - 0 9 - 0 2 R E A C T I O N S T A R T... -
Page 20: Analysis Graph Screen
2.1.4 Analysis Graph Screen 1 0 1 . 5 [ k P a ] 0 9 : 1 7 : 2 8 1 2 - 0 9 - 0 2 T I C m g u 1 2 . 4 9 5 6 C O 2 T O C m g u 1 5 6 . -
Page 21: Select Level Menu
2.1.6 Select Level Menu S E L E C T L E V E L 0 9 : 1 7 : 2 8 1 2 - 0 9 - 0 2 1 < O P E R A T I O N C A L I B R A T I O N M A I N T E N A N C E The Select Level screen allows the user to access the operation, calibration and maintenance menus. -
Page 22: Operation Menu
Operation Menu Operation Menu Diagram Operation menu allows the user to start and stop the analyzer. Menus related to system operation are also accessed using this menu. 2.2.1 Start Stop The user can Start or Stop the BioTector using the Start Stop menu. 1. - Page 23 2. Start. This function starts the BioTector. When BioTector is started, the multi-stream operation sequence (if programmed) is reset. BioTector performs Ozone Purge, Pressure/Flow Test, Reactor Purge and Analyzer Purge sequences automatically before starting its analysis. • Ozone Purge sequence purges any residual ozone through the ozone destructor. •...
-
Page 24: Reagents Setup
2.2.2 Reagents Setup This menu allows the user to access the Reagent menus. 1. Install New Reagents. Menu used to install and prime the reagents in the BioTector. Any “85_Reagents Low” and “20_No Reagents” warnings and notifications can also be reset in this menu. 2. -
Page 25: Purge Reagents & Zero
When all or the necessary reagents have been confirmed to be connected and reset in this menu, and when Start New Reagent Cycle is selected, the Install New Reagents cycle will be executed. It is the responsibility of the user to make sure that all reagent volumes are programmed correctly in Reagents Monitor menu, the reset of the reagents monitoring are carried out correctly in Install New Reagents menu and finally if necessary the Zero Calibration cycle is activated either with the Start New Reagent Cycle function in Install New Reagents menu or with the Run Zero Calibration function in Zero Calibration menu. -
Page 26: Manual Program Menu
2.2.4 Manual Program Menu M A N U A L P R O G R A M 0 9 : 1 7 : 2 8 1 2 - 0 9 - 0 2 1 < R U N A F T E R N E X T R E A C T I O N R U N... -
Page 27: Reaction Archive Screen
2.2.5 Reaction Archive Screen The Reaction Archive holds information on TIC, TOC, TC, VOC (in mgC/l), COD, BOD (in mgO/l), Drinking Water parameters (REMOVAL in %, and RESULT in FAIL/PASS condition), stream valve, reaction range, start time and related analysis information for the last 9999 reactions. If the archive is full, then every new reaction overwrites the oldest one in the archive. -
Page 28: Time & Date Menu
2.2.7 Time & Date Menu This menu allows the system time and date to be set by the user. To change the system time or date (hours, minutes, seconds, day, month and year), press the ENTER key, enter the new time and date and press the ENTER key again. -
Page 29: Calibration Menu
Calibration Menu Calibration menu allows the user to calibrate the analyzer. Zero and Span Calibration menus allow the user to run the zero and span calibration cycles for a single range or for all system ranges available. Calibration Menu Diagram ENTER PASSWORD CALIBRATION ZERO CALIBRATION... - Page 30 1. The Zero Adjust settings for each range are updated automatically by the system using the un- calibrated TOC measurement (not the results seen on the LCD screen). If a Zero Check is used to check the zero offset, the suggested values are shown in brackets “[ ]” next to the actual Zero Adjust settings.
-
Page 31: Span Calibration
2.3.2 Span Calibration S P A N C A L I B R A T I O N 0 9 : 1 7 : 2 8 1 2 - 0 9 - 0 2 1 < T O C S P A N A D J U S T 1 . - Page 32 4.-6. TIC Span Adjust. This menu item allows the user to set the TIC span adjust factors manually for each range as described for TOC Span Adjust above. 10. Run Span Calibration. This function starts the Span Calibration cycle. The span calibration reactions are run at a single range programmed by the RANGE in this menu below.
- Page 33 20. TC Cal Std. In VOC systems, the sum of the TIC and TOC Calibration Standard solution is displayed as TC Calibration Standard. When TOC Calibration Standard is programmed as 0.0mgC/l, and when a concentration of TIC Calibration Standard is programmed above, BioTector displays the TC Calibration Standard as 0.0mgC/l on purpose.
-
Page 34: Technical Specifications
Section 3 Technical Specifications TYPICAL TECHNICAL DATA Enclosure: Fiberglass Reinforced Polyester Dimensions (HxWxD): 750mm x 500mm x 320mm Enclosure height may increase to 1000mm, depending on system optional features. Weight: Typically 46 kg Power Consumption: 100 W (VA) Mains Connection: 115V AC, 60Hz or 230V AC, 50Hz (10%) Other power options are available on request. - Page 35 CONSUMABLES Typical Replacement Frequency & Consumption Acid & Base: 26-33 weeks/19 Liters (based on standard range and 6 minute analysis cycle) Instrument Air: 1.5 bar, - 20°C dew point (free of water, oil and dust) Average consumption is less than 5.4 m /hour.
-
Page 36: Introduction
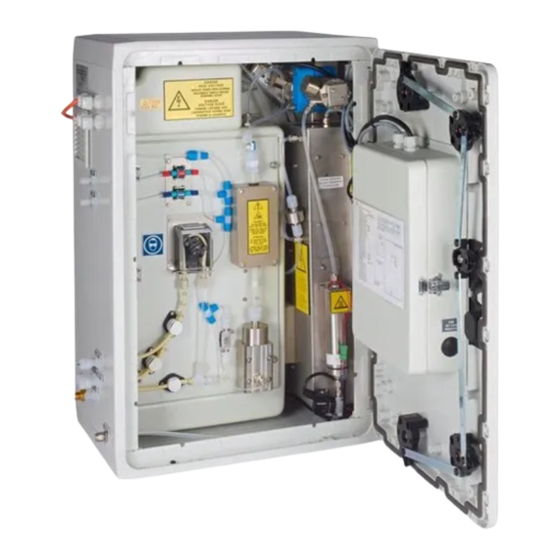
Section 4 Introduction BioTector Major Components 4.1.1 Analysis Enclosure Figure 1, figure 2 and table 2 below shows the typical major analysis enclosure components of BioTector TOC Analyzer. Figure 1 BioTector analysis enclosure major components (typical TIC & TOC system) Page 36... - Page 37 Figure 2 BioTector oxygen concentrator enclosure major components Page 37...
- Page 38 Table 2 BioTector major components Power and Input/Output Board NDIR CO Analyzer Ferrite Acid Pump, P3 Base Pump, P4 Ozone Line Filter Main Power Switch Cooler Ozone Generator Sample Pump, P1 Sample Sensor Reactor Valve, MV3 Manual Grab Sample/Calibration Valve, MV5 or Multi-stream Valve, MV6 Mixer Reactor Ozone Destructor Sample Valve, MV4...
-
Page 39: Motherboard Enclosure
4.1.2 Motherboard Enclosure Figure 3 and table 3 below shows the BioTector motherboard enclosure components. Figure 3 BioTector motherboard enclosure components Page 39... - Page 40 Table 3 BioTector motherboard components Motherboard Battery (Varta, CR2430, Lithium, 3V, 285mAh) Hazardous area analyzers may have a special battery. Contact manufacturer for details. Processor Board MMC/SD Flash Memory Card Slot and Memory Card Page 40...
-
Page 41: Biotector Operation
BioTector Operation Detailed information on the system operation is available, in presentation and video formats, in the MMC/SD card shipped with the BioTector. It is recommended to review these files to understand the system operation. The BioTector is designed to provide continuous online single-component (e.g. TOC) or multi-component (e.g. -
Page 42: Biotector Sample Injection
4.2.2 BioTector Sample Injection The BioTector analyzes a precise volume of liquid. The Sample Pump injects a pre-programmed number of pulses (half revolutions of pump) of liquid into the reactor for each measurement and therefore the volume of liquid included in each pulse is consistent. Sample is initially drawn from the source by a peristaltic Sample Pump. - Page 43 Figure 4 BioTector analysis layout (typical TIC & TOC system) Page 43...
-
Page 44: Biotector Oxygen Concentrator
4.2.3 BioTector Oxygen Concentrator The operation of BioTector oxygen concentrator is based on the crystalline zeolite molecular sieves, which permits the separation of oxygen gas from the mixture of gases that comprise air. As air flows through a column or bed of molecular sieve, the component gases it contains are adsorbed and stratified in the order of their relative affinity to the molecular sieve material. - Page 45 Figure 6 BioTector oxygen concentrator layout Page 45...
-
Page 46: Biotector Analysis Types
4.2.4 BioTector Analysis Types BioTector TOC analyzer has four factory calibrated analysis types: 1. TIC & TOC (NPOC) Analysis: Total Inorganic Carbon & Total Organic Carbon (Non-Purgeable Organic Carbon) Analysis 2. TC Analysis: Total Carbon Analysis 3. VOC (POC) Analysis: Volatile (Purgeable) Organic Carbon Analysis 4.2.4.1 TIC &... -
Page 47: Voc (Poc) Analysis
4.2.4.3 VOC (POC) Analysis BioTector Volatile Organic Carbon (VOC) analysis type is a combination of TC analysis followed by a TIC & TOC (NPOC) analysis. The VOC result obtained from the VOC analysis type represents the Purgeable Organic Carbon (POC) content of the sample. When both TC and TIC & TOC analysis are complete, the flowing data is available: •... -
Page 48: Installation
Section 5 Installation Basic System Requirements Power and Signal Requirements • Mains Connection: 115V AC, 60Hz or 230V AC, 50Hz (10%) • Mains Wire Specification: Number of Cores = 3 Current Rating minimum = 10 Amps CSA (Cross Sectional Area minimum) = 1.50mm •... -
Page 49: Unpacking And Installation
Unpacking and Installation The BioTector analyzer weighs typically 46kg (101 lb). Therefore, appropriate means should be used for transporting, un-packing, lifting and installing the BioTector. Caution The BioTector analyzer is shipped ready to be installed, with a kit of parts including sample tubes, reagent tubes and a selection of spare parts, spare fuses and ferrules. -
Page 50: Analyzer Dimensions And Mounting
5.2.1 Analyzer Dimensions and Mounting The BioTector TOC analyzer enclosure is a Fiberglass Reinforced Polyester (FRP) cabinet. This enclosure facilitates easy access to all components and thus eases the service and maintenance procedures. Figure 7 and table 4 below gives the dimensions of various BioTector enclosures. Figure 7 BioTector Dimensions Table 4 BioTector Dimensions Dimension A... - Page 51 Figure 8 below illustrates the BioTector door clearance dimensions. Figure 8 BioTector Door Clearance Dimensions • It is recommended that a clear space of at least 300mm is allowed around the analyzer from the right and the left sides and from the top and the bottom. The recommended clear space in the front of the analyzer is 1500mm for easy access to the system.
-
Page 52: Wiring Power And Signal Terminals
5.2.2 Wiring Power and Signal Terminals BioTector contains electrical components operating under high voltages. Contact may result in electric shock and severe or fatal injury. DANGER The equipment is for permanent connection to the mains only. (Plug and socket should not be used.) Caution Figure 9 below show the typical mains (for both 230 and 115 Volts systems) and the 4-20mA signal connections in BioTector. - Page 53 Figure 9 Mains and 4-20mA terminal diagram for 115 / 230 V systems All electrical, sample, reagent, drain and exhaust connections should be carried out in accordance with the technical specifications and drawings given in this manual. Errors as a result of non-conformity to these specifications will not be covered by the warranty.
-
Page 54: Wiring External Power Disconnection Switches
5.2.3 Wiring External Power Disconnection Switches The mains power must be connected through one or more external 2-pole disconnection switches, so that the power to the BioTector and/or to the optional air compressor can be isolated without opening the electronics enclosure. - Page 55 When the wiring of the system is completed, the power up of the system should be carried out in the order below: While the external disconnection switches are powered off, power on the internal Main Power Switch in the BioTector. Close the BioTector electronics enclosure.
-
Page 56: System Fuse Specifications
5.2.4 System Fuse Specifications Table 5 below summarizes the location and specification of the fuses used in BioTector. The fuse values tabulated below can be changed depending on system selected options. The locations of the fuses are also displayed in figure 9 above. BioTector contains electrical components operating under high voltages. -
Page 57: Air Supply And Reagent Connections
Air Supply and Reagent Connections The orientation of the ferrules inside each fitting of BioTector is critical for the correct operation of the system. Incorrect ferrule orientation may create gas/liquid leak and/or introduce air bubbles into the system lines. Therefore, the ferrules on all carrier gas, reagents, drain, exhaust and vent fittings have to be fitted with the correct orientation. -
Page 58: Air Supply Connection
5.3.1 Air Supply Connection The recommended air quality for BioTector is -20°C dew point, free of water, oil and dust. A filter pack may be required to meet or exceed the air quality specification. BioTector Air Compressor can be supplied by BioTector distributors as an option. -
Page 59: Reagent Connections
5.3.2 Reagent Connections Special precautions are needed when working with chemical reagents, both when renewing reagents and when dealing with leaks or spills. Some reagents can cause chemical burns and may cause injury or death if swallowed. Please refer to the symbols and codes on the reagent containers. DANGER Use of 20 or 25 liter containers is recommended for each BioTector reagents. - Page 60 As can be seen in the figure 13 above, base (Sodium Hydroxide) reagent container does not contain any vent (breathing) hole. The breathing air into the base container is supplied through the CO filter, which must be fitted on the base container lid. Figure 14 below shows the detailed connections on BioTector base reagent.
-
Page 61: Sample, Drain And Exhaust Connections
Sample, Drain and Exhaust Connections 5.4.1 Sample Inlet Tube Position For the fittings to remain leak proof, they must be kept clean and should not be over tightened. Over tightening of the fittings will damage them and cause eventual leakage. Caution BioTector operates on unfiltered samples, the setup of the sampling point is important for the correct operation of the system. - Page 62 Page 62...
-
Page 63: Drain And Exhaust Connections
5.4.2 Drain and Exhaust Connections The BioTector should be installed in a well-ventilated area with the exhaust port piped to an external vent. The installation should be carried out in accordance with Section 1 Safety Precautions. WARNING All BioTector drain tubing must be positioned correctly so that any liquid pumped will drip freely into a larger drain chamber. -
Page 64: Reagents And Calibration Standards
Section 6 Reagents and Calibration Standards Reagents BioTector TOC analyzer uses the following reagents: I. Acid: 6.0 N Sulfuric Acid (H ) Reagent containing 350 mg/l Manganese Sulfate Monohydrate II. Base: 4.0 N Sodium Hydroxide (NaOH) Reagent Reagents should not contain high levels of organics, nitrates and phosphates. Ideally, the level of organics, nitrates and phosphates should be less than 100 g/l (ppb) in the deionized water used to prepare TOC analyzer reagents. -
Page 65: Calibration Standards
Calibration Standards All hygroscopic chemicals in crystal form should be dried in an oven set at 105°C for 3 hours to remove any traces of absorbed water. All prepared solutions must be mixed thoroughly with a magnetic stirrer or inverted manually at least ten times or until all crystals are completely dissolved inside the solution. - Page 66 The calculation of the quantities required to prepare Potassium Hydrogen Phthalate (KHP) standard solutions with various purities are given as an example below: Name: Potassium Hydrogen Phthalate Formula: Carbon, 12 Oxygen, 16 Potassium, 39 x 1 Hydrogen, 1 5____________ Total weight 204.22 g/mol 47% of KHP is Carbon.
- Page 67 Preparation of Calibration Standard Solutions: Use eye protection and gloves. Standards solutions greater than 1000mg/l can be prepared directly without any dilution by simply mixing the necessary quantity solvent or salt with deionized water. Standard solutions below 1000mg/l concentration should be prepared by dilution technique. First a 1000mg/l standard stock solution should be prepared, and then the required lower concentration standard solution should be prepared by applying the necessary dilution procedures: ➢...
-
Page 68: Analyzer Commissioning And Startup
Section 7 Analyzer Commissioning and Startup The check list below must be used to ensure that the installation has been properly carried out. Please proceed through the check list in the given order, completing the 5 sections below. Detailed commissioning and startup procedures are available in a presentation format in the MMC/SD card shipped with the BioTector. - Page 69 In BioTectors built with a vortex cooler, air should be supplied to the vortex cooler using a regulator, which is dedicated for the vortex cooler only. Connect the EXHAUST port with ¼” PFA tube to a safe and well ventilated area or to open atmosphere.
- Page 70 Confirm that the Sample Valve is working. _____ If installed, confirm that all other valves (e.g. multi-stream valve) are working. _____ Check the air supply pressure. The set point pressure should be 1.5 bar. When the oxygen concentrator is running, the pressure typically cycles from 1.5 bar to 0.9 bar. Check the O2 PRESSURE SENSOR in O2-Controller Status menu.
- Page 71 4. COMMISSIONING MENU SETTINGS: Using the Commissioning menus (see Section COMMISSIONING MENU), follow below procedures to set up the BioTector for specific site requirements: In Reaction Time menu, program the INTERVAL time depending on the required sample analysis _____ frequency. In Sample Pump menu, set the correct Sample Pump FORWARD and REVERSE times.
- Page 72 5. ZERO and SPAN CALIBRATION: Go to Operation, Reagents Setup, Install New Reagents menu, confirm the menu items and select the “START NEW REAGENT CYCLE” function for the BioTector to prime the reagents and set the _____ Zero Adjust (zero offset) values automatically. See Section 2.2.2.1 Install Reagents...
-
Page 73: Maintenance Menu
Section 8 Maintenance Menu Maintenance Menu Diagram Page 73... -
Page 74: Diagnostics Menu
DIAGNOSTICS MENU This group of menu allows the user to access the Process Test, Simulate, Data Output, Input/Output Status and Service menus for diagnostic purposes. Diagnostics Menu Diagram Page 74... -
Page 75: Process Test
8.1.1 Process Test This group of menus allows the user to simulate the Pressure Test, Flow Test, Ozone Test, Sample Pump Test and pH Test routines. In BioTector, when the user enters the Process Test menus, where the oxygen gas flow will be required, the oxygen generator starts to operate automatically. Detailed Process Test procedures are available in the MMC/SD card shipped with the BioTector. -
Page 76: Flow Test
8.1.1.2 Flow Test F L O W T E S T 0 9 : 1 7 : 2 8 1 2 - 0 9 - 0 2 1 < * E X H A U S T T E S T E X H A U S T F L O W S A M P L E... -
Page 77: Ozone Test
8.1.1.3 Ozone Test The ozone test uses the procedure described in information sheet “T020. Procedure to check the ozone level in BioTector System-C (B3500C)”, which is available in the MMC/SD card shipped with the BioTector. The user must read and understand the processes described in this sheet, and have all the correct parts listed before carrying out the test. - Page 78 Ozone Test, Phase 3: O Z O N E T E S T 0 9 : 1 7 : 2 8 1 2 - 0 9 - 0 2 * S T A R T T E S T 2 < S T O P T E S T T I M E...
-
Page 79: Sample Pump Test
8.1.1.4 Sample Pump Test S A M P L E P U M P T E S T 0 9 : 1 7 : 2 8 1 2 - 0 9 - 0 2 V A L V E S T R E A M 2 <... -
Page 80: Ph Test
8.1.1.5 pH Test The user must understand the procedure for testing the pH in the BioTector. Use eye protection and gloves. Have all the relevant parts for this test ready (primarily beaker and pH paper) before carrying out the test. WARNING For the pH test to be accurate, the previous reaction should have finished normally, so that any liquid carried over from that reaction will not affect the pH... - Page 81 3. Start Test. This starts the pH test routine, which goes through the 6 phases described above. 4. Take Sample. Not applicable until the test is running. 5. Continue to next phase. Not applicable until the test is running. 6. Stop Test. When the test is running, activating this control will stop the test. Note that some phases have to be completed before the stop can be used.
- Page 82 pH Test, Phase 3: T E S T 0 9 : 1 7 : 2 8 1 2 - 0 9 - 0 2 1 < R A N G E , V A L V E S T R E A M M O D E T I C + T O C S T A R T...
- Page 83 pH Test, Phase 5: T E S T 0 9 : 1 7 : 2 8 1 2 - 0 9 - 0 2 1 < R A N G E , V A L V E S T R E A M M O D E T I C + T O C S T A R T...
-
Page 84: Simulate
8.1.2 Simulate S I M U L A T E 0 9 : 1 7 : 2 8 1 2 - 0 9 - 0 2 M F C = 1 0 . 0 l / h C O 2 = 3 5 . - Page 85 1. MFC. Use this function to set the MFC (Mass Flow Controller) setpoint. Press the ENTER key, set the required setpoint (e.g. 60 l/h), and press the ENTER key again. The actual flow is shown at the top of the screen.
- Page 86 8. Sample Valve. Use this function to test the Sample Valve. To change the state of the device, press the ENTER key, set the device to ON/OFF, and press the ENTER key again. If the device is on, it will be marked with an “*”.
- Page 87 21. Temp. Switch The Temperature Switch output is automatically controlled by the system depending on the system temperature control setting (System Fan Control), which is programmed as 20°C by default. To test the Temperature Switch, press the ENTER key and select device state option: ON, OFF, AUTO. When the device is on, it will be marked with an “*”.
-
Page 88: Signal Simulate
8.1.3 Signal Simulate S I G N A L S I M U L A T E 0 9 : 1 7 : 2 8 1 2 - 0 9 - 0 2 1 < * C H A N N E L 1 - 4 4 . - Page 89 18. Cal Signal (if configured in the system). Use this function to test the Calibration Signal output. To change the state of the device, press the ENTER key, set the device to ON/OFF, and press the ENTER key again. If the device is on, it will be marked with an “*”. See Section 8.3.5 Output Devices for details.
-
Page 90: Data Output
8.1.4 Data Output D A T A O U T P U T 0 9 : 1 7 : 2 8 1 2 - 0 9 - 0 2 1 < O U T P U T D E V I C E M M C / S D C A R D S E N D... -
Page 91: Send Reaction Archive
8.1.4.1 Send Reaction Archive S E N D R E A C T I O N A R C H I V E 0 9 : 1 7 : 2 8 1 2 - 0 9 - 0 2 1 < S T A R T D A T E 0 1 - 0 9 - 0 2... - Page 92 The meaning of the abbreviations used in the downloaded analysis data in both standard and engineering modes (see Print Mode in Section 8.2.10 Data Program for details) are as follows: Standard mode: TIC & TOC Analysis: TIME The time the reaction started. DATE The date the reaction started.
- Page 93 Engineering mode (VOC Analysis): TIME The time the reaction started. DATE The date the reaction started. S1:2 Reaction type and range. CO2z analyzer zero adjust for the current reaction. TCmgu The un-calibrated TC value in mgC/l (measured value from the TC analysis). TCmgc The calibrated TC value in mgC/l (measured value from the TC analysis).
-
Page 94: Send Fault Archive
8.1.4.2 Send Fault Archive This menu is used to download the fault archive. The communication port parameters used are those set up in the Data Program menu. All items in the fault archive will be downloaded unless the user interrupts the downloading with the Pause Sending or Stop Sending functions. -
Page 95: Input/Output Status
8.1.5 Input/Output Status Input/Output Status menus are used for monitoring the analog and digital inputs and outputs for advanced diagnostics purposes. Digital Input The Digital Input menu allows the engineer to monitor the system digital inputs. This feature is useful for the system trouble-shooting or diagnostics. -
Page 96: Oxygen Controller Status
8.1.6 Oxygen Controller Status O 2 - C T R L S T A T U S 0 9 : 1 7 : 2 8 1 2 - 0 9 - 0 2 1 < I D E N T I F I C A T I O N # c 3 0 0 0 0 1 9 V E R S I O N 0 1 . -
Page 97: Service
8.1.7 Service S E R V I C E 0 9 : 1 7 : 2 8 1 2 - 0 9 - 0 2 1 < R E A C T I O N C O U N T E R 5 2 3 8 S E R V I C E R E Q U I R E D... -
Page 98: Commissioning Menu
COMMISSIONING MENU The Commissioning menus are used during the commissioning and startup of the analyzer. The functions in the menus are used to program system site specific settings. Commissioning Menu Diagram 8.2.1 Reaction Time REACTION TIME 6m09s ▪ REACTION TIME displays the total reaction time (in minutes and seconds) for range 1, based on all programmed settings in System Program, System Program 1 menu. -
Page 99: Sample Pump
8.2.2 Sample Pump SAMPLER FORWARD REVERSE ▪ BioTector Sample Pump runs forward for the FORWARD time to STREAM 1 100s bring a fresh sample from the STREAM, MANUAL and/or STREAM 2 100s CALIBRATION points to the analyzer. This time should be long STREAM 3 enough to guarantee a fresh sample is injected into the reactor ……………………... - Page 100 ▪ VOC CYCLE (1 by default) determines the frequency of the TC VOC CYCLE analysis cycles and the TC TIC & NPOC analysis cycles BioTector carries out depending on the TC CHECK STREAM 1- 3 concentration settings below. In other words, the TIC & NPOC analysis is carried out on a scheduled basis depending on the programmed TC CHECK STREAM 1-3 concentration levels.
-
Page 101: Cod/Bod/Dw Program
8.2.4 COD/BOD/DW Program DISPLAY ▪ DISPLAY function, which is programmed as “NO” by default, allows the user to program COD and BOD results, and DW “Drinking Water” parameters (which are % REMOVAL and PASS/FAIL RESULT). When DISPLAY is programmed as “YES”, the system displays the relevant parameters on screen. -
Page 102: New Reagents Program
▪ If the calculated % REMOVAL value is less than the corresponding expected % level programmed in this menu, BioTector displays FAIL as the RESULT on the Analysis Data Screen and records into the reaction archives. If the calculated % REMOVAL value is greater than the corresponding expected % level programmed in this menu, BioTector displays PASS as the RESULT on the Analysis Data Screen and records into the reaction archives. -
Page 103: Reagents Monitor
8.2.6 Reagents Monitor REAGENTS MONITOR ▪ When REAGENTS MONITOR is activated (YES by default), the system creates a new Reagent Status screen which displays the amount of reagents and the estimated number of days left for each reagent to last. The Reagent Status screen is displayed for a period of 15 minutes and the system automatically reverts back to the default Reaction Result screen. -
Page 104: Autocal Program
8.2.7 Autocal Program TIME 00:00 ▪ TIME (00:00 by default) schedules the Zero & Span Calibration or Check reactions time (in HR:MIN) for the weekdays if any is programmed below. MONDAY CHECK ▪ In this menu, Zero and/or Span Calibration reactions and/or TUESDAY Check reactions are scheduled if programmed on a particular WEDNESDAY... - Page 105 ▪ In CHANNEL 1 STREAM 1 TOC setting, the first parameter CHANNEL 1 STREAM 1 CHANNEL 1 25mgC/l INST defines the type of 4-20mA output which can be programmed as: CHANNEL 2 STREAM 1 STREAM and MANUAL reaction results, CAL (zero & span CHANNEL 2 100mgC/l INST...
-
Page 106: Alarm Program
8.2.9 Alarm Program ALARM 1 STREAM 1 ▪ If ALARM 1-3 is not programmed in Output Devices menu, this 20.0mgC/l option will not be available in this menu. ALARM 2 STREAM 2 ▪ ALARM 1-3 operates on a specific stream and reaction result 10.0mgC/l type. -
Page 107: Data Program
8.2.10 Data Program MMC/SD CARD ▪ This menu allows the user to program the output device communication port configuration profiles for MMC/SD flash card. PRINT MODE ENGINEERING ▪ PRINT MODE specifies the format in which the data will be sent over the communication port to all output devices. -
Page 108: System Configuration Menu
SYSTEM CONFIGURATION MENU System Configuration menus are used to configure the system in the factory. The user should avoid any modifications in these menu settings unless it is absolutely necessary. System Configuration Menu Diagram Page 108... -
Page 109: Analysis Mode
8.3.1 Analysis Mode ANALYSIS TYPE TIC+TOC ▪ ANALYSIS TYPE defines BioTector’s analysis modes, which are TIC+TOC (TIC&TOC), TC and VOC. TIC&TOC and VOC systems can be programmed to run in TIC+TOC, TC and VOC analysis types. If it is necessary to run a TIC&TOC system in any other analysis modes, please contact the distributor or the manufacturer. -
Page 110: System Program
8.3.2 System Program SYSTEM PROGRAM 1 SYSTEM PROGRAM 1 TIC + TOC ▪ SYSTEM PROGRAM 1 TIC + TOC defines the system parameters for Oxidation Phase operation in TIC & TOC analysis mode. In TIC & TOC analysis mode, the TIC and TOC contents of a sample are measured consecutively by means of a single sample injection into a single reactor. - Page 111 ▪ BioTector sparges and measures the TOC content of the sample TOC SPARGE TIME 75s, 20 l/h for the TOC SPARGE TIME (75s by default) with the oxygen flow (20 l/h) settings. ▪ If the TOC level does not drop below the TOC CHECK level (25ppm CO by default in Reaction Check menu) at the end of TOC OXIDATION TIME, BioTector automatically extends this...
- Page 112 SYSTEM PROGRAM 1 TC ▪ SYSTEM PROGRAM 1 TC defines the system parameters for Oxidation Phase operation in TC analysis mode. In TC analysis mode, the TC content of a sample is measured by means of a single sample injection into a single reactor. ▪...
- Page 113 SYSTEM PROGRAM 2 SYSTEM PROGRAM 2 TIC + TOC RANGE CHANGE 1-2 50.0mgC/l ▪ RANGE CHANGE 1-2 defines the concentration levels for the BioTector to change its range automatically from range 1 to range 2. ▪ The RANGE CHANGE 1-2 is typically the top concentration point of TOC RANGE 1 in System Range Data menu by default.
- Page 114 SYSTEM PROGRAM 2 TC SAMPLE IN 5p , P-V ▪ SAMPLE IN defines the amount of sample (in pulses) to be injected into the reactor in TC mode at range 2. ▪ All system parameters for SYSTEM PROGRAM 2 VOC analysis SYSTEM PROGRAM 2 VOC mode are covered in System Program 2 TC and System Program 2 TIC + TOC above.
-
Page 115: Calibration Data
SYSTEM PROGRAM 3 TC SAMPLE IN 5p , P-V ▪ SAMPLE IN defines the amount of sample (in pulses) to be injected into the reactor in TC mode at range 3. TC ACID ▪ TC ACID states the amount of acid (in pulses) to be injected into the reactor for the TC SPARGE phase in TC mode at range 3. -
Page 116: Zero Program
8.3.4.2 Zero Program ZERO PROGRAM ▪ In ZERO PROGRAM 5, 3, 3 setting, the first, second and third inputs define the minimum number of reactions to be carried out at Range 1, Range 2 and Range 3 respectively during the Zero Calibration and Zero Check cycles. - Page 117 ▪ When ZERO WATER (programmed as “NO” by default) is ZERO WATER programmed as “YES”, BioTector takes DI Water from the available system port (which could be the ZERO WATER port or MANUAL/CALIBRATION port, and if these ports are not available SAMPLE 1 port), and uses DI Water as a sample during the Zero Calibration and Zero Check cycles.
-
Page 118: Span Program
8.3.4.3 Span Program ▪ SPAN PROGRAM defines the number of reactions to be carried SPAN PROGRAM out for Span Calibration and Span Check cycles, which are activated by RUN SPAN CALIBRATION/CHECK functions in Span Calibration menu. If the Span Calibration or Span Check is programmed as YES in New Regents Program menu, START NEW REAGENT CYCLE function in Install New Reagents menu will also run the relevant span cycle. - Page 119 ▪ In VOC systems, the sum of the TIC and TOC Calibration TC CAL STD 15.0mgC/l Standard solution is displayed as TC Calibration Standard. When TOC Calibration Standard is programmed as 0.0mgC/l above, and when a concentration of TIC Calibration Standard is programmed above, BioTector displays the TC Calibration Standard as 0.0mgC/l on purpose.
-
Page 120: Reagents Purge
8.3.4.4 Reagents Purge ACID & BASE PURGE 39s , 4 ▪ ACID & BASE PURGE defines the operation time (39 seconds by default) of the acid and base pumps to prime the reagents during the Install New Reagent cycle. The reagent priming and the subsequent reactor purge operation is repeated 4 times by default. - Page 121 ▪ At the end of each reaction during operation, BioTector PRESSURE CHCK FAULT 6.0l/h automatically pressurizes the system with oxygen gas and uses its mass flow controller to detect any gas leak in the system. If the measured flow is less than or equal to the programmed PRESSURE CHECK FAULT flow level (locked to 6.0 l/h by default) during the test, the pressure check passes.
-
Page 122: Output Devices
8.3.5 Output Devices 8.3.5.1 System Outputs POWERED ALL TIME ▪ POWERED ALL TIME parameter specifies if the relays are powered all the time even if the system is stopped or paused with the YES setting, or if the relay is powered only when required with the default NO setting. - Page 123 OUTPUT 1 DEFAULT STATE DEFAULT STATE defines the idle state of the relay. N/D stands for “Normally De- energized” relay by default and N/E stands for “Normally Energized” relay. STOP Output set to operate when the BioTector is stopped condition. Note that remote stand- by is not considered as a stop condition.
-
Page 124: Programmable Outputs
8.3.5.2 Programmable Outputs PWR BRD OUT 1-6 ▪ POWER BOARD OUTPUT1-6 menus typically contain output settings related to external devices. These relay outputs, located on the Power and Input/Output Board, are system optional features. ▪ POWER BOARD OUTPUT1-6 relays can be programmed to a single output function or to multiple output functions as described for OUTPUT 1-6 above. -
Page 125: Reaction Check
8.3.6 Reaction Check CO2 LEVEL 100ppm, AUTO ▪ Due to the organic and inorganic contamination in the BioTector reagents, every TOC/TC reaction will generate a small level of from the reagents alone even if there is no sample present. The first setting (100ppm by default) of CO2 LEVEL specifies the reaction check CO level, which is the minimum expected CO reading in ppm measured by the CO... -
Page 126: Result Integration
8.3.7 Result Integration TOC INTEGRATION ▪ TOC INTEGRATION (3 by default) defines the number of reaction results to be averaged to get the actual TOC result. TOC INT. LIMITS 10% , 0.100 ▪ TOC INTEGRATION LIMITS controls the averaging function defined in TOC INTEGRATION above. -
Page 127: Fault Setup
8.3.8 Fault Setup LOW O2 FLOW TIME ▪ If the O flow drops more than 50% of the MFC set value for longer than the LOW O2 FLOW TIME (12s by default), a “01_LOW O2 FLOW - EX” or “02_LOW O2 FLOW - SO” fault is logged. - Page 128 ▪ OZONE TEST TIME defines the programmed time (18 seconds OZONE TEST TIME by default), which passes the Ozone Test in Process Test, Ozone Test menu. The maximum time the ozone generator remains on during the Ozone Test is 60 seconds. OZONE GEN ALARM 0.50A , 5s ▪...
- Page 129 ▪ COOLER ALARM defines the current (0.1A by default) and the COOLER ALARM 0.10A , 5s time (5 seconds by default) setting for the “107_COOLER FAULT” event. If the current drawn through the Cooler has dropped below 0.1 Amp for longer than 5 seconds, BioTector generates a “107_COOLER FAULT”...
-
Page 130: Fault Status
8.3.9 Fault Status This menu gives a short status history of several system devices before a fault is registered. The default 0.0 values indicate that there are no faults detected for the specific device. O2 FLOW ▪ The O2 FLOW menu consists of 120 entries for the MFC setpoint value (first column) and MFC flow value (second column). -
Page 131: Co 2 Analyzer
8.3.10 Analyzer ANALYSIS GRAPH SCALE 5000ppm ▪ ANALYSIS GRAPH SCALE (5000ppm by default) determines the scale of the y-axis “CO2 analyzer’s ppm-CO2 readings” on the Analysis Graph Screen (see section 2.1.4 Analysis Graph Screen for details). This function allows the system to display CO2 data peaks in optimal resolution on the LCD screen. -
Page 132: Cooler Program
8.3.11 Cooler Program MODE T CONTROL ▪ MODE defines the operation mode of the Cooler. Cooler operates automatically with the default TEMPERATURE CONTROL setting, to achieve the programmed TEMPERATURE DIFFERENCE below. ▪ When MODE is programmed as PWM “PULSE WIDTH MODULATION”, the Cooler operates using the BACKUP PWM DUTY setting below. -
Page 133: Ozone Destructor Program
8.3.12 Ozone Destructor Program ▪ PULSE WIDTH MODULATION defines the standard operation of PWM DUTY the Ozone Destructor Heater. The default 50% settings mean that the Ozone Destructor Heater is on for 50% of the time, which is typically 5 seconds on and 5 seconds off during normal operation. -
Page 134: Software Update
8.3.13 Software Update LOAD FACTORY CONFIG. ▪ Each BioTector system contains a configuration which is installed and protected by system flash memory. When any modification is carried out in system configuration, LOAD FACTORY CONFIGURATION function allows the user to revert back to the original system settings programmed in the factory. -
Page 135: Password
8.3.14 Password ▪ Password menu allows any number from 1 to 9999 to be set as OPERATION 0000 CALIBRATION 0000 passwords for the Operation, Calibration, Diagnostics, DIAGNOSTICS 0000 Commissioning and System Configuration menus (levels). When COMMISSIONING 0000 the setting is 0000 (by default), the password is disabled. SYSTEM CONFIGURATION 0000 ▪... -
Page 136: Troubleshooting Of System Fault, Warning And Notification Events
Section 9 Troubleshooting of System Fault, Warning and Notification Events BioTector Fault Event Explanation and Remedial Action The following fault conditions activate the BioTector stop sequence, set all 4-20mA signals to the FAULT LEVEL (1mA by default) programmed in the 4-20mA Program menu, and activate the FAULT relay. When the system fault is rectified, acknowledge the fault by pressing the ENTER key in the Fault Archive menu. - Page 137 04_REACTION ERROR No TOC (or TC) CO peak detected or Acid/Base containers are empty. peak is below the “CO2 (can also be programmed as a the CO Acid/Base tube ferrule and fitting LEVEL” for 3 consecutive reactions. warning condition) installed incorrectly. See Section 8.3.6 Reaction...
- Page 138 12_HIGH CO2 IN O2 High level of CO has been detected in Check the quality of oxygen the input oxygen gas. following the Oxygen Purity Test Go to Simulate menu and read the CO procedures in Section 7 analyzer’s CO ppm value.
- Page 139 109_HI MPU TEMP Temperature on the Micro Processor Check the filters in the fan and Unit (MPU) has been exceptionally high vent. and has exceeded 70°C. Check the operation of the fan. (Note that at temperatures below 25°C, BioTector automatically switches the fan off to stabilize system temperature using its own internal heat.)
-
Page 140: Biotector Warning Event Explanation And Remedial Action
BioTector Warning Event Explanation and Remedial Action The following warning conditions do not activate the BioTector stop sequence and leave the 4-20mA signals un-changed and do not activate the fault relay. When the system warning is rectified, acknowledge the warning by pressing the ENTER key in the Fault Archive menu. WARNING CONDITION CAUSE/REMEDY... - Page 141 29_PRESSURE TEST OFF There are two pressure tests carried Activate the Pressure/Flow Test out in BioTector. One is a daily cycle by programming the factory pressure test and the other, called flow settings in Pressure/Flow pressure check, is carried out every Test Program menu.
- Page 142 52_HIGH CO2 IN BASE level in the base reagent, which is Confirm the base reagent CO checked during the Zero Calibration or filter is serviced and in good Zero Check cycles, is higher than the condition, and the container is “BASE CO2 ALARM”...
- Page 143 89_TC SPAN CAL FAIL TC Span Calibration/Check result is Check the concentration of the 90_TC SPAN CHCK FAIL outside the specified TC BAND defined standard solution used. in Span Program menu. See Section Check the settings in Span 8.3.4.3 Span Program for details.
- Page 144 95_LO AIR PRESSURE 1 Air pressure supply has been less than Extreme fluctuations in air supply 0.8 bar for longer than 60 seconds. pressure or faulty external air When the oxygen concentrator is regulator. running, the pressure typically cycles Increase air supply pressure to from 1.5 bar to 0.9 bar.
- Page 145 100_ROTARY V STOP:ON Rotary Valve stopped with its rotation Go to Simulate menu, set MFC sensor on (sensor signal 1). flow to 20 l/h and check the The sensor is faulty and it is always rotation of the Rotary Valve. showing on (sensor signal 1).
- Page 146 107_COOLER FAULT The current drawn through the Cooler Check fuse 3 (F3) on the has dropped below 0.1 Amp for longer motherboard. than 5 seconds. This indicates cooler Check fuse holder and confirm peltier element failure. that the fuse is snapped in tightly Fuse 3 is blown on the into the fuse holder.
- Page 147 112_LO TEMP STANDBY BioTector temperature has dropped Check ambient and BioTector below 2°C for longer than 2 minutes. temperature. BioTector has been automatically put Confirm BioTector is operating into standby mode and has stopped within its specification temperatures (5°C – 45°C). analyzing.
- Page 148 128_REACTOR PURGE System has detected irregularities in Various, for example, partially WARN the gas flow, which indicates a possible blocked reactor. blockage or restriction in the reactor, Faulty/blocked Reactor Valve Reactor Valve (MV3), Sample Valve and/or Sample Valve. (MV4) or associated tubing and fittings. Partially blocked tube after MFC.
-
Page 149: Biotector Notification Event Explanation And Remedial Action
BioTector Notification Event Explanation and Remedial Action The following Notification conditions do not activate the BioTector stop sequence, leave the 4-20mA signal un-changed and do not activate the fault relay. Relevant notifications below can be acknowledged in the Fault Archive menu. NOTIFICATION CONDITION CAUSE/REMEDY... -
Page 150: Service And Maintenance
Section 10 Service and Maintenance 10.1 Weekly Maintenance ▪ Check the air supply pressure: A) An existing instrument air supply line B) BioTector Compressor ▪ Check and confirm that the air pressure is 1.5 bar on the filter pack pressure regulator. ▪... -
Page 151: Six Month Service
10.2 Six Month Service Below procedure is a recommended check list for the 6 month service on the BioTector using the 6 Month Service Kit. Please note that any special models and applications may require additional service items. Service procedures may be changed without notice due to the continuous research and development program. - Page 152 Check for possible build-up of salts or any material at any of the PFA T fittings located between the Ozone Generator and the Mixer Reactor. Clean the fittings and/or the tubing if _____ necessary. Remove Ozone Line Filter and wash it with DIW (or tap water). Dry the filter well and reinstall in place.
- Page 153 Warning! A Torque Screwdriver with 3mm Allen bit, calibrated to 1.5 Nm (150 Ncm), is required for the correct service of the Mixer Reactor. It is strongly recommended not to proceed with the Mixer Reactor service procedures without a torque screwdriver. An adjustable torque screwdriver can be obtained from a local supplier.
- Page 154 Check the air supply pressure. The set point pressure should be 1.5 bar (BioTector compressor 1.2 bar). When the oxygen concentrator is running, the pressure typically cycles from 1.5 bar to 0.9 bar. Check the O2 PRESSURE SENSOR reading looking at the O2- _____ Controller Status menu.
-
Page 155: System Replacement And Spare Parts
Section 11 System Replacement and Spare Parts Page 155... - Page 156 BioTector Parts and Spare Parts Part Number and Part Number and Description Description 10-DVB-013 19-PCB-050 Oxygen Concentrator B5C Motherboard Sieve Beds (set of 2) Hazardous area analyzers may have a different motherboard with a special battery. Contact manufacturer for details. 20-B5C-013 20-PCB-036 B5C PSU Module...
- Page 157 Part Number and Part Number and Description Description 19-B5C-014 19-B5C-015 B5C Type 6606 B5C Type 6606 N/O Valve N/C Valve 19-B5C-016 19-B5C-017 B5C Pinch Valve B5C Pinch Valve 20-B5C-011 20-CO2-008 B5C Oxygen B5C CO Analyzer Concentrator Rotary Valve 20-B5C-025 19-PCB-034 B5C Ozone B5C Ozone Board Generator Module...
-
Page 158: Warranty And Exclusions
Section 12 Warranty and Exclusions Coverage of BioTector Warranty The BioTector comes with a standard 1 year warranty for agreed applications. The BioTector warranty is against manufacturing defects only. The warranty does not cover service/consumable items and consequential damage. Validity of Warranty For the warranty to be valid, regular 6 Month servicing must be carried out using the Service Kit supplied by the manufacturer. -
Page 159: Appendices
Section 13 Appendices Appendix 1 Glossary of Terms and Abbreviations - - - No function is programmed 4-20mA CHNG 4-20mA Change signal Amperes A1 – A3 24 hours average for stream 1 – 3 ALLDAT All Data Amperes Atmospheric pressure Biochemical Oxygen Demand C-276 Hastelloy... - Page 160 Multi-Component Reactor milligram Milliliter ml/min Milliliters per minute MMC/SD Multi Media Card/Secure Digital Card Normal Not Applicable Normally de-energized Normally Energized NaOH Sodium Hydroxide Nitrile Butadiene Rubber NDIR Nondispersive Infrared NOTE Notification NPOC Non-purgeable Organic Carbon Oxygen Ozone Outside Diameter Operating System 3 Printed Circuit Board PEEK...
- Page 161 Zero Zero calibration Zero check Manually input zero adjust Zero and Span Page 161...
-
Page 162: A 2 C I
HACH Company Repair Service in the Repair Service in Canada: Repair Service in World Headquarters United States: Hach Sales & Service Latin America, the Canada Ltd. P.O. Box 389 HACH Company Caribbean, the Far East, 1313 Border Street, Unit 34... - Page 163 HACH LANGE MAROC SARLAU Villa 14 – Rue 2 Casa Plaisance Quartier Racine Extension MA-Casablanca 20000 Tél. +212 (0)522 97 95 75 Fax +212 (0)522 36 89 34 info-maroc@hach-lange.com www.hach-lange.ma Page 163...
- Page 164 DOC012.97.80506 User Guidance for EMC Class A Equipment 업무용을 위한 EMC 등급 A 장치에 대한 사용자 지침 사용자안내문 A급 기기 (업무용 방송통신기자재) 이 기기는 업무용(A급) 전자파적합기기로서 판매자 또는 사용자는 이 점을 주의하시기 바라며, 가정외의 지역에서 사용하는 것을 목적으로 합니다.
- Page 165 This document contains information which is only required for the export of this instrument into the People’s Republic of China. 本手册只包含出口到中华人民共和国的仪器的必要信息。 Statement on China "Management Methods for the Restriction of the Use of Hazardous Substances in Electrical and Electronic Products”, Ministry of Information Industry Order #39.
Need help?
Do you have a question about the BioTector B3500dw and is the answer not in the manual?
Questions and answers