Advertisement
Quick Links
Introduction
Thank you for purchasing the Auber WS series temperature controller. We sincerely
appreciate your decision and trust that our machine will meet your expectations in both
the quality of the result and the value of our product. While we are delighted that you may
be anxious to operate the controller for your project, a few minutes of your time reading
through this manual will only serve to enhance your experience in the months and years
ahead. In particular, we would urge you to read through the safety warnings below.
Although this plug-and-play controller is very easy to operate, the process involves high
temperature and high wattage appliances and your safety is paramount.
• This controller is designed only to be used with devices that have limited power
and their own thermal cut off protection, such as a thermostat or thermal fuse in
case of controller failure. Do not use it with a cook top or hot plate.
• Do not place any objects on the top of controller surface which is used to vent
excess heat during its operation.
• When open the cover of a rice cooker or slow cook that has been running for
extended period of time, the cover will carry a lot of condensation that can drip to
everywhere. Avoid drip the water over the controller.
• The maximum electric current this controller can handle is 15 ampere. For 120
volt ac in US and Canada, this limits the heater power to1800 watts. In addition, if
the heater power is more than 1400 watts, the volume of the pot is also limited to
less than 10 gallons (or 38 liters). Due to its compact size and the splash proof
design for kitchen applications, the controller has a limited ability to dissipate the
*
Patent pending
Operation Instruction Manual
WS-1500C
Precision PID Temperature Controller
Version 1.1
Auber Instruments
730 Culworth Manor
Alpharetta, GA 30022
770-569-8420
www.auberins.com
SAFETY WARNINGS
Dec, 2008
1
*
Advertisement

Related Manuals for Auber Instruments WS-1500C


Summary of Contents for Auber Instruments WS-1500C
- Page 1 Operation Instruction Manual WS-1500C Precision PID Temperature Controller Version 1.1 Auber Instruments 730 Culworth Manor Alpharetta, GA 30022 770-569-8420 www.auberins.com Dec, 2008 Introduction Thank you for purchasing the Auber WS series temperature controller. We sincerely appreciate your decision and trust that our machine will meet your expectations in both the quality of the result and the value of our product.
-
Page 2: Specifications
Instruments only. Using it to control a not recommended device can be dangerous and cause fire. Auber Instruments is not liable for damages caused by misuse of the controller. If you are not sure the controller can be used, please contact Auber Instruments before use. - Page 3 Note, for international orders (except Canada), the input power cord is not included due to its weight and different plug requirement. The controller has standard IEC 320 C13/14 socket. Users can use a power cord that meets the local standard to power it. Please make sure the wire gauge can carry the maximum current required.
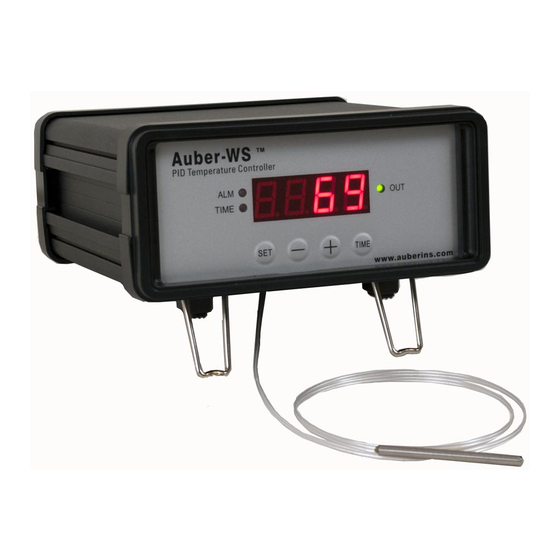
- Page 4 5) “-“ Key - To decrement displayed value. 6) Time Key – Change the Parameter Window between current timer and temperature values, when pressed. 7) Mode indicator, the small “dot” – if it is lit and flashing, the value displayed in the Parameter Window is time, else it is temperature.
- Page 5 Fig 3. Typical connection between the controller and the heating device (in this example, the cooker). The connection of controller should be done in the following steps. • Plug the temperature sensor to the back of the controller. • Plug the power cord to the back of the controller and the other end to the power outlet on the wall.
- Page 6 press the SET again to confirm the change. Note: the timer setting will not be changed if SET is not pressed (confirmed). The display will return to the normal display mode if no key is pressed within 3 seconds. Using the timer The timer can be used in two different ways. a) Use it as timer.
- Page 7 6.1 Auto-Tune The controller's most powerful feature is its ability to regulate virtually any cooker with stable temperature control. For stable temperature control the controller requires two things; (1) the controller must be set to the correct power level (see next section) and, (2) that it must be tuned to the cooker being used.
- Page 8 configuration it will be used. For example, to tune a rice cooker, place the sensor in the room temperature pot filled with water and plug the cooker into the controller. If the cooker has its own thermostat or power control, turn both as high as they’ll go. Set the controller to the appropriate power level (see next Section).
- Page 9 turned off). This constant also affects both integral and derivative action. Smaller P values will make the both integral and derivative action stronger. Please note the value of the P is temperature unit sensitive. If you found an optimized P value when operating the controller in Celsius, you need to multiply the P by 1.8 when changing the temperature unit to Fahrenheit.
- Page 10 Fig 5. Code 166 Parameter setup flow chart Press and hold SET key for 4 seconds until LED display “LCK”, then release the SET key. The display will show “0”. To get into parameters setting mode, you need to key in the pass code.
- Page 11 in ice water mixture, set SC=-2.0 will make the display to shown 0.0 degree. • Out, Output power reduction. It is expressed as a percentage value. This function will allow you to control the maximum output power delivered by the heater in your cooker, for example, if you set Out=50 and your heater is 1000 watts, the output will use 50% of the 1000 watts as the full output.
- Page 12 Fig 6. Code 155 Parameter setup flow chart Press and hold SET key for 4 second until Parameter Window displayed “LCK”. Release the SET. The display will show “0”. Use “+” and “-“ keys to adjust the display to 155 (another pass code) and press SET.
-
Page 13: Warranty
Alpharetta, GA 30022. If the appliance is found by Auber Instruments to be defective in material or workmanship, Auber Instruments will repair or replace it free of charge. A dated proof of purchase may be required. The liability of Auber Instruments is limited solely to the cost of the repair or replacement of the unit at our discretion. - Page 14 In no event is Auber Instruments liable for incidental or consequential damages of any nature whatsoever. Some states/provinces do not permit the exclusion or limitation of incidental or consequential damages and therefore the above may not apply to you.
- Page 15 Appendix 1 Managing the heat generated by the controller The heat dissipation of the controller is directly related to the electric current drawing power of the heater. If your cooker consumes less than 10 ampere of current or your pot is less than 5 gal (19 liters), you do not need to worry about the heat generated by the controller.
- Page 16 minute will provide enough energy to heat 10 gallon (38 liters) of water up by 108F (60 C). If your have a pot that is bigger than 10 gallon and the heater is drawing 15 A, and you need to raise the temperature by 108 F, you better use one of the methods mentioned below to reduce the heat in the controller.
- Page 17 Appendix 2 Controlling the Temperature of Slow Cooker For long duration sous-vide cooking, water bath temperature stability can be easily achieved with a slow cooker. Almost any PID parameters’ settings will hold the set temperature within one degree, if given enough time. However, the time needed for a slow cooker to stabilize at the set temperature is sensitive to the settings of the PID parameters.
- Page 18 Depending on the amount of water in the cooker, the performance may vary slightly. If the temperature still overshoots too much, increase the P value. If the temperature stabilizes one degree below the set point, reduce the P value. Technical explanation For people used to a conventional thermocouple or RTD sensor based PID controller, they may think a PD controller can’t hold the temperature within one degree, because a few degree temperature offset is needed for the controller to output enough power to...
- Page 19 This study is preliminary. It will give you a guide on how to achieve a good stability control. We will keep you updated when better results are obtained from our tests or from our customers.
- Page 20 Appendix 3 Controlling the Temperature of Bradley Smoker 1) Connecting the controller There are two ways to power up the controller and smoker. a) Using two power cords and a power strip. This set up is good for the “Original”, Stainless Steel, and Digital Bradley Smoker.
- Page 21 Fig 4. Power connection of the controller and smoker. The generator is connected to the power strip by the power cord from Bradley (green arrows). The input of the controller is connected to the female receptacle on the generator by the power jumper cord provided by the Bradley (blue arrows).
- Page 22 Fig 5. Sensor position. Left, the sensor should be placed close to the food but high enough so that it does not touch the food. Right, hold the sensor in place by a piece of tape. For the “Original” and Stainless Steel Bradley smoker, the Temperature Heat Control Switch on the smoker tower should be slide to the Hi position (Most right).
- Page 23 c) Damper position. Keeping the damper open will result in better temperature stability because more heat loss is created. This is important when the temperature is set below 140F. When the damper is closed, the temperature will take longer time to drop if it is overshot during initial heat up.
Need help?
Do you have a question about the WS-1500C and is the answer not in the manual?
Questions and answers