Table of Contents
Advertisement
Available languages
Available languages
Quick Links
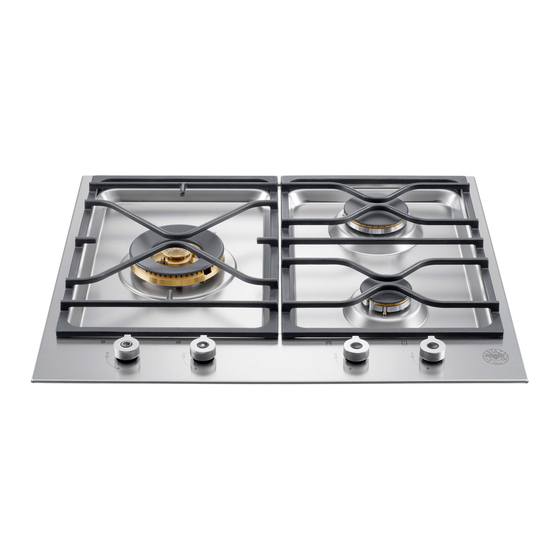
DIMENSIONS: 23 13/16'' (605 mm)(W) x 20 1/2'' (520 mm)(D)
Models PNM0..D7X (2 or 5)D
Models PN40..D7X(2 or 5)D
IMPORTANT SAFETY INFORMATION
PLEASE READ AND FOLLOW THESE IMPORTANT INSTRUCTIONS FOR THE SAFETY OF YOUR HOME AND OF
THE PEOPLE LIVING IN IT.
Save this Manual for local electrical inspector's use.
Read and save these instructions for future reference.
Observe all governing codes, ordinances and regulations.
If the information in this manual is not followed exactly, a fire or explosion may result
-Do not store or use gasoline or other flammable substances in the vicinity of this or any other appliance.
- WHAT TO DO IF YOU SMELL GAS
Do not light any appliance.
Do not touch any electrical switch.
Do not use any phone in your building.
Immediately call your gas supplier from a neighbor's phone. Follow the gas supplier's instructions.
If you cannot reach your gas suppliers, call the fire department.
-Installation and service must be performed by a qualified installer, service agency or the gas supplier.
In Massachusetts: All gas products must be installed by a "Massachusetts" licensed plumber or gasfitter. A
"T" handle type manual gas valve must be installed in the gas line connected to this appliance.
Installation must conform with local codes or in the absence of codes, the National Fuel Gas Code ANSI
Z223.1 / NFPA 54.
ANSI/NFPA70 – latest edition and/or local codes. IN CANADA: Installation must be in accordance with the
current CAN/CGA-B149.1 National Gas Installation Code or CAN/CGA-B 149.2, Propane Installation Code
and/or local codes. Electrical installation must be in accordance with the current CSA C22.1 Canadian
Electrical Codes Parts 1 and/or local codes.
Installation of any gas-fired equipment should be made by a licensed plumber. A manual gas shut-off valve
must be installed in the gas supply line ahead of the oven in the gas flow for safety and ease of service.
Installation, Service and User Instructions
(French version page 11)
causing property damage, personal injury or death.
Electrical installation must be in accordance with the National Electrical Code,
PMB 243 00X Type 'A'
PM 244 00 X
WARNING!
WARNING: This appliance shall not be installed with
a ventilation system that blow air downward toward
the range/rangetop/cooktop; this type of ventilation
system may cause ignition and combustion problem
with the gas appliance resulting in a personal injury
or unintended operation
WARNING: An air curtain or other overhead
range/rangetop/cooktop hood, which operates by
blowing
a
range/rangetop/cooktop, shall not be used/installed
in conjunction with this gas range/rangetop/cooktop.
Type 'B'
downward
airflow
onto
a
Advertisement
Chapters
Table of Contents

Related Manuals for Bertazzoni PNM0 D7X D Series


Summary of Contents for Bertazzoni PNM0 D7X D Series
- Page 1 Installation, Service and User Instructions (French version page 11) DIMENSIONS: 23 13/16’’ (605 mm)(W) x 20 1/2’’ (520 mm)(D) Models PNM0..D7X (2 or 5)D PMB 243 00X Type ‘A’ Models PN40..D7X(2 or 5)D PM 244 00 X Type ‘B’ IMPORTANT SAFETY INFORMATION PLEASE READ AND FOLLOW THESE IMPORTANT INSTRUCTIONS FOR THE SAFETY OF YOUR HOME AND OF THE PEOPLE LIVING IN IT.
-
Page 2: Table Of Contents
WARRANTY AND SERVICE All Bertazzoni products are covered by a 2 years parts and labor warranty. Service on all Bertazzoni products shall be carried out by factory-trained professionals only. For warranty service please contact Customer Service at the numbers indicated below. -
Page 3: Installation Instructions
Installation instructions This appliance shall only be installed by an authorized person. This appliance shall be installed in accordance with the manufacturers installation instructions, IMPORTANT: this appliance must be installed in accordance with the norms in force of the country concerned. The installation of this appliance must conform to local codes and ordinances. -
Page 4: Requirements
Requirements 1. Overhead clearances (Minimum values) The minimum overhead clearances shall be in accordance with the minimum values indicated in the table n.1 and are shown and in the fig. 1- 2 Range hoods and exhaust fans shall be installed in accordance with the manufacturer’s instructions. However, in no case shall the clearance between the top of the highest burner of the cooking appliance and the range hood be less than 25 ½”( 650mm). -
Page 5: Gas Connection
Gas connection Before connecting the appliance to the gas supply, first remove the plastic plug on which is press- fitted into the gas inlet union; to remove, just pull it off. 1. Check the ‘gas type’ sticker attached to the hotplate. Details of the injector sizes used are recorded on the data plate located on the base of the appliance. -
Page 6: Electrical Connection
Electrical connection The connection of the hobs to mains is effected via the flex and the three pin plug located underneath the hotplate. The appliance operate at a main voltage of 120V a.c., frequency 60Hz. Electric power absorption is about 1W. WARNING: Electrical Grounding Instructions: This appliance is equipped with a (three-prong) grounding plug for your protection against shock hazard and should be plugged directly into a properly grounded receptable. -
Page 7: Descriptions
Adaptation of the pressure regulator for use with different type of gas The pressure regulator supplied with the appliance is a convertible type pressure regulator for use with Natural Gas at a nominal outlet pressure of 4” w.c. or LP gas at a nominal outlet pressure of 11” w.c. and it is pre-arranged from the factory to operate with one of these gas/pressure as indicated in the pre-arranging labels affixed on the appliance, package and Instruction booklet. -
Page 8: User Instructions
SURFACE BURNER OPERATION THERMOCOUPLE SAFETY VALVE Each surface burner of a Bertazzoni range is equipped with a thermocouple safety device. The thermocouple opens the flow of gas to the burner only when hot. Should the flame go off, the thermocouple will immediately close the gas flow to the burner eliminating any risk to your home. - Page 9 Note: Dual burner is composed by two burner (inside and outside); each one operates under the relative gas valve indipendently from the other one. Note: It is recommended not to try to ignite the burner if the relative flame cap is not in the correct position Tips for using burners correctly: WARNING: During use of each gas burner(s) adjust the burner flame size properly so it does not verify that it be completely blue and with regular ...
-
Page 10: Cleaning The Appliance
Before replacement on the burner head ensure that the holes are not clogged. After sale service: Dealer /Importer: Name, address, phone SERVICE CENTERS Name Phone MANUFACTURER: BERTAZZONI SPA VIA PALAZZINA, 8 – 42016 – GUASTALLA (REGGIO E.) ITALY Tel. 0522/226411 – telefax 0522/226440 – http://www.bertazzoni.com... - Page 11 Installation, Service et Instructions pour l’Utilisateur DIMENSIONS: 23 13/16’’ (605 mm)(W) x 20 1/2’’ (520 mm)(D) Models PNM0..D7X (2 or 5)D PMB 243 00X Type ‘A’ Models PN40..D7X(2 or 5)D PM 244 00 X Type ‘B INFORMATIONS DE SÉCURITÉ IMPORTANTES VEUILLEZ LIRE ET SUIVRE CES INSTRUCTIONS IMPORTANTES POUR LA SECURITÉ DE VOTRE LOGEMENT ET DES PERSONNES QUY ...
- Page 12 GARANTIE ET SERVICE Tous les produits Bertazzoni sont garantis 2 ans pièces et main-d'œuvre. Les réparations concernant tous les produits Bertazzoni doivent uniquement être prises en charge par des professionnels formés par l'entreprise. Pour le service de garantie, veuillez contacter le Service clientèle aux numéros indiqués ci-dessous.
-
Page 13: Instructions D'installation
Instructions pour l’installation Cet appareil devra uniquement être installé par une personne autorisée. Il devra être installé selon les instructions d’installation des fabricants. IMPORTANT: cet appareil doit être installé selon les normes en vigueur du pays concerné. L’installation de cet appareil doit se conformer aux codes et aux ordonnances locaux. En l’absence de codes locaux, l’installation de cet appareil doit se conformer aux Normes Nationales Américaines, ‘’National Fuel Gas Code’’... -
Page 14: Exigences
Exigences 1. Distances des meubles suspendus (Valeurs minimum) Les distances minimum devront être conformes aux valeurs minimum indiquées dans la table n.1 et sont illustrées dans la fig. 1- 2 Les hottes de cuisine et les ventilateurs aspirant doivent être installés selon les instructions du fabricant. Cependant, dans aucun cas, la distance entre la partie supérieure du brûleur le plus haut de l’appareil de cuisson et la hotte d’aspiration devra être inférieure au 25 ½”( 650mm). -
Page 15: Branchement Du Gaz
Branchement du gaz Avant de brancher l’appareil à l’alimentation gaz, enlevez d’abord le bouchon en plastique qui est monté en force dans le raccord d’admission du gaz; pour l’enlever, le tirer simplement. 1. Vérifiez l’étiquette du ‘’type de gaz’’ attachée à la table de cuisson. Les détails concernant les dimensions des injecteurs utilisés sont indiqués sur la plaquette des données située sur la base de l’appareil. -
Page 16: Branchement Électrique
Branchement électrique Le branchement de la table de cuisson au réseau est effectué par le fil électrique et la fiche tripolaire positionnée sous la table de cuisson. L’appareil fonctionne à une tension du réseau de 120V c.a., fréquence 60Hz. L’absorption d’énergie électrique est d’environ 1W . AVERTISSEMENT: Instructions pour la mise à... -
Page 17: Descriptions
3) Enfoncez la pointe d'un petit tournevis à côté de la tige du robinet de la table en correspondance de la vis dorée située sur la partie inférieure du robinet et tournez la vis à droite ou à gauche jusqu'à ce que la flamme du brûleur soit réglée correctement au MINIMUM. -
Page 18: Instructions Pour L'utilisateur
FONCTIONNEMENT DU BRULEUR DE LA SURFACE DE CUISSON SOUPAPE DE SECURITÉ DU THERMOCOUPLE Chaque brûleur d'une cuisinière Bertazzoni est équipé d'un dispositif de sécurité à thermocouple. Le thermocouple ouvre le flux de gaz vers le brûleur seulement quand il est chaud. Si la flamme s'éteint, le thermocouple arrêtera immédiatement le flux de gaz vers le brûleur en éliminant tout risque pour votre... - Page 19 Tournez le bouton qui correspond au brûleur choisi dans le sens contraire des aiguilles d’une montre à la position de MAXIMUM à l’étoile gravée (flamme large) et puis appuyez sur le bouton pour activer l’allumage par étincelle. Relâchez le bouton quelques secondes après l’allumage du brûleur. Brûleurs équipés d’un dispositif de sécurité...
-
Page 20: Nettoyage De L'appareil
Tableau B Brûleur Diamètres recommandés en pouces pour les casseroles (mm) Petit ”- 5 ”(120 – 140) Moyen ”- 10 ”(140 – 260) Large ”- 10 ” (180 – 260) Dual (poêle chinoise) ”-10 ” (220 – 260) Utilisation correcte des casseroles: - Essuyez le fond de la casserole avant de la positionner sur la plaque de cuisson. - Page 21 Service après vente: Revendeur /Importateur: Nom, adresse, téléphone CENTRES DE SERVICE Téléphone FABRICANT: BERTAZZONI SPA VIA PALAZZINA, 8 – 42016 – GUASTALLA (REGGIO E.) ITALY Tél. 0522/226411 – fax 0522/226440 – http://www.bertazzoni.com...
-
Page 22: Figures
Fig 1 Fig 2 Fig.3 Fig. 4A Fig. 4B... - Page 23 Fig.5 Fig.6 Fig.7 Fig.8...
- Page 24 Fig.9 Fig.10 Fig.11 Fig.12 310982...
Need help?
Do you have a question about the PNM0 D7X D Series and is the answer not in the manual?
Questions and answers