Table of Contents
Advertisement
Quick Links
Quick start guide
4-Bay Docking Station - eSATA, USB 3.0 to SATA (6Gbps)
SDOCK4U33E
FR: Guide de l'utilisateur - fr.startech.com
DE: Bedienungsanleitung - de.startech.com
ES: Guía del usuario - es.startech.com
NL: Gebruiksaanwijzing - nl.startech.com
PT: Guia do usuário - pt.startech.com
IT: Guida per l'uso - it.startech.com
Packaging contents
• 1 x 4-bay drive docking station
• 1 x universal power adapter
• 4 x power cords (NA/UK/EU/AU)
• 1 x USB A to B cable
• 1 x eSATA cable
• 1 x quick start guide
System requirements
• Computer system with an available USB or eSATA port
Note: The eSATA port needs to support port-multiplier technology.
• Up to four 2.5 in. or 3.5 in. SATA hard drives (HDD) or solid-state
drives (SSD)
The SDOCK4U33E is OS independent and doesn't require any
additional drivers or software.
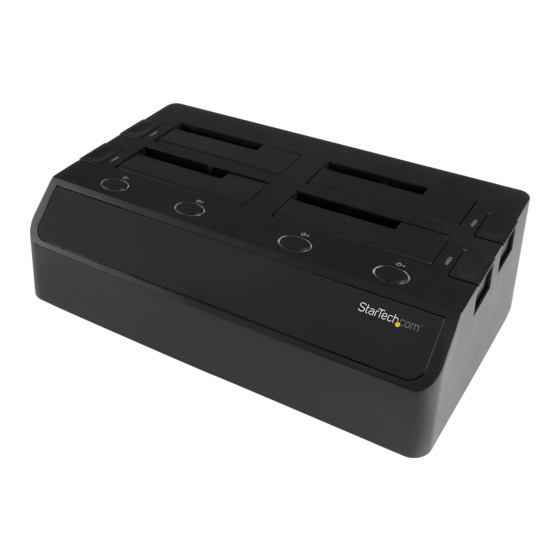
Product diagram
Drive 2 slot
Eject buttons
Drive 1 slot
Drive power buttons and LEDs
For the latest information, technical specifications, and support for
this product, please visit www.startech.com/SDOCK4U33E.
Drive 4 slot
Drive 3 slot
Eject buttons
*actual product may vary from photos
Rear view
eSATA
connector
Fan 2 speed
control
Installation
Connect the dock
Warning! Drives and storage enclosures should be handled carefully,
especially when they're transported. If you're not careful with your
drives, you may lose data as a result. Always handle storage devices
with caution.
1. Connect the external power adapter from the dock to a power
outlet.
2. Do one of the following:
• Connect the included USB cable from the dock to a USB port on
your computer system. Your computer can either be turned on
or turned off when you connect the USB cable.
• Connect the included eSATA cable from the dock to an eSATA
port on your computer system. Your computer can either be
turned on or turned off when you connect the eSATA cable.
Note: The host eSATA port needs to support port-multiplier
technology. If the eSATA port doesn't support port multiplication,
only one of the installed SATA drives will be accessible.
3. Press the Power button on the top of the dock for each of the
slots that contain a drive. The LED indicator should light up to
indicate that the dock is turned on.
Install a drive
1. Carefully align a 2.5 in. or 3.5 in. SATA drive with a drive slot on the
dock, so that the SATA power and data connectors on the drive
are aligned with the corresponding connectors that are inside of
the drive slot.
2. Insert the 2.5 in. or 3.5 in. SATA drive into one of the drive slots.
3. Press the Power button to turn on the duplicator dock. The LED
indicator should light up to indicate that the dock is turned on.
After the drive is installed and the dock is turned on, your computer
automatically recognizes the drive and it's accessible as though the
drive is installed internally in the system. If your computer doesn't
automatically recognize the drive, see the Prepare a drive for use
topic.
DC power
connector
Fan 1 speed
USB 3.0
control
connector
Manual Revision: 04/27/2016
Advertisement
Table of Contents

Related Manuals for StarTech.com SDOCK4U33E


Summary of Contents for StarTech.com SDOCK4U33E
- Page 1 • Connect the included USB cable from the dock to a USB port on your computer system. Your computer can either be turned on The SDOCK4U33E is OS independent and doesn’t require any or turned off when you connect the USB cable.
- Page 2 This manual may make reference to trademarks, registered trademarks, and other protected names and/or symbols of third-party companies not related in any way to StarTech.com. Where they occur these references are for illustrative purposes only and do not represent an endorsement of a product or service by StarTech.com, or an endorsement of the product(s) to which this manual applies by the third-party company in question.
Need help?
Do you have a question about the SDOCK4U33E and is the answer not in the manual?
Questions and answers