Table of Contents
Advertisement
Quick Links
Installation & Operations Manual
36" Emergency Call Station
• 2100-CSL Landline Solar Call Station
• 2100-CSC Cellular Solar Call Station
• 2100-CS9 900 MHz Solar Call Station
• 2100-CST 2-Way Radio Solar Call Station
• 2100-CSV VoIP Solar Call Station
• 2100-CSW Wi-Fi VoIP Solar Call Station
N56W24720 N. Corporate Circle
Sussex, WI 53089
RP8500CS
Made in the USA
Ver. 5
800-451-1460
www.RATHCommunications.com
2 Year Warranty
10/17
Advertisement
Table of Contents

Related Manuals for Rath 2100-CSL


Summary of Contents for Rath 2100-CSL
- Page 1 Installation & Operations Manual 36” Emergency Call Station • 2100-CSL Landline Solar Call Station • 2100-CSC Cellular Solar Call Station • 2100-CS9 900 MHz Solar Call Station • 2100-CST 2-Way Radio Solar Call Station • 2100-CSV VoIP Solar Call Station •...
-
Page 2: Table Of Contents
Thank you for purchasing RATH’s Solar Call Station. We are the largest Emergency Communication Manufacturer in North America and have been in business for over 35 years. We take great pride in our products, service, and support. Our Emergency Products are of the highest quality. -
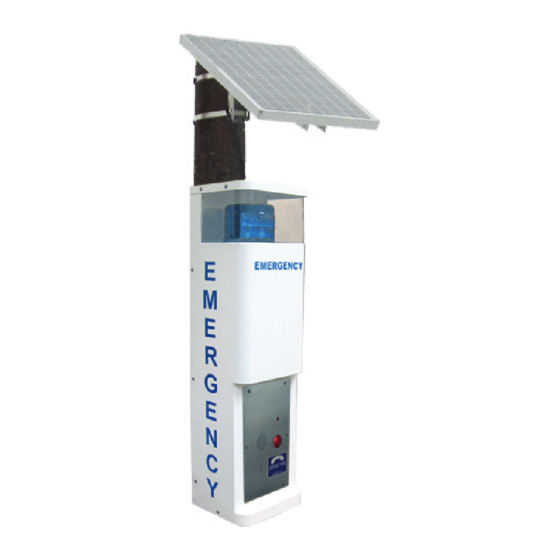
Page 3: Description
Description Figure 1: Front & Back View Features: • ADA compliant (hands free operation) • LED call status indicator • Powder coated aluminum construction 8” 10” 1-9/16” • NEMA 4 enclosure for electronics • Conduit holes for easy installation 3” •... -
Page 4: Items Needed
(provided). Power Cable Connection Note: Batteries that will not be installed within 90 days should be connected to a RATH® Charger Part # RP7700100AV. Failure to do this may result in the battery not working correctly upon installation or shortening of the battery life. -
Page 5: Solar Panel Installation
Solar Panel Installation 1. Identify a location that will allow the solar panel to collect the maximum amount of light and a minimal amount of shade. 2. Mount the solar panel bracket to the wall using screws (not provided) or to a pole with the two supplied hose clamps. -
Page 6: Communication
Adjusting the Photocell (If Equipped): 1. Slide the cover to the proper position on the photocell in order for the blue light to be lit at the proper time (see drawing below). The cell may need to be partially covered if the Call Station is near a light source. Photocell Cover Solar Panel Wiring and Testing:... - Page 7 5. Verify SmartPhone is plugged into the FXS port on Cellular Module. Note: If the SIM card is not provided to RATH® at time of purchase, an active SIM Card will need to be installed into SIM Card slot. When installing SIM Card, disconnect power from cellular unit, install SIM Card in SIM Card slot, then reapply power.
-
Page 8: Phone Programming
Phone Programming 1. You can program the phone on-site or remotely. Note: Cellular and 900 MHz applications cannot be remotely programmed. 2. If programming on-site, remove 12 security screws from unit, remove top cap, and pull front assembly away from back unit. 3. -
Page 9: Phone Testing
If you have answered YES to all questions, you have successfully installed and tested the phone. If you answer NO to any question, proceed to the Troubleshooting Section. *RATH® recommends the Call Station be tested on a regular basis to ensure proper operation. Adjusting the Volume If the volume is too low or high, adjust it by referring to the diagram and instructions below. -
Page 10: Troubleshooting
Troubleshooting Problem Possible Cause & Solutions No dial tone when the • Check to make sure the phone line is connected to SmartPhone board. button is pushed: Audio is low from the speaker: • Speaker control needs to be adjusted. Go to “Speaker Adjustment” on page 9. •... -
Page 11: Wiring
Wiring Solar Panel Strobe LOAD AVER- CHARGING DISCONNECT LOAD SOLARB ATTERY SEALED FLOODED SELECT Strobe Constant To Red and FRONT Black connectors COVER off NEMA 4 enclousre Phone line to 900 MHz, Radio, or Cellular Enter Note: If using Record landline phone, Play / Pause Communication...
Need help?
Do you have a question about the 2100-CSL and is the answer not in the manual?
Questions and answers