Table of Contents
Advertisement
Quick Links
Advertisement
Table of Contents

Related Manuals for Unitech HT660EBTG


Summary of Contents for Unitech HT660EBTG
- Page 1 HT660e Rugged Handheld Terminal - HT660e - User’s Manual 400831G Version 1.0...
-
Page 3: Preface
The material in this manual is subject to change without notice. © Copyright 2011 Unitech Electronics Co., Ltd. All rights reserved. Unitech global website address: http:\\www.unitech-adc.com Bluetooth is a registered trademark of Bluetooth SIG. -
Page 4: Regulatory Compliance Statements
Regulatory Compliance Statements FCC Warning Statement This equipment has been tested and found to comply with the limits for a Class B digital device, pursuant to part 15 of the FCC rules. These limits are designed to provide reasonable protection against harmful interference in a residential installation. -
Page 5: Canadian Compliance Statement
Canadian Compliance Statement This Class B Digital apparatus meets all requirements of the Canadian Interference-Causing Equipment Regulations. Cet appareil numerique de la classe B respecte les exigences du Reglement sur le material broilleur du Canada. European Conformity Statement Declaration of Conformity with Regard to the R&TTE 1999/5/EC and EMC 89/336/ EEC directives. -
Page 6: Laser Information
Laser Information The Unitech HT660e series is certified in the U.S. to conform to the requirements of DHHS/CDRH 21CFR Subchapter J and to the requirements of IEC 825-1. Class II and Class 2 products are not considered to be hazardous. -
Page 7: Battery Charge Notice
If the main battery is removed, the backup battery ensures the data on SDRAM is safe for up to 72 hours. To prevent data loss, do not leave the HT660e uncharged with the main battery removed for an extended period. See First Time to Charge the Main Battery &... -
Page 8: Storage And Safety Notice
It is recommended to store batteries within normal room temperature ranges. Warranty The following items covered under Unitech Limited Warranty are free from defects during normal use: Terminal is covered by 1-year limited warranty. -
Page 9: Table Of Contents
Table of Contents Preface About This Manual..................i Regulatory Compliance Statements............ii FCC Warning Statement ..............ii FCC Label Statement ................ ii Canadian Compliance Statement ............. iii European Conformity Statement............iii RoHS Statement ................iii Taiwan NCC Warning Statement ............iii Laser Information.................. - Page 10 HT660e Front View................5 HT660e Rear View ................6 First Step with HT660e ..............7 Switch On Backup Battery ..............7 Install the Battery Pack ..............7 Supply Power to the HT660e.............8 Charge the Battery for the First Time..........8 Protective Screen Film...............9 First Time Use of the HT660e............9 Setting the Time Zone..............10 Setting Date/Time ................10 Chapter 2...
- Page 11 Warm Boot / Cold Boot / Factory Default ..........17 Warm Boot..................17 Warm Boot via Software ..............17 Warm Boot via Hardware..............17 Cold Boot..................18 Cold Boot via Software ..............18 Clean Boot via Software ..............19 Chapter 4 Data Communication ...................20 Introduction .....................20 Connecting....................20 Serial or USB Cable.................20 Cradle ....................21 Using ActiveSync ................21...
- Page 12 Introduction .....................40 Info....................40 Funckey ...................41 IO.....................42 Server ....................42 Virtual Key ..................44 Screen .....................45 Ping ....................45 CPU ....................46 Backup.....................46 Battery .....................46 Appendix Worldwide Support ..................48...
-
Page 13: Getting Started
Notice This unit is equipped with a battery pack and backup battery. It is possible that the Unitech HT660e may not be powered ON due to battery discharge as a result of storage. In the above situation and the first-time... -
Page 14: Warranty
Warranty Unitech's Limited Warranty provides for different warranty periods for different parts and accessories: Terminal is covered by 1-year limit warranty. Cradle is covered by 1-year limit warranty. Cable is covered by 1-year limit warranty. Battery is covered by 3-month warranty. -
Page 15: Ht660E Model Specification
HT660e Model Specification Samsung 6410 / 667mHz CPU Processor Microsoft Windows CE 6.0 R3 Operating System System Professional/Core Flash ROM 256MB MDDR 128MB Keypad Full Alphanumeric 36 keys Weight (g) 360g (with Battery) Enclosure 199.5 X 79 X 39.6mm Dimension (LxWxH mm) (Approximately) 3.7V / 2200mAH Li-ion, Main Battery Type... -
Page 16: Ht660E Product Introduction & Accessory Kit
HT660e Product Introduction & Accessory Kit HT660e Terminal Manual CD Communication Cable Battery Adaptor Kit Hand Strap Stylus Holder... -
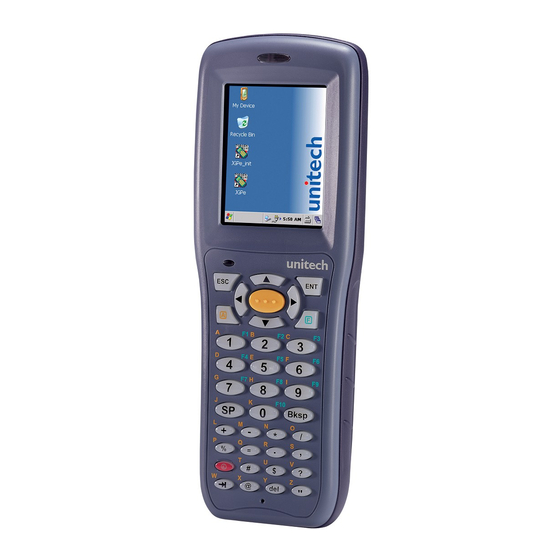
Page 17: Ht660E Front View
HT660e Front View Touch Screen Display Scan key Indicator Alpha key Function key Power Communication Interface... -
Page 18: Ht660E Rear View
HT660e Rear View Bar Code Scanner SD Memory Slot Speaker Battery Cover Hand Strap & Stylus... -
Page 19: First Step With Ht660E
First Step with HT660e Before first using the HT660e, please ensure the battery is fully charged. There are three ways to charge your HT660e: Cradle with one battery charger slot USB/Charging cable Rechargeable Lithium-Ion battery pack NOTE: Data loss may occur if the HT660e's backup battery is not adequately charged. -
Page 20: Supply Power To The Ht660E
Cover the battery. Supply Power to the HT660e Connect the USB/Charging Cable to the HT660e and connect the AC adapter to the cable’s power jack and an electrical outlet. Or place the HT660e into the Cradle (first connect the power supply to the Cradle). -
Page 21: Protective Screen Film
First Time Use of the HT660e Pressing the Power ON/OFF Key The Unitech HT660e welcome screen appears. The Windows CE screen will appear shortly thereafter. Align the Screen When prompted, use the stylus to tap the targets as they appear in order to align the touch screen. -
Page 22: Setting The Time Zone
Setting the Time Zone Follow the steps below to set up your time zone. Tap the location arrow to see a list of cities. Choose your location (or nearest listed one). Select the Daylight Savings Time check box, if necessary. Tap the Apply button. -
Page 23: Using The Keypad And Scanner
Chapter 2 Using the Keypad and Scanner Keypad Data can be entered via its 36-key keypad, which includes: 0~9, alpha, function, escape, backspace, enter, scanner trigger, cursor, and on/off keys. Escape Key Enter Key Alpha Key Scan Key Cursor Key Function Key Space Key Tab Key... -
Page 24: Ht660E Hotkey
The escape key returns the user to a previous page. [ESC] The Tab key moves the cursor to the next tab or next control [TAB] on a form. [Cursor] The cursor key moves the cursor around the screen. [Alpha] The Alpha key toggles Alpha mode and Caps mode. First press of the Alpha key turns the HT660e's keys to input alpha characters, indicated by a blue... -
Page 25: Bar Code Scanner
Bar Code Scanner The HT660e has an integrated 1D laser bar code scanner (depending on model number) capable of reading all major bar code labels. -
Page 26: Power System
Chapter 3 Power system Charging the Lithium-Ion Battery Pack The HT660e's batteries can be charged via the USB or serial communication cable, or via the optional cradle - both using the included AC adaptor. Please charge the battery for at least 4 hours per session to ensure a full charge. Please note that the first time charge should be for at least 12 hours (see the description below). -
Page 27: Environment Consideration For Charging
Environment Consideration for Charging It is important to consider the environment temperature whenever you are charging the Lithium-Ion battery pack. The process is most efficient at normal room temperature or slightly cooler. It is essential that you charge batteries within the stated range of -5°C to 50°C. Charging batteries outside of the specified range could damage the batteries and shorten their charging life cycle. -
Page 28: Storage And Safety Precautions
terminal or spare battery from staying in a hot vehicle. For prolonging the storage time, keep the battery at a 40% charge level. Lithium ion batteries oxidize least when they are stored at the state of 40% charge. To save the battery power, it is better to turn off wireless mode. Please follow the steps below to turn off the wireless mode Tap Setting →... -
Page 29: Warm Boot / Cold Boot / Factory Default
Warm Boot / Cold Boot / Factory Default Warm Boot Warm Boot is a reset to re-boot the HT660e without losing saved data. Perform a warm boot when: The terminal fails to respond. After installing some software applications After making changes to certain system settings, such as network cards WARNING - Performing a Warm Boot will result in the loss of all unsaved data! Warm Boot via Software... -
Page 30: Cold Boot
Cold Boot Cold Boot is used to reset the operating system and reset the terminal after a bootloader, keyboard, or kernel upgrade. WARNING - Performing a Cold Boot will result in the loss of all data in RAM! Cold Boot via Software Tap Start →... -
Page 31: Clean Boot Via Software
Clean Boot via Software Clean Boot is used to reset the terminal to factory default settings. WARNING - Performing a Clean Boot will return the HT660e to its original factory settings! Tap Start → Programs → Utilities → BootMode. Tap “Clean Boot”. The system reset the terminal to factory default settings. -
Page 32: Data Communication
Chapter 4 Data Communication Introduction The Unitech HT660e allows users to link to a host computer via USB, Bluetooth, or Wireless connection for data communication. This chapter provides an overview of the communication of the HT660e. The following subchapters cover these topics: “Series or USB or Modem”... -
Page 33: Cradle
Cradle USB Cradle For data transmission, plug one end of your HT660e's USB communication cable into your PC's USB Port and the other end into the HT660e Cradle's USB port. To simultaneously charge the HT660e, plug the AC power adaptor into the power receptacle on the Cradle. -
Page 34: Installation
required to connect the HT660e to your host computer. If you run the Windows NT® operating system with a service pack, you will be informed during setup that you may need to reinstall the service pack. Try connecting first, and if unsuccessful, reinstall the latest service pack. Requirements To synchronize, ActiveSync version 3.7 or higher must be installed on both your desktop computer and the HT660e terminal. -
Page 35: Connecting The Device To Your Computer
Connecting the Device to Your Computer After ActiveSync has been installed, connect HT660e to your PC as described in Connecting the terminal to a host (PC/Notebook) to a PC. Turn the HT660e on. ActiveSync starts automatically and configure the USB port to work with the HT660e. -
Page 36: Wifi Connection
WiFi Connection Unitech terminals come with built-in RF facility, Summit or Marvel. A wireless network can be added either when the network access point is detected or by manually entering setting data. Before following these instructions, make sure if authentication information is needed. - Page 37 Enter Admin Password. (Default pass-word: SUMMIT Scan Available AP Under Profile tab, tap Scan for available You may select a desired AP to create a new profile. Tap Configure.
- Page 38 Tap Yes to create the new profile. Enter the WEP key or network key. Tap OK. Commit and Activate Tap Commit to activate the setting.
-
Page 39: Bluetooth Connection
Under Main tab, select the profile you want to activate. A pop-up window appears “A Power Cycle is required to make settings activate properly.” Tap OK, and then tap OK to exit the Summit Client Utility. Tap Start → Programs → Utilities → Boot-Mode. Tap Warm Boot to warm start the terminal and load the previous settings. - Page 40 Using BTMAN to connect and pair a Bluetooth device After enabling the built-in Bluetooth module, you may use BTMAN to connect and pair a Bluetooth device around. BTMAN is a Bluetooth manager gathering and managing all Bluetooth profiles you add. Tap Start →...
- Page 41 Power OFF/ON: To enable or disable paired Bluetooth earphones First of all, tap the Power OFF icon to enable the Bluetooth module. Tap Yes to turn ON the Bluetooth module. Tap the Scan Device tab to scan Bluetooth devices around. Tap Scan Device.
- Page 42 Scanned Bluetooth devices around are listed. Later, you may double tap a desired device and check Trusted and then Active. ActiveSync Between HT660e and a PC or Terminal On the Scan Device tab, for example, select and double tap a desired PC. Tap Trusted.
- Page 43 Enter a PIN code on the terminal and tap OK. Then, an Enter PIN dialog box pops up and enter the PIN code same as that you inputted on the terminal. Double tab the paired PC. When the pairing is successful, Trust and Active are checked.
- Page 44 File Transfer Protocol (FTP) via Bluetooth You may use the FTP profile to transfer files to and receive files from a PC or terminal. Please follow the instruction below to connect and pair the PC or terminal for file transfer and receiving. On the Serve tab, tap the FTP icon.
- Page 45 Choose a desired PC or terminal to or from which you want to transfer or receive data. Tap OK to confirm the connection. Next, a dialog box pops up on the selected PC. S elect and determine a path where a file or files may be transferred between H T660e and the PC.
- Page 46 Tap Scan Device. Scanned Bluetooth mobile phones around are listed. Later, you may double tap a desired phone and check Trusted and then Active. Then, HT660e is successfully connect to and paired with the phone as the modem.
-
Page 48: Useful Utilities
Chapter 5 Useful Utilities Introduction Unitech has been developing some of useful utilities for user’s application. The followings are Unitech Utilities introduction. Scanner Setting When it is necessary for the user to change the default barcode symbology for a different application,... - Page 49 Transmit Leading Barcode Enable/ Char Check / Check Digit Others Symbology Disable Digit verification Char/digit Transmit Transmit Start/Stop bits, Function Code, Double label decoding,*data length, *double labels separator Code 93 *data length Deta Code EAN 128 Transmit Code ID, * Field separator EAN 13 EAN 8 * Not suppress...
- Page 50 Transmit Leading Barcode Enable/ Char Check / Check Digit Others Symbology Disable Digit verification Char/digit Transmit before supplement, most have supplement, *Add-on code try level Group GS1 YES Note: *Value Adjustable Scanner Control Pannel V3.0 Barcode Symbologies 2D Transmit Leading Barcode Enable/ Char Check /...
-
Page 51: Scan2Key
Scan2Key The Scan2Key application can route input from the scanner port to the keyboard buffer, with the result that all scanned data will be treated as if they were input from the keypad. With this router, scanned data can be directly input into generic applications like MS Pocket Word. -
Page 52: Device Setting
Chapter 6 Device Setting Introduction The Device Setting is a short cut for you to view device information and do settings, such as Function Key, I/O, Server and so on. The following description will guide you through completion of all device-setting items. Left click Control Panel in My Device. -
Page 53: Funckey
Funckey Tap “FuncKey” tab. Four hot keys can be changed by the users. Tap “Func6”. Tap “Browse” to select a file. Tap “Set”. Press “Func” key and “6” key. Func6 will call the application that the users specified. You can repeat the steps for Func7, Func8, and Func9. By default: Func6 –... -
Page 54: Server
1. Tap “IO” tab. 2. Under status, select “Enable” or “Disable”. 3. When enable, SD/ Wireless card is always accessible; when disabled, SD/Wireless card is not accessible. Server Server Manager is a tool for the user to manager the NTLM (Windows NT LAN Manager) users, FTP users and telnet users. - Page 55 Key in the user name and password. Tap OK. To modify a user’s password, select the user and tap “Modify”. Enter the new password and confirm password. Tap OK. To delete a user, select the user you want to delete, tap “Delete”. Under “FTP”...
-
Page 56: Virtual Key
Server Settings Option Tap “Option”. For telnet server setting, enable/disable server. For FTP server setting, enable/disable server and define anonymous login. Save Tap “Save” to save the server settings. Load Tap “Load” to load the saved server settings. Virtual Key This tool allows you to enable/disable the alpha keys on the terminal’s keypad, set auto enter and inter character delay. -
Page 57: Screen
non-alpha keys. In “Virtual keys”, enter the time delay for “Delay To Send Key”. Characters will be output in the speed as defined. In “Virtual keys”, check “Enable Auto Enter”. Define a value for “Auto Enter Timeout”. Tap “Set”. Tap OK. In MS WordPad, turn to alpha mode. -
Page 58: Cpu
This allows you to select the speed of the CPU according to your requirement of the performance. Check “Dynamic Speed Adjustment”, or select a CPU speed, which will let the CPU speed change. Backup This tool allows you to save the current registry or reset to factory default. Tap “Backup”... -
Page 60: Appendix
Appendix Worldwide Support Unitech’s professional support team is available to quickly answer questions or technical-related issues. Should an equipment problem occur, please contact the nearest Unitech regional service representative. For complete contact information please visit the Web sites listed below:...
Need help?
Do you have a question about the HT660EBTG and is the answer not in the manual?
Questions and answers