
Related Manuals for Ranger design C10-E


Summary of Contents for Ranger design C10-E
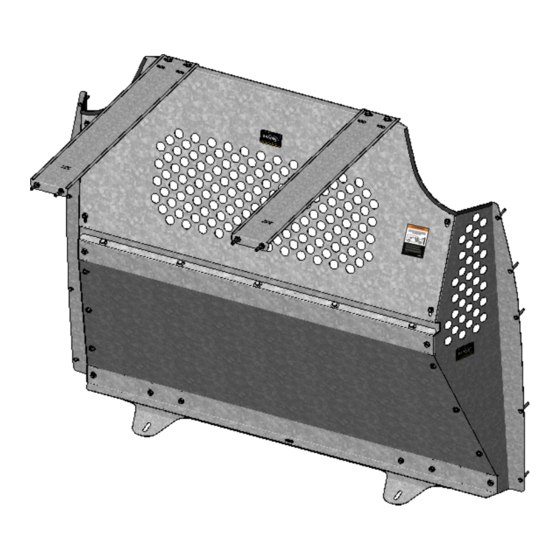
- Page 1 INSTALLATION GUIDE C10-E CONTOURED PARTITION Transit Connect Partition ( Perforated Window, Steel )
-
Page 2: Required Items
QUICK START GUIDE Phase 1 - Assembly q 1.1 Setup..............................3 - 4 q 1.2 Partition Assembly..........................5 - 6 Phase 2 - Installation q 2.1 Tips On How To Attach a Plusnut....................... q 2.2 Vehicle Preparation..........................8 - 9 q 2.3 Contoured Partition Installation...................... -
Page 3: Phase 1 - Assembly
Floor Bracket 30-500 Edge Trim ( QTY in Inches ) 34.75 79-932 Warning Label ( Bilingual ) 94-3024 Assembly Fastener Bag 96-3014 Installation Fastener Bag C10-E Installation Guide | REV. F5 | Page 3 For technical support, contact us at 1-800-565-5321... - Page 4 10× 10× 4× 4× Regular 1/4" # 98-118 ZINC #90-971Self Tapping Screw M6 Self-Tapping Screw 10× 10× M6-1.0 × 20mm # 90-971 1022 BO C10-E Installation Guide | REV. F5 | Page 4 For technical support, contact us at 1-800-565-5321...
- Page 5 1.2.2 Attach both wings to the upper and lower panels. TOOLS q Cordless Impact q 1/2" Socket HARDWARE USED 14× #90-200 Hex Bolt 5/16" × 1/2" #98-116 Flat Washer #94-116 Serrated Nut C10-E Installation Guide | REV. F5 | Page 5 For technical support, contact us at 1-800-565-5321...
- Page 6 Cordless Impact q 1/2" Socket HARDWARE USED 4× hand tighten the nuts #90-204 Hex Bolt 5/16" × 3/4" #98-116 Flat Washer #94-116 Serrated Nut C10-E Installation Guide | REV. F5 | Page 6 For technical support, contact us at 1-800-565-5321...
-
Page 7: Phase 2 - Installation
7/16" socket until the plusnut locks, then remove the bolt by turning the impact in reverse. FORWARD REVERSE C10-E Installation Guide | REV. F5 | Page 7 For technical support, contact us at 1-800-565-5321... - Page 8 PHASE 2 – INSTALLATION 2.2 VEHICLE PREPARATION 2.2.1 Floor preparation. Remove the 2 D-rings, for re-use. TOOLS q Cordless Impact q T50 Torque Bit C10-E Installation Guide | REV. F5 | Page 8 For technical support, contact us at 1-800-565-5321...
- Page 9 Cordless Drill q 3/8" Drill Bit Attach plusnuts on the 4 factory holes. TOOLS q Plusnut Tool HARDWARE USED 4× # 94-130 Plusnut .250 C10-E Installation Guide | REV. F5 | Page 9 For technical support, contact us at 1-800-565-5321...
- Page 10 TOOLS q Cordless Impact q 7/16" Socket HARDWARE USED 4× #90-108 Hex Bolt 1/4" × 5/8" #98-112 Flat Washer #94-112 Serrated Nut C10-E Installation Guide | REV. F5 | Page 10 For technical support, contact us at 1-800-565-5321...
- Page 11 2.3.2 Attach the 2 ceiling brackets using the hex bolts into the plusnuts. TOOLS q Socket Wrench q 7/16" Socket HARDWARE USED 4× #90-118 Hex Bolt 1/4" x 1-1/4" #98-118 Lock Washer #98-112 Flat Washer C10-E Installation Guide | REV. F5 | Page 11 For technical support, contact us at 1-800-565-5321...
- Page 12 2.3.4 Attach the floor bracket to the van using 2 D-rings, then tighten the bolts that attach the froor bracket and lower panel. TOOLS q Cordless Impact q T50 Torque Bit HARDWARE USED 2× Use the D-ring bolt C10-E Installation Guide | REV. F5 | Page 12 For technical support, contact us at 1-800-565-5321...
- Page 13 2.3.5 Apply the warning label on the upper panel. NOTE: The english warning label is already attached to the upper panel. C10-E Installation Guide | REV. F5 | Page 13 For technical support, contact us at 1-800-565-5321...
- Page 14 “Congratulations, you have successfully installed your C10-E Partition! Thank you for doing business with us.” cs@rangerdesign.com For any feedback or suggestions you may have, please contact: C10-E Installation Guide | REV. F5 | Page 14 For technical support, contact us at 1-800-565-5321...
Need help?
Do you have a question about the C10-E and is the answer not in the manual?
Questions and answers