Technaxx TX-28 User Manual
Easy security camera set
Hide thumbs
Also See for TX-28:
- User manual (18 pages) ,
- User manual (19 pages) ,
- User manual (98 pages)
Table of Contents
Advertisement
Available languages
Available languages
Quick Links
The user manuals in the following languages: English, German, French, Spanish, Italian,
Polish, Dutch and Czech are on the CD-ROM enclosed to the package contents.
®
Technaxx
Easy Security Camera Set TX–28
User Manual
The Declaration of Conformity for this device is under the Internet link:
www.technaxx.de/ (in bottom bar "Konformitätserklärung")
Before using the device the first time, read the user manual carefully.
Features
Digital wireless interference-free waterproof (IP65) camera set
100% Privacy & SD Recording
Has 4 channels, can support 4 cameras on one monitor (means simultaneous
display of 4 cameras on one monitor is possible)
Transmission range ≥ 200m in open range
Infrared night vision
High sensitivity microphone
Supports MicroSD cards up to 32GB
Record function with different recording modes (manual, time-scheduled,
motion-activated)
Motion Detection: Detect the moment to auto record
Mobile displayable on: iPhone / Android
Anytime sharp picture and good sound quality
Easy installation, Plug & Play
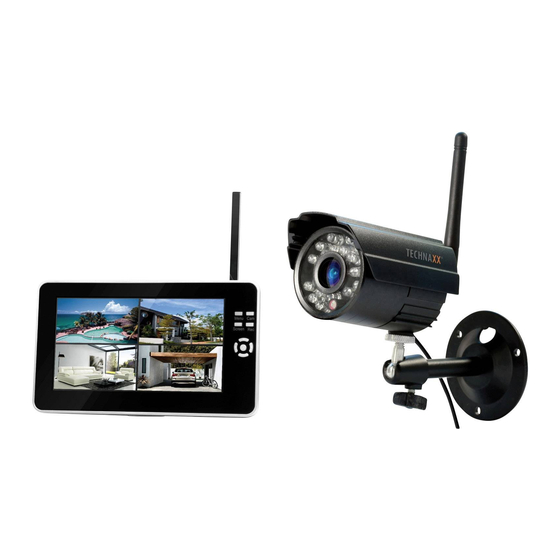
1. Front of the wireless receiver with 7" display
Advertisement
Table of Contents

Related Manuals for Technaxx TX-28


Summary of Contents for Technaxx TX-28
- Page 1 Easy Security Camera Set TX–28 User Manual The Declaration of Conformity for this device is under the Internet link: www.technaxx.de/ (in bottom bar “Konformitätserklärung”) Before using the device the first time, read the user manual carefully. Features Digital wireless interference-free waterproof (IP65) camera set ...
- Page 2 2. Side of the wireless receiver (Descriptions from up to down) Wireless receiver OFF / ON switch (= Power switch) TF: MicroSD memory card slot USB port: USB connecter for wireless receiver software to to update only AV-OUT port: use AV cable to connect with TV/LCD DC 12V Input 3.
- Page 3 4. Side of the wireless camera (Descriptions from up to down) Antenna Power Connector Pair code Camera stand 5. Front of the wireless camera with the IR night lights...
-
Page 4: Remote Control
6. Remote Control Menu: Press Menu key to show Main Menu. Cam: Press Camera key to change channels. Screen: Press Screen key to show 4 video same time, press it again, video auto to show one by one, press it again to enlarge one of 4 video. Rec: Press Video Record key to record a video, press it again to stop recording. -
Page 5: Playback Mode
Connect the 5VDC power adapter to the camera, connect the 12V/1A DC power adapter to the Receiver and turn on the receiver (has a built-in battery). Press “Pair Code” at the wireless camera power connector to pair the camera to the receiver. - Page 6 Manual Capture Now you see different methods to record. Use the LEFT or RIGHT navigation key to select: Manual Take 1 photo, Take 3 photos, Take 5 photos 5s video 10s video video 1 Min video Press OK button to confirm the selection.
- Page 7 SD Format Press UP or Down navigation key to select “SD Format”. Press OK key to confirm. SD Format DOWN navigation key to select NO or YES. If select YES, it will format all files on MicroSD card. Press OK button to confirm the selection.
- Page 8 8.3. Select Camera Mode Press Menu key to display the main menu. Press LEFT or RIGHT navigation key to select the “Select Camera Mode”. Press OK key to enter it. Then below settings are shown: Select CAM Press UP or Down navigation key to select: CAM1, CAM2, CAM3, CAM4, Quad view, Exit...
- Page 9 Contrast / Brightness Press UP or Down navigation key to select “Brightness”. With the LEFT or RIGHT navigation key you can choose between a value range from 0– 9. Press OK key to confirm the selection. Select Exit with the UP/DOWN navigation key to go back to the Main Menu.
-
Page 10: Motion Detection Mode
8.6. Motion Detection Mode Press Menu key to display the main menu. Press LEFT or RIGHT navigation key to select the “Motion Detection Mode”. Press OK key to enter it. Then below settings are shown: Motion Detection Press UP or Down navigation key to select “Enable”. - Page 11 8.7. Setting Mode Press Menu key to display the main menu. Press LEFT or RIGHT navigation key to select the “Setting”. Press OK key to enter it. Then below settings are shown: Setting Press UP or Down navigation key to select “Pair” and press confirm selection.
- Page 12 Date & Time With the UP or DOWN navigation key you can set the Date. Press OK key to confirm the setting. Select Exit with the UP/DOWN navigation key to go back to the Main Menu. Date & Time With the UP or DOWN navigation key you can set the Time.
- Page 13 Auto Switch Setting Mode Press UP or Down navigation key to select “Switch Time”. Default setting is 5 sec. You can select: 5 sec, 10 sec, 30 sec. Press OK key to confirm the selection. Select Exit with the UP/DOWN navigation key to go back to the Main Menu.
- Page 14 Advanced Setting Press UP or Down navigation key to select “TV out Format”. Default setting is NTSC. Press LEFT or RIGHT navigation key to select PAL or NTSC. Press OK key to confirm the selection. Select Exit with UP/DOWN navigation key to go back to the Main Menu.
- Page 15 No video Make sure, camera and monitor are in effective range. 11. Package Contents Easy Security Camera Set TX-28, 1x Wireless Camera, Wireless Video 7” TFT LCD Receiver, USB to Mini USB cable (for connection to a PC), Cinch cable, Power...
-
Page 16: Important Safety Notice
Protect the device from contamination and pollution (use a clean drapery). Avoid using rough, coarse-grained materials/solvents/other aggressive cleaner. Wipe the cleaned device. Important Notice: Should battery fluid leak from a battery, wipe the battery-case with a soft cloth dry. Distributor: Technaxx Deutschland GmbH & Co.KG, Kruppstr. 105, 60388 Frankfurt a.M., Germany... - Page 17 Appendix: The installation of “My Secure” 15. Connecting the Camera Set TX-28 via “My Secure” Connect the monitor of the TX-28 with a computer/notebook via the included USB cable. Install the SIPCam software from the included CD-ROM and follow the installation instructions on the screen. After installation is completed, this icon is shown on your desktop.
- Page 18 Smartphone. The user manual for the „My Secure App“ you can find here: http://www.technaxx.de/support/ ATTENTION: When you want to follow up watching the Camera Set TX-28 via WLAN, the connection (with included USB cable) between the Camera Set TX-28 and your computer/notebook must be active all the time.
- Page 19 Technaxx Easy Security Camera Set TX–28 Bedienungsanleitung Die Konformitätserklärung für dieses Gerät ist unter dem Internet-Link: www.technaxx.de/ (in Leiste unten “Konformitätserklärung”) Vor Nutzung lesen Sie die Bedienungsanleitung sorgfältig durch. Besonderheiten Digitales, kabelloses, störungsfreies, wasserfestes (IP65) Kameraset 100% Privatsphäre & SD-Aufnahme ...
- Page 20 2. Seite des kabellosen Empfängers (Beschreibung von oben nach unten) Kabelloser Empfänger EIN-/ AUSSCHALTER (= Netzschalter) TF: MicroSD-Karte-Anschluss USB-Anschluss: USB-Anschluss nur für Aktualisierung der Software des kabellosen Empfängers AV-OUT-Anschluss: mit AV-Kabel an TV/LCD anschließen DC 12V Eingang 3. Rückseite des kabellosen Empfängers Lautsprecher Antenne Monitorständer...
- Page 21 4. Seite der kabellosen Kamera (Beschreibung von oben nach unten) Antenne Stromversorgung Steckverbinder Pairing-Code Kameraständer 5. Vorderseite der kabellosen Kamera mit IR-Nachtlichter...
- Page 22 6. Fernbedienung Menu: Menu-Taste drücken, um das Hauptmenü aufzurufen. Cam: Camera-Taste drücken, um die Kanäle zu ändern. Screen: Screen-Taste drücken, um 4 Videos gleichzeitig abzuspielen, erneut drücken, um die Videoaufnahmen nacheinander anzusehen, erneut drücken, um eines der 4 Videos zu vergrößern. Rec: Video Record-Taste drücken, um ein Video aufzuzeichnen, erneut drücken, um die Aufnahme zu stoppen.
- Page 23 Schließen Sie den 5V DC-Netzadapter an die Kamera an und verbinden Sie den 12V/1A DC-Netzadapter mit dem Empfänger. Schalten Sie nun den Empfänger ein (verfügt über einen Akku). Drücken Sie “Pairing-Code” auf dem Steckverbinder der kabellosen Kamera, um die Kamera mit dem Empfänger zu verbinden. Wurde die Verbindung hergestellt, erscheint im Hintergrund des Hauptmenüs die Bewegung, auf die die Kamera gerichtet ist.
- Page 24 Manual Capture Sie sehen nun die verschiedenen Aufzeichnungsmethoden. Pfeiltasten LINKS oder RECHTS drücken zur Auswahl von: Manual Take 1 photo, Take 3 photos, Take 5 photos video 10s video 30s video 1 Min video Taste Bestätigen Auswahl drücken. Exit mit den Pfeiltasten OBEN/ UNTEN auswählen, um wieder zum Modus Aufnahme zurückzukehren.
- Page 25 SD Format Pfeiltasten OBEN oder UNTEN drücken zur Auswahl von “SD Format”. Taste Bestätigen drücken. SD Format Pfeiltasten OBEN oder UNTEN drücken zur Auswahl von NO oder YES. Wurde ausgewählt, werden alle Dateien auf der MicroSD-Karte formatiert. OK Taste zum Bestätigen der Auswahl drücken.
- Page 26 8.3. Modus Kamera auswählen Menu Taste drücken, um das Hauptmenü aufzurufen. Drücken Sie die Pfeiltaste LINKS oder RECHTS zur Auswahl von “Modus Kamera auswählen” OK Taste drücken, um in den Modus zu gelangen. Die unten angezeigten Einstellungen werden angezeigt: Select CAM Pfeiltasten OBEN oder UNTEN drücken zur Auswahl von: CAM1, CAM2, CAM3, CAM4,...
- Page 27 Contrast / Brightness Pfeiltasten OBEN oder UNTEN drücken Auswahl “Brightness ". Mit der Pfeiltaste LINKS oder RECHTS können Sie einen Wert zwischen 0 - 9 wählen. OK Taste zum Bestätigen der Auswahl drücken. Exit mit den Pfeiltasten OBEN/ UNTEN auswählen, um zum Hauptmenü...
- Page 28 8.6. Modus Bewegungserkennung Menu-Taste drücken, um das Hauptmenü aufzurufen. Drücken Sie die Pfeiltaste LINKS oder RECHTS zur Auswahl des “Modus Bewegungserkennung”. OK-Taste drücken, um in den Modus zu gelangen. Die unten angezeigten Einstellungen werden angezeigt: Motion Detection Pfeiltasten OBEN oder UNTEN drücken Auswahl “Enable...
-
Page 29: Modus Einstellungen
8.7. Modus Einstellungen Menu Taste drücken, um das Hauptmenü aufzurufen. Drücken Sie die Pfeiltaste LINKS oder RECHTS zur Auswahl der “Einstellungen”. OK Taste drücken, um in den Modus zu gelangen. Die unten angezeigten Einstellungen werden angezeigt: Setting Pfeiltasten OBEN oder UNTEN Auswahl “Pair”... - Page 30 Date & Time Pfeiltasten LINKS oder RECHTS drücken zur Einstellung Date. OK Taste zum Bestätigen der Einstellung drücken. Exit mit den Pfeiltasten OBEN/ UNTEN auswählen, um wieder zum Hauptmenü zurückzukehren. Date & Time Pfeiltasten LINKS oder RECHTS drücken zur Einstellung Time. OK Taste zum Bestätigen der Einstellung drücken.
- Page 31 Auto Switch Setting Mode Pfeiltasten OBEN oder UNTEN drücken Auswahl “Switch Time”. Standardeinstellung ist 5 sec. Sie können wählen zwischen: 5 Sek, 10 Sek, 30 Sek. OKTaste zur Bestätigung der Auswahl drücken. Exit mit den Pfeiltasten OBEN/ UNTEN auswählen, um zum Hauptmenü...
- Page 32 Advanced Setting Pfeiltasten OBEN oder UNTEN drücken zur Auswahl von "TV out Format". Standardeinstellung ist NTSC (für USA; PAL ist für Europa). Pfeiltasten LINKS oder RECHTS drücken zur Auswahl von PAL oder NTSC. OK Taste zum Bestätigen der Auswahl drücken. Exit mit den Pfeiltasten OBEN/UNTEN auswählen, Hauptmenü...
-
Page 33: Kein Signal
10. Problem: Kein Video Vergewissern Sie sich, dass Kamera und Monitor innerhalb der Reichweite liegen. 11. Packungsinhalt Easy Security Camera Set TX-28, 1x Kabellose Kamera, Kabelloser Video 7” TFT LCD-Empfänger, USB-zu-MiniUSB-Kabel (Anschluss an einen PC), Cinch-Kabel, Kamera-Netzadapter, Empfänger-Netzadapter, Schrauben Dübel,... -
Page 34: Wichtiger Sicherheitshinweis
Verschmutzung schützen (mit sauberem Tuch reinigen). Keine rauen, groben Materialien, Lösungsmittel oder andere aggressive Reiniger verwenden. Gereinigtes Gerät gründlich abwischen. Wichtiger Hinweis: Sollte Batterieflüssigkeit aus der Batterie austreten, das Batteriefach mit einem weichen Tuch abwischen. Inverkehrbringer: Technaxx Deutschland GmbH & Co.KG, Kruppstr. 105, 60388 Frankfurt a.M., Deutschland... - Page 35 Anhang: Die Installation von “My Secure” 15. Das Camera Set TX-28 mit “My Secure” verbinden Verbinden Sie den Monitor der TX-28 mit einem PC/Notebook mit dem mitgelieferten USB Kabel. Installieren Sie die Software SIPCam von der mitgelieferten CD-ROM und folgen Sie dem Installationsvorgang auf dem Bildschirm Nachdem die Installation beendet ist, wird dieses Symbol (Icon) auf Ihrem Bildschirm angezeigt.
- Page 36 Bedienungsanleitung für die „My Secure App“ finden Sie hier: http://www.technaxx.de/support/ ACHTUNG: Wenn Sie das Camera Set TX-28 über WLAN immer verfolgen möchten, muss die Verbindung (über das mitgelieferte USB-Kabel) zwischen dem Camera Set TX-28 und Ihrem Computer/Notebook immer bestehen bleiben.
- Page 37 ® Technaxx Easy Security Camera Set TX–28 Manuel d’utilisation Déclaration de Conformité est disponible sur: www.technaxx.de/ (dans la barre du bas, cliquez sur “Konformitätserklärung”). Avant d'utiliser pour la première fois l'appareil, lisez attentivement ce manuel. Particularités Jeu de caméra sans fil numérique étanche (IP65) et sans interférence ...
- Page 38 2. Côté du récepteur sans fil (Description du haut vers le bas) Récepteur sans bouton MARCHE / ARRET (= Bouton d’alimentation) Fente carte mémoire MicroSD Port USB : Connexion USB pour uniquement mise à jour du logiciel du récepteur sans fil Port AV-OUT : Utiliser le cordon AV pour la connexion à...
- Page 39 4. Côté de la caméra sans fil (Description du haut vers le bas) Antenne Adaptateur Alimentation Code Pairage Pied de Caméra 5. Face de la caméra sans fil avec objectifs nocturnes IR...
- Page 40 6. Télécommande Menu: Appuyer sur la touche Menu pour afficher le Menu Principal. Cam: Appuyer sur la touche Camera pour changer de canal. Screen: Appuyer sur la touche Screen afficher 4 vidéos simultanément, ré-appuyer, vidéo automatique affichée individuellement, ré-appuyer pour agrandir l’une des 4 vidéos. Rec: Appuyer sur la touche Record pour enregistrer une vidéo, la ré-appuyer pour arrêter l’enregistrement.
-
Page 41: Mode De Lecture
Brancher l'adaptateur d’alimentation 5V CC à la caméra, brancher l’adaptateur secteur 12V/1A CC au Récepteur et allumer le récepteur (muni d’une batterie intégrée). Appuyer sur «Code Appairage» de l’adaptateur d’alimentation de la caméra sans fil pour apparier la caméra au récepteur. Lorsque la connexion est établie, l’arrière plan du Menu Principal montrera la mobilité... - Page 42 Manual Capture Maintenant diverses méthodes d’enregistrements s’affichent. Utiliser la touche directionnelle GAUCHE ou DROITE pour sélectionner : Manual Take 1 photo, Take 3 photos, Take 5 photos 5s video 10s video video 1 Min video Appuyer sur la touche OK pour valider la sélection.
- Page 43 SD Format Appuyer touche directionnelle HAUT ou BAS pour sélectionner ‘SD Format’. Appuyer sur la touche OK pour valider. SD Format Utiliser la touche HAUT ou BAS pour sélectionner NO ou YES. Si YES est sélectionné, tous les fichiers de la carte MicroSD seront formatés.
- Page 44 8.3. Sélection du Mode de Caméra Appuyer sur la touche Menu pour afficher le menu principal. Appuyer sur la touche directionnelle GAUCHE ou DROITE pour sélectionner le ‘Sélection du Mode de Caméra’. Appuyer sur la touche OK pour y accéder. Alors les réglages suivants apparaissent : Select CAM Appuyer sur la touche HAUT...
- Page 45 Contrast / Brightness Appuyer sur la touche HAUT pour sélectionner ‘Brightness’. Choisir avec touche GAUCHE ou DROITE une valeur de portée de 0 à 9. Appuyer sur la touche OK pour valider la sélection. Sélectionner Exit avec touche HAUT/BAS pour revenir au Menu Principal.
- Page 46 8.6. Mode de Détection de Mouvement Appuyer sur la touche Menu pour afficher le menu principal. Appuyer sur la touche directionnelle GAUCHE ou DROITE pour sélectionner le ‘Mode de Détection de Mouvement’. Appuyer sur la touche OK pour y accéder. Alors les réglages suivants apparaissent : Motion Detection Appuyer sur la touche HAUT...
- Page 47 8.7. Mode de Réglages Appuyer sur la touche Menu pour afficher le menu principal. Appuyer sur la touche directionnelle GAUCHE ou DROITE pour sélectionner ‘Réglages’. Appuyer sur la touche OK pour y accéder. Alors les réglages suivants apparaissent : Setting Appuyer sur la touche HAUT pour sélectionner...
- Page 48 Date & Time Régler avec la touche HAUT ou BAS la Date. Appuyer sur la touche OK pour valider le réglage. Sélectionner Exit avec la touche HAUT/BAS pour revenir au Menu Principal. Date & Time Régler avec la touche HAUT ou BAS Time.
- Page 49 Auto Switch Setting Mode Appuyer sur la touche HAUT pour sélectionner ‘Switch Time’. Le réglage par défaut est de 5 sec. Il est possible de sélectionner : 5 secs, 10 secs, 30 secs. Appuyer sur la touche OK pour valider la sélection. Sélectionner Exit avec...
- Page 50 Advanced Setting Appuyer sur la touche HAUT ou BAS pour sélectionner ‘TV out Format’. Le réglage par défaut est NTSC. Appuyer sur la touche GAUCHE ou DROITE pour sélectionner ‘PAL ou NTSC’. Appuyer sur la touche OK pour valider la sélection. Sélectionner Exit avec...
- Page 51 11. Contenus de l’emballage Easy Security Camera Set TX-28, 1x Caméra sans fil, Récepteur vidéo 7” TFT LCD sans fil, Câble USB pour Mini USB (pour connexion sur un PC), Câble sangle, Adaptateur d’alimentation pour la caméra, Adaptateur d’alimentation pour le récepteur, Vis et chevilles, Manuel d’utilisation...
- Page 52 Nettoyage: Protéger le dispositif de la saleté et de la pollution (nettoyer avec un chiffon propre). Ne pas utiliser des matériaux dures, à gros grain/des solvants/des agents nettoyants agressifs. Essuyer soigneusement le dispositif nettoyé. Distributeur: Technaxx Deutschland GmbH & Co.KG, Kruppstr. 105, 60388 Frankfurt a.M., Allemagne...
- Page 53 Choisissez la rubriqie “Sélection Caméra” le “Dispositif Vidéo USB” et cliquez sur le bouton “OK”. Lorsque vous avez déjà installé le Technaxx App “My Secure”, vous pouvez vous connecter avec le Cam ID/User et Login Password (à la fois vous...
- Page 54 „My Secure App“ vous pouvez trouver ici: http://www.technaxx.de/support/ ATTENTION: Lorsque vous voulez suivre en regardant la Caméra Set TX-28 via WLAN, la connexion (avec le câble USB) entre la Caméra Set TX-28 et votre ordinateur/ordinateur portable droit être actif tout le temps.
- Page 55 ® Technaxx Easy Security Camera Set TX–28 Manual de usuario Declaración de Conformidad se encuentra en: www.technaxx.de/ (en la barra inferior “Konformitätserklärung”) Antes de utilizar el dispositivo por la primera vez, lea atentamente este manual. Particularidad Cámara digital inalámbrico resistente al agua 8IP65) y libre de interferencias ...
- Page 56 2. Lateral del receptor inalámbrico (descripciones de arriba abajo) Interruptor ENNDIDO/APAGADO del receptor inalámbrico Interruptor alimentación) TF: Ranura de tarjeta MicroSD Puerto USB : Conector USB para la actualización del software del receptor inalámbrico solamente Puerto de salida AV-OUT : utilice el cable AV para conectar con TV/LCD Entrada CC de 12V...
- Page 57 4. Lateral de la cámara inalámbrica (descripciones de arriba abajo) Antena Alimentación Conector Código de sincronizació Soporte de la cámara 5. Parte frontal de la cámara Inalámbrica con luz nocturna IR...
-
Page 58: Mando A Distancia
6. Mando a distancia Menu: Presione la tecla Menu para mostrar el Menú Principal. Cam: Presione la tecla Camera para cambiar los canales. Screen: Presione la tecla Screen para mostrar 4 vídeos al mismo tiempo, vídeo automático para ver uno a uno, presione de nuevo para ampliar uno de los vídeos. -
Page 59: Modo De Reproducción
Conecte el adaptador de alimentación de 5V CC a la cámapar, conecte el adaptador de 12V/1A CC al Receptor y encienda el receptor (tiene una batería incorporada). Pulse "Pair Code" (Código de sincronización) en la cámara inalámbrica para sincronizar la cámara con el receptor. Cuando se haya establecido la conexión verá en el fondo del Menú... - Page 60 Manual Capture Ahora verá diferentes métodos de grabación: teclas navegación IZQUIERDA o DERECHA para seleccionar: Manual Sacar 1 foto, Sacar 3 fotos, Sacar 5 fotos 5s de vídeo 10s de vídeo 30s de vídeo 1 Min de vídeo Presione el botón OK para confirmar la selección.
- Page 61 SD Format Pulse las teclas de navegación Arriba Abajo para seleccionar formatear SD “SD Format”. Presione OK para confirmar. SD Format Use las teclas de navegación ARRIBA ABAJO para seleccionar NO o SÍ NO o YES. Si selecciona YES, formateará todos los archivos en la tarjeta MicroSD.
- Page 62 8.3. Selección del modo de cámara Presione la tecla Menu para ver el menú principal. Presione las teclas de navegación IZQUIERDA o DERECHA para seleccionar el modo de cámara “Select Camera Mode” Presione OK para entrar. Se muestran los siguientes ajustes: Select CAM Pulse las teclas Arriba o Abajo para...
- Page 63 Contrast / Brightness Pulse las teclas ARRIBA o ABAJO para seleccionar brillo “Brightness”. teclas navegación IZQUIERDA O DERECHA puede seleccionar entre un rango de valor entre 0 – 9. Presione el botón OK para confirmar la selección. Seleccione Exit (salir) con las teclas de navegación ARRIBA/ABAJO para volver al menú...
- Page 64 8.6. Grabación con detección de movimiento Presione la tecla Menu para ver el menú principal. Presione las teclas de navegación IZQUIERDA o DERECHA para seleccionar el modo de grabación por detección de movimiento “Motion Detection Mode”. Presione OK para entrar. Se muestran los siguientes ajustes: Motion Detection Pulse las teclas de navegación...
-
Page 65: Modo Configuración
8.7. Modo configuración Presione la tecla Menu para ver el menú principal. Presione las teclas de navegación IZQUIERDA o DERECHA para seleccionar el modo de configuración “Setting”. Presione OK para entrar. Se muestran los siguientes ajustes: Setting Pulse las teclas de navegación SUBIR BAJAR para... - Page 66 Date & Time Con las teclas IZQUIERDA O DERECHA puede establecer la fecha - Date. Presione el botón OK para confirmar la configuración. Seleccione Exit (salir) con las teclas navegación ARRIBA/ABAJO para volver al menú principal Main Menu. Date & Time Con las teclas SUBIR o BAJAR puede establecer la hora - Time.
- Page 67 Auto Switch Setting Mode Pulse las teclas ARRIBA o ABAJO para seleccionar la hora encendido“Switch Time”. El ajuste predeter- minado es 5 seg. Puede seleccionar: 5 seg, 10 seg, 30 seg. Pulse OK para confirmar la selección. Seleccione Exit (salir) con las teclas ARRIBA/ ABAJO para volver al menú...
- Page 68 Advanced Setting Pulse las teclas ARRIBA o ABAJO para seleccionar el formato de salida TV“TV format ”. configuración predeterminada es NTSC. teclas IZQUIERDA DERECHA para seleccionar PAL o NTSC. Presione el botón OK para confirmar la selección. Seleccione Exit (salir) con las teclas ARRIBA/ABAJO para volver al menú...
- Page 69 11. Contenido del paquete Easy Security Camera TX-28, 1x Cámara inalámbrica, Receptor de vídeo inalámbrico 7” TFT LCD, Cable USB a Mini USB (para conectar a un PC), Cable de enlace, Adaptador de alimentación para la cámara, Adaptador de alimentación para el receptor, Tuercas y tornillos, Manual de usuario.
-
Page 70: Información De Seguridad Importante
Limpieza: Proteja el dispositivo contra la contaminación y la polución (limpie el dispositivo con un paño limpio). No utilice materiales rugosos, de grano grueso/disolventes/productos de limpieza agresivos. Pase un paño por el dispositivo después de limpiarlo. Distribuidor: Technaxx Deutschland GmbH & Co.KG, Kruppstr. 105, 60388 Frankfurt a.M., Alemania... - Page 71 Apéndice: La instalación de “My Secure” 15. Conexión de la Cámara Set TX-28 a través de “My Secure” Conecte el monitor del TX-28 con un ordenador/ordenador portátil a través del cable USB incluido. Instale el software SIPCam desde el CD-ROM incluido y siga las instrucciones de instalación en la pantalla.
- Page 72 Smartphone. EI manual de usuario para el „My Secure App“ se puede encontrar aquí: http://www.technaxx.de/support/ ATENCIÓN: Si desea seguir viento la Cámara Set TX-28 a través de WLAN, la conexión (con el cable USB incluido) entre la Cámara Set TX-28 y su ordenador/ordenador portátil debe estar activo todo el tiempo.
- Page 73 ® Technaxx Easy Security Camera Set TX–28 Manuale dell’utente Dichiarazione di Conformità può essere trovate: www.technaxx.de/ (sulla barra inferiore “Konformitätserklärung”). Prima di utilizzare questo dispositivo per la prima volta, leggere attentamente il manuale utente. Particularità Kit telecamera wireless digitale impermeabile (IP65) e senza interferenze ...
- Page 74 2. Lato del ricevitore wireless (Descrizioni dall'alto verso il basso) Ricevitore wireless Interruttore OFF/ON Interruttore accensione) TF: Slot per schede di memoria MicroSD Porta USB: Connettore USB, solo per aggiornare il software del ricevitore wireless Porta AV-OUT: utilizzare un cavo AV per collegare una TV o uno schermo LCD Ingresso DC12 V...
- Page 75 4. Lato della telecamera senza fili (Descrizioni dall'alto verso il basso) Antenna Connettore alimentazione Codice di associazione Base di appoggio della telecamera 5. Parte frontale della telecamera wireless con luci notturne IR...
- Page 76 6. Telecomando Menu: Premere il tasto Menu per visualizzare il menu principale. Cam: Premere il tasto Camera per cambiare canale. Screen: Premere il tasto Screen per visualizzare i 4 canali video contemporaneamente, premere di nuovo per mostrare i canali video uno per volta in automatico, premere nuovamente per ingrandire uno dei 4 video.
-
Page 77: Modalità Di Riproduzione
Collegare l'alimentatore 5VDC alla telecamera, collegare l'adattatore di alimentazione 12V/1A DC al ricevitore e accendere il ricevitore (ha una batteria integrata). Premere "Codice Associazione" sul connettore di alimentazione della telecamera wireless per associare la telecamera al ricevitore. Una volta stabilita la connessione si vede sullo sfondo del menu principale il movimento della telecamera che mette a fuoco l'immagine. - Page 78 Manual Capture Ora potete vedere diversi metodi di registrazione. Utilizzare i tasti di navigazione SINISTRA o DESTRA per selezionare: Manual, Take 1 photo, Take 3 photos, Take 5 photos, 5s video, 10s video, 30s video, 1 Min video. Premere il tasto OK per confermare la selezione.
- Page 79 SD Format Premere i tasti di navigazione SU o GIÙ per selezionare " SD Format". Premere tasto confermare. SD Format Utilizzare tasti navigazione su o giù per selezionare NO o YES. Se si seleziona YES, vengono formattati tutti i file presenti nella scheda MicroSD.
- Page 80 8.3. Selezione della modalità della telecamera Premere il tasto Menu per visualizzare il menu principale. Premere i tasti di navigazione SINISTRA o DESTRA per selezionare la "Modalità della telecamera". Premere il tasto OK per confermare. Vengono mostrate le seguenti impostazioni: Select CAM Premere i tasti di navigazione SU o GIÙ...
- Page 81 Contrast / Brightness Premere i tasti di navigazione SU GIÙ selezionare “Brightness”. tasti navigazione SINISTRA o DESTRA è possibile scegliere tra i valori 0–9. Premere tasto confermare la selezione. Selezionare Exit con i tasti di navigazione SU/GIÙ per tornare al Menu principale. 8.5.
- Page 82 8.6. Modalità di rilevazione del movimento Premere il tasto Menu per visualizzare il menu principale. Premere i tasti di navigazione SINISTRA o DESTRA per selezionare la "Modalità di rilevazione del movimento". Premere il tasto OK per confermare. Vengono mostrate le seguenti impostazioni: Motion Detection Premere i tasti di navigazione SU o GIÙ...
-
Page 83: Modalità Di Impostazione
8.7. Modalità di impostazione Premere il tasto Menu per visualizzare il menu principale. Premere i tasti di navigazione SINISTRA o DESTRA per selezionare "Impostazione". Premere il tasto OK per confermare. Vengono mostrate le seguenti impostazioni: Setting Premere i tasti di navigazione SU o GIU' per selezionare “Pair”... - Page 84 Date & Time Con i tasti di navigazione SU o GIÙ è possibile impostare la funzione Date (Data). Premere il tasto OK per confermare l'impostazione. Selezionare Exit con i tasti di navigazione SU/GIÙ per tornare al Menu principale. Date & Time Con i tasti di navigazione SU o GIÙ...
- Page 85 Auto Switch Setting Mode Premere i tasti di navigazione SU o GIÙ per selezionare “Switch Time”. L'impostazione predefinita è 5 sec. È possibile selezionare: 5 sec, 10 sec, 30 sec. Premere il tasto OK per confermare la selezione. Selezionare Exit con i tasti di navigazione SU/GIU' tornare al Menu principale.
- Page 86 Advanced Setting Premere i tasti di navigazione SU o GIÙ per selezionare " TV out Format". L'impostazione predefinita è NTSC. Premere tasti navigazione SINISTRA o DESTRA per selezionare PAL o NTSC. Premere il tasto OK per confermare la selezione. Selezionare Exit tasti navigazione SU/GIÙ...
-
Page 87: Contenuto Della Confezione
11. Contenuto della confezione Easy Security Camera Set TX-28, 1x Telecamera wireless, Video wireless 7" TFT LCD del ricevitore, Cavo da USB a mini USB (per il collegamento al PC), Cavo Cinch, Adattatore di alimentazione per la telecamera, Adattatore di alimentazione per il ricevitore, Viti e tasselli, Manuale dell'utente. - Page 88 Non smaltire dispositivi vecchi nei rifiuti domestici. Pulizia: Proteggere il dispositivo da contaminazione e inquinamento (pulire il dispositivo con un panno pulito). Non usare di materiali ruvidi, a grana grossa/solventi/detergenti aggressivi. Asciugare il dispositivo dopo la pulizia. Distributore: Technaxx Deutschland GmbH & Co.KG, Kruppstr. 105, 60388 Frankfurt a.M., Germania...
- Page 89 Scegliere sotto “Selezzione Camera” il “Dispositivo Video USB” e fare clic sul pulsante “OK”. Se avete già installato il Technaxx App “My Secure”, è possibile effettuare il login con il Cam ID/User e Login Password (entrambi si possono trovare sul...
- Page 90 Smartphone. II manuale dell’utente per il „My Secure App“ si possono trovare qui: http://www.technaxx.de/support/ ATTENZIONE: Quando si desidera seguire guardando la Camera Set TX-28 tramite WLAN, la connessione (con il cavo USB incluso) tra la Camera Set TX-28 e il computer/notebook deve essere attivo per tutto il tempo.
- Page 91 Easy Security Camera Set TX–28 Instrukcja obsługi Zgodności dla tego urządzenia znajduje się pod poniższym linkiem internetowym: www.technaxx.de/ (w dolnym pasku “Konformitätserklärung”). Przed rozpoczęciem korzystania z urządzenia po raz pierwszy, należy uważnie przeczytać instrukcję Cechy Cyfrowy bezprzewodowy zestaw kamera bezzakłóceniowy i wodoodporny (IP65) ...
- Page 92 2. Bok odbiornika bezprzewodowego (opis w porządku od góry do dołu) Włącznik/wyłącznik odbiornika bezprzewodowego (włącznik zasilania) TF: Gniazdo karty pamięci Micro Port USB: Gniazdo USB wyłącznie aktualizacji oprogramowania odbiornika bezprzewodowego Port AV-OUT: Służy podłączania TV/LCD kablem AV DC 12V Input 3.
- Page 93 4. Bok kamery bezprzewodowej (opis w porządku od góry do dołu) Antena Zasilanie Złącze parowania Stojak kamery 5. Przód kamery bezprzewodowej ze światłem podczerwonym do pracy w nocy...
- Page 94 6. Pilot Menu: Naciśnij przycisk Menu, aby wyświetlić menu główne. Cam: Naciśnij przycisk Camera, aby zmienić kanały. Screen: Naciśnij przycisk Screen, aby wyświetlić obrazy z 4 kamer jednocześnie, naciśnij ponownie, aby wyświetlać je po kolei, naciśnij jeszcze raz, aby powiększyć obraz jednej z 4 kamer. Rec: Naciśnij przycisk Record, aby rozpocząć...
-
Page 95: Tryb Odtwarzania
Podłącz zasilacz 5V DC do kamery, podłącz zasilacz 12V/1A DC do odbiornika i włącz go (posiada wbudowany akumulator). Naciśnij przycisk „kod parowania”, znajdujący się kablu zasilania kamery bezprzewodowej. Po ustanowieniu połączenia, w tle menu głównego zobaczysz ruch, na którym skupiona jest kamera. 8.1. - Page 96 Manual Capture Spójrz na różne metody nagrywania. Naciśnij przycisk nawigacyjny LEWO lub PRAWO, aby wybrać: Manual Take 1 photo, Take 3 photos, Take 5 photos 5s video 10s video video 1 Min video Naciśnij przycisk OK, aby potwierdzić wybór. Wybierz Exit przyciskiem nawigacyjnym GÓRA/DÓŁ, aby wyjść...
- Page 97 SD Format Naciśnij przycisk nawigacyjny GÓRA lub DÓŁ, aby wybrać „SD Format”. Naciśnij OK, aby potwierdzić. SD Format Naciśnij przycisk nawigacyjny GÓRA lub DÓŁ, aby wybrać NO lub YES. wybraniu YES, karta pamięci Micro SD zostanie sformatowana. Naciśnij przycisk potwierdzić wybór. SD Info Naciśnij przycisk nawigacyjny GÓRA lub DÓŁ, aby wybrać...
- Page 98 8.3. Wybór trybu kamery Naciśnij przycisk Menu, aby wyświetlić menu główne. Naciśnij przycisk nawigacyjny LEWO lub PRAWO, aby wybrać „tryb kamery”. Naciśnij OK, aby wejść. Pokażą się następujące opcje ustawień: Select CAM Naciśnij przycisk nawigacyjny GÓRA lub DÓŁ, aby wybrać: CAM1, CAM2, CAM3, CAM4, Quad view, Exit Naciśnij OK, aby potwierdzić...
- Page 99 Contrast / Brightness Naciśnij przycisk nawigacyjny GÓRA lub DÓŁ, aby wybrać „Brightness”. LEWYM PRAWYM przyciskiem nawigacyjnym możesz wybrać zakres wartości pomiędzy 0–9. Naciśnij OK, aby potwierdzić wybór. Wybierz Exit przyciskiem nawigacyjnym GÓRA/DÓŁ, aby wyjść z powrotem do menu głównego. 8.5. Tryb programowania nagrywania Naciśnij przycisk Menu, aby wyświetlić...
- Page 100 8.6. Tryb wykrywania ruchu Naciśnij przycisk Menu, aby wyświetlić menu główne. Naciśnij przycisk nawigacyjny LEWO lub PRAWO, aby wybrać „tryb wykrywania ruchu”. Naciśnij OK, aby wejść. Pokażą się następujące opcje ustawień: Motion Detection Naciśnij przycisk nawigacyjny GÓRA lub DÓŁ, aby wybrać „Enable”.
- Page 101 8.7. Tryb ustawień Naciśnij przycisk Menu, aby wyświetlić menu główne. Naciśnij przycisk nawigacyjny LEWO lub PRAWO, aby wybrać „ustawienia”. Naciśnij OK, aby wejść. Pokażą się następujące opcje ustawień: Setting Naciśnij przycisk nawigacyjny GÓRA lub DÓŁ, aby wybrać „Pair” i naciśnij OK, aby potwierdzić...
- Page 102 Date & Time Naciśnij przycisk nawigacyjny GÓRA lub DÓŁ, aby ustawić Date. Naciśnij potwierdzić ustawienie. Wybierz Exit przyciskiem nawigacyjnym GÓRA/DÓŁ, wyjść powrotem menu głównego. Date & Time Naciśnij przycisk nawigacyjny GÓRA lub DÓŁ, aby ustawić Time. Naciśnij potwierdzić ustawienie. Wybierz Wyjdź...
- Page 103 Auto Switch Setting Mode Naciśnij przycisk nawigacyjny GÓRA lub DÓŁ, aby wybrać „Switch Time”. Ustawienie domyślne to 5 sec. Możesz wybrać: 5 sek., 10 sek., 30 sek. Naciśnij OK, aby potwierdzić wybór. Wybierz Exit przyciskiem nawigacyjnym GÓRA/DÓŁ, aby wyjść z powrotem do menu głównego.
- Page 104 Advanced Setting Naciśnij przycisk nawigacyjny GÓRA lub DÓŁ, aby wybrać „TV out Format”. Ustawienie domyślne to NTSC. Naciśnij przycisk nawigacyjny LEWO lub PRAWO, aby wybrać PAL lub NTSC. Naciśnij OK, aby potwierdzić wybór. Wybierz Exit przyciskiem nawigacyjnym GÓRA/DÓŁ, aby wyjść z powrotem do menu głównego.
- Page 105 Brak obrazu Upewnij się, że kamera i monitor znajdują w swoim zasięgu. 11. Zawartość opakowania Easy Security Camera Set TX-28, 1x Bezprzewodowa kamera, Bezprzewodowy odbiornik wideo 7” TFT LCD, Kabel USB do Mini USB (do podłączania do komputera), Kabel Cinch, Zasilacz do kamery, Zasilacz do odbiornika, Wkręty i kołki, Instrukcja obsługi...
- Page 106 Nie usuwać starych urządzeń z odpadami gospodarstwa domowego. Czyszczenie: Chronić urządzenie przed skażeniem i zanieczyszczeniami (czyścić urządzenie wyłącznie miękką szmatką). Nie używać agresywne materiały/rozpuszczalników/żrących środków czyszczących. Dokładnie wytrzeć urządzenie czyszczeniu. Dystrybutor: Technaxx Deutschland GmbH & Co.KG, Kruppstr. 105, 60388 Frankfurt a.M., Niemcy...
- Page 107 Dodatek: Instalacja “My Secure” 15. Podłączenie Camera Set TX-28 poprzez “My Secure” Podłącz monitor z TX-28 z komputera/laptopa za pomocą dołączonego kabla USB. Zainstaluj oprogramowanie SIPCam z dołączonej płycie CD-ROM i postępuj zgodnie z instrukcjami wyświetlanymi na ekranie. Po instalacji jest zakończona, pojawi się ta ikona na pulpicie.
- Page 108 Smartphone. Instrukcja obsługi dla aplikacji „My Secure App“ można znaleźć tutaj: http://www.technaxx.de/support/ UWAGA: Jeśli chcesz kontynuować oglądanie Camera Set TX-28 za pośrednictwem sieci WLAN, połączenie (za pomocą dołączonego kabla USB) pomiędzy Camera Set TX-28 i komputera/laptopa musi być aktywne przez cały czas.
- Page 109 Easy Security Camera Set TX–28 Gebruiksaanwijzing U treft de verklaring van conformiteit voor dit apparaat aan op de volgende Internet-link: www.technaxx.de/ (in de onderste balk “Konformitätserklärung”) Voordat u het apparaat de eerste keer, lees aandachtig de gebruiksaanwijzing. Bijzonderheden Digitale, draadloze, interferentievrije, waterbestendige (IP65) camera set ...
- Page 110 2. Zijaanzicht van de draadloze ontvanger (Beschrijvingen van boven naar beneden). AAN-/UIT schakelaar draadloze ontvanger Sleuf voor MicroSD geheugenkaart USB-poort: USB-connector; uitsluitend voor bijwerken software draadloze ontvanger. AV-OUT-poort: voor het aansluiten op een TV/LCD met een AV-kabel. DC 12V ingang 3.
- Page 111 4. Zijaanzicht van de draadloze camera (Beschrijvingen van boven naar beneden) Antenne Voedings- connector Paarcode Camerastandaard 5. Vooraanzicht van de draadloze camera met de IR nachtverlichting...
- Page 112 6. Afstandsbediening Menu: Druk de toets Menu om het hoofdmenu te openen. Cam: Druk de toets Camera om de kanalen te wijzigen. Screen: Druk de toets Screen om gelijktijdig 4 videobeelden te tonen. Door nogmaals te drukken worden automatisch één voor één weergegeven.
- Page 113 Sluit de 5 V gelijkspanning lichtnetadapter aan op de camera; sluit de 12 V/1 A gelijkspanning adapter aan op de ontvanger en schakel de ontvanger in (hij is voorzien van een geïntegreerde batterij). Druk de toets “Paarcode” op de voedingsaansluiting van de draadloze camera om de camera met de ontvanger te paren.
- Page 114 Manual Capture U ziet nu verschillende methodes om nemen. Gebruik navigatietoetsen LINKS en RECHTS om één van de volgende opties te selecteren: Manual Take photo, Take photos, Take photos video video 30s video 1 Min video Druk de toets OK om uw keuze te bevestigen.
- Page 115 SD Format Gebruik de navigatietoetsen NEER “SD Format” te selecteren. Druk de toets OK om uw keuze te bevestigen. SD Format Gebruik de navigatietoetsen OP en NEER om NO of YES te selecteren. Als YES wordt geselecteerd, wordt micro-SD-kaart geformatteerd en gaan alle bestanden verloren.
- Page 116 8.3. Selecteer cameramodus Druk de toets Menu om het hoofdmenu te openen. Gebruik de navigatietoetsen LINKS en RECHTS om “Selecteer cameramodus” te selecteren. Druk de toets OK om uw keuze te bevestigen. De onderstaande instellingen worden weergegeven: Select Gebruik de navigatietoetsen OP en NEER om één van de volgende opties te selecteren: CAM1, CAM2, CAM3, CAM4,...
- Page 117 Contrast / Brightness Gebruik de navigatietoetsen NEER “Brightness” te selecteren. U kunt met de navigatietoetsen LINKS OF RECHT kiezen uit een waardebereik van 0 – 9. Druk de toets OK om uw keuze te bevestigen. Selecteer Exit navigatietoetsen OP en NEER om terug te keren naar het Hoofdmenu.
- Page 118 8.6. Modus bewegingsdetectie Druk de toets Menu om het hoofdmenu te openen. Gebruik de navigatietoetsen LINKS en RECHTS om de “Modus bewegingsdetectie” te selecteren. Druk de toets OK om uw keuze te bevestigen. De onderstaande instellingen worden weergegeven: Motion Detection Gebruik de navigatietoetsen OP en NEER om “Enable”...
- Page 119 8.7. Instellingenmodus Druk de toets Menu om het hoofdmenu te openen. Gebruik de navigatietoetsen LINKS en RECHTS om “Setting” te selecteren. Druk de toets OK om uw keuze te bevestigen. De onderstaande instellingen worden weergegeven: Setting Druk de navigatietoetsen OP NEER “Pair”...
- Page 120 Date & Time U kunt met de navigatietoetsen OP en NEER Date instellen. Druk de toets OK om de instelling te bevestigen. Selecteer Exit navigatietoetsen OP en NEER om terug keren naar Hoofdmenu. Date & Time U kunt met de navigatietoetsen OP en NEER Time instellen.
- Page 121 Auto Switch Setting Mode Gebruik de navigatietoetsen OP en NEER om “Switch Time” selecteren. standaard instelling is 5 sec. U kunt kiezen: 5 sec, 10 sec, 30 sec. Druk de toets OK om uw keuze te bevestigen. Selecteer Exit navigatietoetsen OP en NEER om terug te keren naar het Hoofdmenu.
- Page 122 Advanced Setting Gebruik de navigatietoetsen OP en NEER “TV Format” selecteren. De standaard instelling is NTSC. Gebruik de navigatietoetsen LINKS en RECHTS NTSC selecteren. Druk de toets OK om uw keuze te bevestigen. Selecteer Exit met de navigatietoetsen OP en NEER om terug te keren naar het Hoofdmenu.
- Page 123 Geen video Zorg ervoor dat de camera en monitor binnen bereik zijn. 11. Inhoud van de verpakking Easy Security Camera Set TX-28, 1x Draadloze camera, Draadloze 7”TFT LCD video-ontvanger, USB naar mini-USB-kabel (voor aansluiting op een PC), Tulpkabel, Lichtnetadapter voor de camera, Lichtnetadapter voor de ontvanger, Pluggen en schroeven, Gebruiksaanwijzing 12.
- Page 124 Voer oude apparatuur niet af met het huishoudelijk afval. Reiniging: Bescherm het toestel tegen verontreiniging (reinig het toestel met schone doek). Vermijd gebruik ruwe. schurende materialen/oplosmiddelen/agressieve schoonmaakmiddelen. Veeg de gereinigde toestel. Distributeur: Technaxx Deutschland GmbH & Co.KG, Kruppstr. 105, 60388 Frankfurt a.M., Duitsland...
- Page 125 Kies onder “Camera Select” de “USB Video apparaat” en klik op de knop “OK”. Wanneer u de Technaxx App “My Secure” al geïnstalleerd, kunt u inloggen met de Cam ID/User en Login Password (zowel u kunt vinden op de monitor...
- Page 126 Smartphone. De gebruiksaanwijzing voor het „My Secure App“ kun je hier vinden: http://www.technaxx.de/support/ LET OP: Wanneer u de follow-up kijken naar de Camera Set TX-28 via WLAN, moet de verbinding (met de meegeleverde USB-kabel) tussen de Camera Set TX-28 en uw computer/notebook de hele tijd actief zijn.
-
Page 127: Návod K Obsluze
Easy Security Camera Set TX–28 Návod k obsluze Prohlášení o shodě pro tento výrobek je k dispozici na: www.technaxx.de/ (na spodní liště „Konformitätserklärung“) Před použitím zařízení poprvé, přečtěte návod k obsluze pečlivě. Vlastnosti Digitální bezdrátová kamera sada, vodotěsný (IP65) a odolná proti rušení... - Page 128 2. Boční strana bezdrátového přijímače (Popis shora dolů) Spínač ZAP/VYP bezdrátového přijímače (= vypínač) TF: Otvor pro paměťovou kartu mikro SD Port USB: Konektor USB pouze aktualizaci softwaru bezdrátového přijímače Port AV-OUT: připojení k TV/LCD pomocí kabelu AV Vstup DC 12V 3.
- Page 129 4. Boční strana bezdrátové kamery (Popis shora dolů) Anténa Konektor napájení Kód párování Stojan kamery 5. Přední strana bezdrátové kamery s infračervenými nočními světly...
-
Page 130: Dálkové Ovládání
6. Dálkové ovládání Menu: Stiskem tlačítka Menu zobrazíte hlavní nabídku. Cam: Stiskem tlačítka Camera měníte kanály. Screen: Stiskem tlačítka Screen (Obrazovka) zobrazíte 4 videozáznamy současně, opětovným stiskem tlačítka zobrazíte jeden záznam za druhým a dalším stiskem tlačítka jedno ze čtyř videí zvětšíte. -
Page 131: Režim Nahrávání
Připojte ke kameře napájecí adaptér 5 V DC, napájecí adaptér 12 V/1 A DC připojte k přijímači a zapněte přijímač (má vestavěnou baterii). Na napájecím konektoru bezdrátové kamery stiskněte “Kód párování”, aby se kamera spárovala s přijímačem. Když je spojení navázáno, uvidíte v pozadí hlavní nabídky pohyb, na který... - Page 132 Manual Capture Nyní vidíte různé způsoby nahrávání. Stiskem navigačního tlačítka DOLEVA nebo DOPRAVA zvolíte: Manual, Take 1 photo, Take 3 photos, Take 5 photos, 5s video, 10s video, 30s video, 1 Min video Stiskem tlačítka OK volbu potvrdíte. Volbou položky Exit pomocí...
- Page 133 SD Format Stiskem navigačního tlačítka NAHORU nebo DOLŮ zvolíte „SD Format“. Stiskem tlačítka OK potvrdíte. SD Format Stiskem navigačního tlačítka NAHORU nebo DOLŮ zvolíte NO nebo YES. Zvolíte-li YES, naformátují se všechny soubory kartě mikro SD. Stiskem tlačítka volbu potvrdíte. SD Info Stiskem navigačního tlačítka NAHORU nebo DOLŮ...
- Page 134 8.3. Volba režimu kamery Stiskem tlačítka Menu zobrazíte hlavní nabídku. Stiskem navigačního tlačítka DOLEVA nebo DOPRAVA zvolíte „Volba režimu kamery“. Stiskem tlačítka OK potvrdíte. Zobrazí se nastavení uvedená níže: Select CAM Stiskem navigačního tlačítka NAHORU nebo DOLŮ zvolíte: CAM1, CAM2, CAM3, CAM4, Quad view (Zobrazení...
- Page 135 Contrast / Brightness Stiskem navigačního tlačítka NAHORU nebo DOLŮ zvolíte „Brightness“ (Jas). Navigačním tlačítkem DOLEVA nebo DOPRAVA můžete zvolit rozsah hodnot od 0–9. Stiskem tlačítka volbu potvrdíte. Volbou položky Exit pomocí navigačního tlačítka NAHORU/DOLŮ se vrátíte do Hlavní nabídky. 8.5. Režim časovaného nahrávání Stiskem tlačítka Menu zobrazíte hlavní...
- Page 136 8.6. Režim detekce pohybu Stiskem tlačítka Menu zobrazíte hlavní nabídku. Stiskem navigačního tlačítka DOLEVA nebo DOPRAVA zvolíte „Režim detekce pohybu“. Stiskem tlačítka OK jej potvrdíte. Zobrazí se nastavení uvedená níže: Motion Detection Stiskem navigačního tlačítka NAHORU nebo DOLŮ zvolíte „Enable“. Stiskem navigačního tlačítka DOLEVA nebo...
-
Page 137: Režim Nastavení
8.7. Režim nastavení Stiskem tlačítka Menu zobrazíte hlavní nabídku. Stiskem navigačního tlačítka DOLEVA nebo DOPRAVA zvolíte „Nastavení“. Stiskem tlačítka OK jej potvrdíte. Zobrazí se nastavení uvedená níže: Setting Stiskem navigačního tlačítka NAHORU nebo DOLŮ zvolte „Pair“ (Párování) a stiskem tlačítka OK volbu potvrdíte. Stiskem navigačního tlačítka DOLEVA nebo... - Page 138 Date & Time Stiskem navigačního tlačítka DOLEVA nebo DOPRAVA můžete nastavit Date. Stiskem tlačítka nastavení potvrdíte. Volbou položky Exit pomocí navigačního tlačítka NAHORU/DOLŮ se vrátíte do Hlavní nabídky. Date & Time Stiskem navigačního tlačítka DOLEVA nebo DOPRAVA můžete nastavit Time. Stiskem tlačítka nastavení...
- Page 139 Auto Switch Setting Mode Stiskem navigačního tlačítka NAHORU nebo DOLŮ zvolíte „Switch Time“ (Dobu zapnutí). Výchozím nastavením je 5 sec. Můžete si zvolit: 5 s, 10 s, 30 s. Stiskem tlačítka volbu potvrdíte. Volbou položky Exit pomocí navigačního tlačítka NAHORU/ DOLŮ...
- Page 140 Advanced Setting Stiskem navigačního tlačítka NAHORU nebo DOLŮ zvolíte „TV out Format“. Výchozím nastavením je NTSC. Stiskem navigačního tlačítka DOLEVA nebo DOPRAVA zvolíte „Pal nebo NTSC“. Stiskem tlačítka OK volbu potvrdíte. Volbou položky Exit pomocí navigačního tlačítka NAHORU/DOLŮ se vrátíte do Hlavní nabídky. Reset to Factory Default Stiskem navigačního tlačítka NAHORU nebo DOLŮ...
- Page 141 účinném rozsahu. 11. Obsah balení Easy Security Camera Set TX-28, 1x Bezdrátová camera, Bezdrátový videopřijímač 7” TFT LCD, USB pro kabel Mini USB (pro připojení k PC), Cinch kabel, Napájecí adaptér pro kameru, Napájecí adaptér pro přijímač, Šrouby a čepy, Návod k obsluze 12.
- Page 142 Odborně se musejí zlikvidovat i staré přístroje a baterie! Čištění: Chránit přístroj před znečištěním. Skříňka přístroje se čistí měkkou utěrkou, nepoužívat drsné nebo hrubozrnné materiály. Nepoužívat rozpouštědla nebo jiné agresivní čisticí prostředky. Po vyčištění přístroj dobře vysušit. Distributor: Technaxx Deutschland GmbH & Co.KG, Kruppstr. 105, 60388 Frankfurt a.M., Německo...
- Page 143 Příloha: Instalace “My Secure” 15. Připojení Camera Set TX-28 prostřednictvím “My Secure” Připojte monitor na TX-28 s počítači/notebooku promocí přiloženého USB kabelu. Neinstalujte software SIPCam z přiloženého disku CD-ROM a postupujte podle pokynů k instalaci na obrazovce. Po dokončení instalace je dokončen, tato ikona se zobrazí ploše.
- Page 144 Google Play store a Apple APP store. Následujte instalačního procesu na displeji vašeho Smartphone. Návod k obsluze pro „My Secure App“ najdete zde: http://www.technaxx.de/support/ POZOR: Chcete-li sledovat Camera Set TX-28 přes WLAN, spojení (s pomocí dodávaného USB kabelu) mezi Camera Set TX-28 a počítači/notebooku musí být aktivní po celou dobu.
Need help?
Do you have a question about the TX-28 and is the answer not in the manual?
Questions and answers