Technaxx TX–28 User Manual
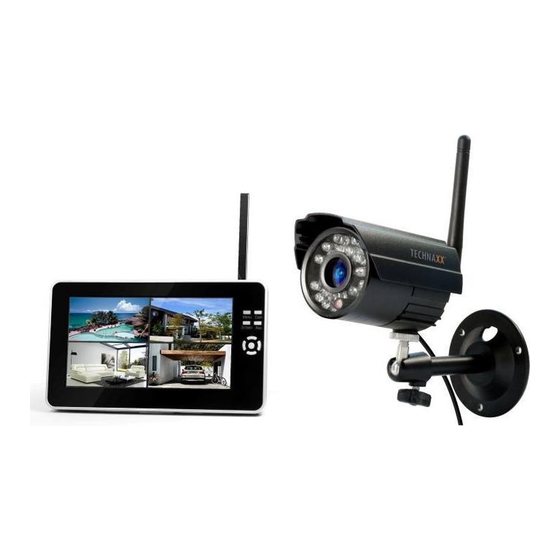
Easy security camera set
Hide thumbs
Also See for TX–28:
- User manual (19 pages) ,
- User manual (98 pages) ,
- User manual (144 pages)
Advertisement
Quick Links
Download this manual
See also:
User Manual
Easy Security Camera Set TX–28
The Declaration of Conformity for this device is under the Internet link:
www.technaxx.de/ (in bottom bar "Konformitätserklärung")
Before using the device the first time, read the user manual carefully.
Features
Digital wireless interference-free waterproof (IP65) camera set
100% Privacy & SD Recording
Has 4 channels, can support 4 cameras on one monitor (means simultaneous
display of 4 cameras on one monitor is possible)
Transmission range ≥ 200m in open range
Infrared night vision
High sensitivity microphone
Supports MicroSD cards up to 32GB
Record function with different recording modes (manual, time-scheduled,
motion-activated)
Motion Detection: Detect the moment to auto record
Mobile displayable on: iPhone / Android
Anytime sharp picture and good sound quality
Easy installation, Plug & Play
1. Front of the wireless receiver with 7" display
Technaxx
User Manual
®
Advertisement

Related Manuals for Technaxx TX–28


Summary of Contents for Technaxx TX–28
-
Page 1: User Manual
Easy Security Camera Set TX–28 User Manual The Declaration of Conformity for this device is under the Internet link: www.technaxx.de/ (in bottom bar “Konformitätserklärung”) Before using the device the first time, read the user manual carefully. Features Digital wireless interference-free waterproof (IP65) camera set 100% Privacy &... - Page 2 2. Side of the wireless receiver (Descriptions from up to down) Wireless receiver OFF / ON switch (= Power switch) TF: MicroSD memory card slot USB port: USB connecter for wireless receiver software to to update only AV-OUT port: use AV cable to connect with TV/LCD DC 12V Input 3.
- Page 3 4. Side of the wireless camera (Descriptions from up to down) Antenna Power Connector Pair code Camera stand 5. Front of the wireless camera with the IR night lights...
- Page 4 6. Remote Control Menu: Press Menu key to show Main Menu. Cam: Press Camera key to change channels. Screen: Press Screen key to show 4 video same time, press it again, video auto to show one by one, press it again to enlarge one of 4 video. Rec: Press Video Record key to record a video, press it again to stop recording.
- Page 5 Connect the 5VDC power adapter to the camera, connect the 12V/1A DC power adapter to the Receiver and turn on the receiver (has a built-in battery). Press “Pair Code” at the wireless camera power connector to pair the camera to the receiver.
- Page 6 Manual Capture Now you see different methods to record. Use the LEFT or RIGHT navigation key to select: Manual Take 1 photo, Take 3 photos, Take 5 photos 5s video 10s video video 1 Min video Press OK button to confirm the selection.
- Page 7 SD Format Press UP or Down navigation key to select “SD Format”. Press OK key to confirm. SD Format DOWN navigation key to select NO or YES. If select YES, it will format all files on MicroSD card. Press OK button to confirm the selection.
- Page 8 8.3. Select Camera Mode Press Menu key to display the main menu. Press LEFT or RIGHT navigation key to select the “Select Camera Mode”. Press OK key to enter it. Then below settings are shown: Select CAM Press UP or Down navigation key to select: CAM1, CAM2, CAM3, CAM4, Quad view, Exit...
- Page 9 Contrast / Brightness Press UP or Down navigation key to select “Brightness”. With the LEFT or RIGHT navigation key you can choose between a value range from 1 – 9. Press OK key to confirm the selection. Select Exit with the UP/DOWN navigation key to go back to the Main Menu.
- Page 10 8.6. Motion Detection Mode Press Menu key to display the main menu. Press LEFT or RIGHT navigation key to select the “Motion Detection Mode”. Press OK key to enter it. Then below settings are shown: Motion Detection Press UP or Down navigation key to select “Enable”.
- Page 11 8.7. Setting Mode Press Menu key to display the main menu. Press LEFT or RIGHT navigation key to select the “Setting”. Press OK key to enter it. Then below settings are shown: Setting Press UP or Down navigation key to select “Pair” and press confirm selection.
- Page 12 Date & Time With the UP or DOWN navigation key you can set the Date. Press OK key to confirm the setting. Select Exit with the UP/DOWN navigation key to go back to the Main Menu. Date & Time With the UP or DOWN navigation key you can set the Time.
- Page 13 Auto Switch Setting Mode Press UP or Down navigation key to select “Switch Time”. Default setting is 5 sec. You can select: 5 sec, 10 sec, 30 sec. Press OK key to confirm the selection. Select Exit with the UP/DOWN navigation key to go back to the Main Menu.
- Page 14 Advanced Setting Press UP or Down navigation key to select “TV out Format”. Default setting is NTSC. Press LEFT or RIGHT navigation key to select PAL or NTSC. Press OK key to confirm the selection. Select Exit with UP/DOWN navigation key to go back to the Main Menu.
- Page 15 About & Version Here you can see the Software Information. Press OK key to go back to Setting Mode. Select Exit with UP/DOWN navigation key to go back to the Main Menu. 9. Signal Strength Indicators – Description Perfect No signal 10.
-
Page 16: Important Safety Notice
Wipe the cleaned device. Important Notice: Should battery fluid leak from a battery, wipe the battery-case with a soft cloth dry. Distributor: Technaxx Deutschland GmbH & Co.KG, Kruppstr. 105, 60388 Frankfurt a.M., Germany Appendix: The installation of “My Secure”... - Page 17 Choose under “Camera Select” the “USB Video device” and click on the “OK” button. When you already installed the Technaxx App “My Secure”, you can login with the Cam ID/User and Login Password (both you can find on the monitor back side).
- Page 18 Secure” in the Google Play store and Apple APP store. Follow the installation process on the display of your Smartphone. The user manual for the „My Secure App“ you can find here: http://technaxx-europe.de/shop/enduser/4319_Android_Installation_Manual.doc http://technaxx-europe.de/shop/enduser/4320_Android_Installation_Manual.doc ATTENTION: When you want to follow up watching the Camera Set TX-28 via WLAN, the connection (with included USB cable) between the Camera Set TX-28 and your computer/notebook must be active all the time.
Need help?
Do you have a question about the TX–28 and is the answer not in the manual?
Questions and answers
Does this do continuous 24 hr recording or is it like a ring cam
The Technaxx TX-28 supports different recording modes, including manual, time-scheduled, and motion-activated recording. However, the manual does not explicitly mention continuous 24-hour recording. Unlike a Ring camera, which primarily uses motion-activated recording and cloud storage, the TX-28 records locally on a MicroSD card (up to 32GB) and offers privacy-focused recording.
This answer is automatically generated