Table of Contents
Advertisement
Quick Links
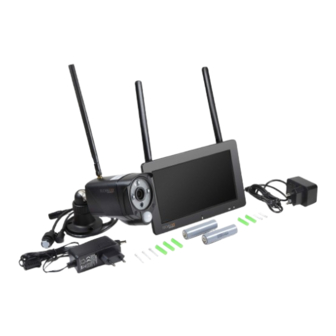
Security Camera Set 7" Touch Screen TX-128
Introduction
The manufacturer Technaxx Deutschland GmbH & Co.KG hereby declares
that this device, to which this user manual belongs, complies with the essential
requirements of the standards referred to the Directive RED 2014/53/EU. The
Declaration of Conformity you find here: www.technaxx.de/ (in bar at the
bottom "Konformitätserklärung"). Before using the device the first time, read
Service phone No. for technical support: 01805 012643 (14 cent/minute from
German fixed-line and 42 cent/minute from mobile networks).
The support hotline is available Mon-Fri from 9 am to 1 pm & 2 pm to 5 pm
If you drill a hole in the wall, please make sure that power cables, electrical
cords and/or pipelines are not damaged. When using the supplied mounting
material, we do not take the liability for a professional installation. You are
entirely responsible to ensure that the mounting material is suitable for the
particular masonry, and that the installation is done properly. When working at
higher altitudes, there is danger of falling! Therefore, use suitable safeguards.
Keep this user manual for future reference or product sharing carefully. Do the
same with the original accessories for this product. In case of warranty, please
contact the dealer or the store where you bought this product.
Enjoy your product * Share your experience and opinion on one of the
®
Technaxx
the user manual carefully.
Free Email: support@technaxx.de
well-known internet portals.
Hints
for
materials are raw materials and can be recycled. Do
not disposal old devices or batteries into the domestic
waste.
Cleaning:
contamination and pollution (use a clean drapery).
Avoid using rough, coarse-grained materials or
solvents/aggressive cleaner. Wipe the cleaned device
accurately.
GmbH & Co.KG, Kruppstr. 105, 60388 Frankfurt a.M.,
Germany
* User Manual
Environment
Protect
Distributor:
1
Warranty 2 years
Protection:
the
device
Technaxx
Deutschland
Packages
from
Advertisement
Table of Contents

Related Manuals for Technaxx TX-128


Summary of Contents for Technaxx TX-128
-
Page 1: Introduction
Directive RED 2014/53/EU. The Declaration of Conformity you find here: www.technaxx.de/ (in bar at the bottom “Konformitätserklärung”). Before using the device the first time, read the user manual carefully. -
Page 2: Table Of Contents
3. Quick operation guide ................6 3.1 Start up the TX-128 Set ..............6 3.2 How to connect the TX-128 Set with Security Premium App ..... 7 3.3 Adding an additional camera to the TX-128 Set ........ 8 4. How to operate the monitor ................ 9 4.1 First steps .................. -
Page 3: Features
1. Features ⚫ 7” touch screen monitor (1024x600 pixel) ⚫ 4 channel live view, 1 channel playback (at same time) ⚫ Max. 4 cameras with 7 "monitor connected (one camera included in the set) ⚫ Camera viewing angle 90° horizontal & 55° vertical ⚫... -
Page 4: Monitor 7" Touch
2.1 Monitor 7” touch USB port 2.0 (Backup, Upgrade, Mouse, Keyboard) MicroSD card slot (max. 128GB) Battery switch (turn on/off the battery) Power supply (DC5V/2.5A) Antenna (wireless signal transmission) Wall bracket Stand (foldable) Battery compartment (2pcs type 18650 batteries) Speaker (audio output) 10 7”... -
Page 5: Outdoor Camera (Tx-145)
2.2 Outdoor camera (TX-145) 1 Antenna 7 PIR sensor 2 Housing metal (IP66) 8 Vandal-Proof Housing 3 IR LED’s 9 Built in Speaker MicroSD(HC/XC) card slot Lens (under the cover) 5 Light sensor 10 Adjustable Holder / Feet 6 Microphone 11 Mounting holes Cable connections: DC power input (12V/1A) -
Page 6: Quick Operation Guide
3. Quick operation guide 3.1 Start up the TX-128 Set → Open the battery compartment and put in the rechargeable batteries (2x type 18650). Close the battery compartment. → Put a MicroSD card (max. 128GB) into the MicroSD card slot on the right side of the monitor. -
Page 7: How To Connect The Tx-128 Set With Security Premium App
→ After opening and logging in to the App press the plus + symbol on the top right corner and choose Add device → Select the type of camera. For TX-128 it is Touch screen NVR. → The app is now searching your home network for devices. -
Page 8: Adding An Additional Camera To The Tx-128 Set
3.3 Adding an additional camera to the TX-128 Set Compatible with the TX-128 Set: TX-145 (outside); TX-146 (inside) Step one: Power on the monitor and camera. (Normally when adding an additional camera you are using the monitor already so it should be powered on.) -
Page 9: How To Operate The Monitor
4. How to operate the monitor 4.1 First steps After the first start you see the live video of the camera on the monitor. There are only two options to operate the touch screen: ⚫ one click: Mainly used to navigate through the monitor menu ⚫... -
Page 10: Main Menu
4.2 Main Menu The Main menu shows all the possible settings. Video Here you can playback the recordings triggered by motion Playback detection. You will have Upper directory, 01, 02, 03, 04. With upper directory you can go one step back. Under the numbers which equal the camera channel you find first the date and after choosing a date you can choose a time. - Page 11 Video While the video is played you are able to zoom Playback in /zoom out by single tap on the video. Not possible when the video is paused. To delete the video press on the dustbin and confirm with Yes. The video is irretrievably deleted.
- Page 12 → Network Setup: Enable DHCP, the WiFi System Setup Router assigns the monitor an IP address. Disable the DHCP to manually set IP address, Subnet Mask, Gateway and Preferred DNS →Hotspot list: Shows the WiFi Router nearby, you can connect to. Use the option to change the WiFi of the monitor if necessary, e.g.
- Page 13 ⚫ Record You can set 4 schedules. Each schedule you Record Setup schedule can enable/disable. You can set the camera channels that are influenced. You can set the weekdays and the time the cameras should record motion timer (continuous recording). ⚫...
- Page 14 ⚫ Alarm Set the volume of the alarm sound that occurs on Alarm Setup volume the monitor when a motion is detected. setup ⚫ Enable/disable. When enabled the monitor turns Mobile split screen back into split screen after the motion detection recording has finished.
- Page 15 → Local Upgrade: If there is a new firmware Upgrade (monitor) available homepage www.technaxx.de/support under Security Premium. Copy it to an empty USB stick max. 32GB and insert it to the USB port of the monitor. After that choose local Upgrade to update the firmware.
-
Page 16: How To Start (Login/Registration)
App pictures of chapter 5 and 6 are based on Security Premium for iOS and Android in version 3.3.6 and 3.3.7. 5. How to start (Login/Registration) 5.1 Local mode & Users mode There are Local mode and User mode on the App. Users without a registered account can click “Local”... -
Page 17: Forget Password
5.3 Forget Password If you forget the password and needs to get it back, click „Forget password”. Enter the Email address into the user interface and press Confirm. The system sends a confirmation Email, which the user can check via his Email account). -
Page 18: How To Add A Device
The WiFi configuration was already done via the monitor. The Smartphone you are using and the TX-128 monitor are in the same WiFi network. 1. After opening and logging in to the App press the plus + symbol on the top right corner and choose Add device 2. -
Page 19: Add Device By Device Id (Cloud Id)
Smartphone. Device ID adding: On the bottom of the TX-128 you will find a sticker with ID number (and bar code). This ID number is the Device ID. Users can add the device by entering ID manually (or scanning the bar code). -
Page 20: Adding Device From The Same Network
TX-128. LAN/network scan adding: By clicking on LAN/network scan the App will search the local network for already configured cameras (TX-128). Choose the Device ID. Fill in the device name, username and password for the camera. The password can be customized by you on the monitor. The standard username is admin and password is to leave empty. -
Page 21: Ip/Ddns Adding
6.4 IP/DDNS adding By clicking on networked devices (1) the ADD by device ID will open. Here you can click on other adding way (2). Now it is possible to add the TX-128 by IP or DDNS (3). (1) Add device... - Page 22 Adding by DDNS: Enter your DDNS domain or the static IP of the router. You maybe need to set a port forwarding for the IP of the TX-128 in your WiFi router. There for check the manual of your router. Fill in the device name, username and password for the camera.
-
Page 23: How To Navigate Through The App
7. How to navigate through the App 7.1 My device In the Device Interface you can see all your added devices. After clicking on the three dots next to the status (online, connecting, offline) you can set the device to the top, show manually taken Screenshot/Recordings, Edit or Delete the camera. - Page 24 Gesture operation ⚫ Single finger double clicks into one of the four screens to enlarge or narrow the image. ⚫ Single finger slides left/right to change the camera channel. ⚫ Two fingers touch the screen and move outward to enlarge the image. ⚫...
- Page 25 Calendar Choose the date you want to see the playback Zoom Click it to zoom in and out on the timeline Device Setup Clicking on Setup or Setting under the live view. It opens the Device setup below. This interface can differ a little bit depending on the use of iOS or Android. All options are explained below.
- Page 26 64 -128GB must be formatted via the App or via the monitor! It could be necessary to format until the App shows MicroSD status: Formatted. Click and check if there is new software version. If there is, Firmware click and update directly to achieve OTA upgrade of the update device.
-
Page 27: Playback
Click the button of remote playback in the live view. Precondition of TX-128 remote playback: → Make sure the camera time is already time synchronized with the App → Insert the suitable MicroSD card into the monitor. → Setup recording schedule and enable motion detection recording. -
Page 28: My Center (Personal Area)
7.2 My center (personal area) On this interface users can setup their account and App settings. See the picture above. Add email address, cellphone number or WeChat account to bind and be able to login with. Change the password of your account. Like shown in the picture below. - Page 29 Setup interface Personal info (account) interface...
-
Page 30: How To Use Pc Software Windows (& Mac)
Premium.exe which find under www.technaxx.de/support --> Security Premium --> TX-128 Set. → Double click on the Security Premium.exe to start the installation. → Choose the language and click on OK. → Agree to license agreement and click on I Agree. -
Page 31: Login And Add Device
8.2 Login and add device → The PC Software starts automatically. A login window will show up. Just click on Login if you choose Local login in the Setup guide. →→ If you choose Cloud login enter the email address and the password, that you created over the Security Premium App. -
Page 32: Open Live View
8.3 Open live view To open the live view choose the Live view menu. Select the camera you want to view from the list on the right and double click on the device. The live view will open in the black window which is marked with a red frame. -
Page 33: Playback Recordings
8.4 Playback recordings Click on playback and to open it. The software will ask to close all currently opened live views (when there are open ones). Accept to close so you can change to the playback interface. Click on the + in front of the camera on the right and select the channel. -
Page 34: Faqs
9. FAQs Q1: When adding device by LAN or serial number, it warns “device is not online” or “device is not registered” A1: Make sure the internet connection which the device is using could access to internet normally. Check if the router has opened the DHCP function. If you have changed the network parameters of the device manually, we suggest to enable DHCP or restore the device to factory settings. -
Page 35: Important Additional Information
Q7: How to turn the alarm sound prompt on or off? A7: Enter the main menu, select the alarm setup. Enable/disable for each channel the button sound alarm. (main menu, alarm setup, 1-4 channel, sound alarm on/off) 10. Important additional Information 10.1Expand wireless coverage Wireless connection is simple and convenient, but wireless is not a panacea! Because of the nature of wireless, decided in some complicated scenarios,... - Page 36 2. The antenna of IPC should be placed in parallel with the NVR antenna to maximize the respective radiation direction angles. In contrast, the maximum coverage of the signal is formed, as shown in the following figure. correct method false method...
-
Page 37: Technical Specifications
11. Technical Specifications 11.1 Monitor Display size: 7” (17.8cm); Touch screen, 1024x600 pixel Max. 4 channel Network Interface: 2.4GHz WiFi Radiated output power max. 100mW Video bit rate: 256kbps – 3.0Mbps WiFi: IEEE802.11b/g/n (30m) Protocol: TCP/IP, UDP, P2P, DNS, DHCP, RTSP, ONVIF Connections: USB, MicroSD card slot, DC power input Supports MicroSD(HC/XC) cards up to 128GB (FAT32/ exFAT) class10 Video file format: .MP4... - Page 38 APP "Security Premium": iOS 9.0 or above; Android 7.0 or above / EN, DE, FR, ES, IT, NL, SE, DK, NO, FI, CZ, PO (06-2020) Package contents: Security Camera Set 7" Touch Screen TX-128 (1x monitor & 1x camera), 1x power adapter 5V/2.5A, 1x power adapter 12V/1A, 2x rechargeable battery type 18650 2600mAh, 5x Screws &...
- Page 39 GPL v2 without charge except for the cost of media, shipping, and handling, upon written request to Technaxx GmbH & Co. KG, Kruppstraße 105, 60388 Frankfurt am Main, Germany.
- Page 40 For example, if you distribute copies of such a program, whether gratis or for a fee, you must give the recipients all the rights that you have. You must make sure that they, too, receive or can get the source code. And you must show them these terms so they know their rights.
- Page 41 2. You may modify your copy or copies of the Program or any portion of it, thus forming a work based on the Program, and copy and distribute such modifications or work under the terms of Section 1 above, provided that you also meet all of these conditions: a) You must cause the modified files to carry prominent notices stating that you changed the files and the date of any change.
- Page 42 machine-readable copy of the corresponding source code, to be distributed under the terms of Sections 1 and 2 above on a medium customarily used for software interchange; or, c) Accompany it with the information you received as to the offer to distribute corresponding source code.
- Page 43 7. If, as a consequence of a court judgment or allegation of patent infringement or for any other reason (not limited to patent issues), conditions are imposed on you (whether by court order, agreement or otherwise) that contradict the conditions of this License, they do not excuse you from the conditions of this License.
- Page 44 10. If you wish to incorporate parts of the Program into other free programs whose distribution conditions are different, write to the author to ask for permission. For software which is copyrighted by the Free Software Foundation, write to the Free Software Foundation;...
- Page 45 (2) To do so, attach the following notices to the program. It is safest to attach them to the start of each source file to most effectively convey the exclusion of warranty; and each file should have at least the "copyright" line and a pointer to where the full notice is found. <one line to give the program's name and an idea of what it does.>...
Need help?
Do you have a question about the TX-128 and is the answer not in the manual?
Questions and answers