Table of Contents
Advertisement
Quick Links
Declaration of Conformity internet link::
Features
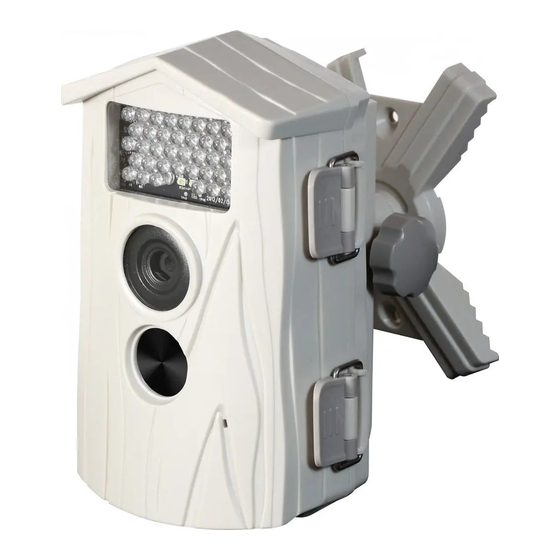
Security camera for indoor and outdoor use
Ideal for viewing wild animals and for monitoring houses
5 mega pixels CMOS sensor
Video and photo function are selectable
Standby time ~ up to 180 days
Motion and infrared sensor for night shots
Motion Detection Distance ~ up to 15m
Spashproof to IPX4
Mount for the camera and fixation belt
Easy handling and installation
System Requirements for PC
Intel® Core2Duo 1.8G or AMD equivalent CPU
Hi-speed USB2.0 port
1 GB RAM internal memory minimum
500MB free hard disk space
800 x 600 pixel color monitor
nVIDIA GeForce MX440 or above, AMD (ATi) Radeon 9200 or above
DirectX 9.0 or higher
Windows® XP (SP2 or higher) / Windows Vista™ / Windows 7
Note: If your system is Windows XP Service Pack I, go to
It's free to update your system to Windows XP SP II.
System Requirement for MAC
Power PC G5 or Intel Core Duo processor recommended
Free USB2.0 port
1 GB RAM internal memory minimum
500MB free hard disk space
800 x 600 color monitor
MAC OS 10.5x or above
Accessories: USB cable, TV-out cable, Mount for the camera, Belt for the trunk,
User Manual
Measurements / Weight of device: 145 (L) x 100 (P) x 170 (H) / 523g
Colours: Brown, White
Nature Cam TX-09
User Manual
www.technaxx.de/
(in bottom bar "Konformitätserkärung")
www.microsoft.com
Advertisement
Table of Contents

Related Manuals for Technaxx TX-09


Summary of Contents for Technaxx TX-09
- Page 1 Nature Cam TX-09 User Manual Declaration of Conformity internet link:: www.technaxx.de/ (in bottom bar “Konformitätserkärung”) Features Security camera for indoor and outdoor use Ideal for viewing wild animals and for monitoring houses 5 mega pixels CMOS sensor Video and photo function are selectable...
- Page 2 Front View Bottom View...
- Page 3 Inside View Control Panel...
-
Page 4: Start The Camera
Installing batteries and SD card Release 2 fastener locks and open the rear cover (battery pack) and install 4 new alkaline D cell batteries. Make sure to observe correct polarity. Install the SD card (see RED CIRCLE). Make sure to observe the correct polarity with clipped corner on the card to the right. -
Page 5: Setting Up The Camera
Setting up the Camera Press the POWER Button to turn it on. Press the MENU Button and show the Setup menu (A) PIRDelay (Passive InfraRed sensor): Define the interval time, before the PIR sensor will activate. The PIR sensor only activates after end (!) of the interval time. During this time camera does not take another picture. - Page 6 (B) Date & Time: Adjust the date / time and define the date format. The date and time data will print on the picture / video. Press the UP / DOWN Button to the Date & Time item then press the OK Button. User the UP / DOWN / LEFT / RIGHT buttons to adjust the date, clock and date format.
-
Page 7: Test Mode
(D) Format: Clean all data in the memory card or the internal memory. If you have inserted a memory card that only format the memory. Press the UP / DOWN Button to the Format item. Then press the OK Button. Press UP / DOWN Button to select No / Yes. -
Page 8: Function Mode
Function Mode (A) Still Capture Mode Press the RIGHT / MODE button to change the function to Still Capture mode. You can press the OK button to test this function. It will take a picture then stop. Cose the rear cover and lock latches completely. - Page 9 (D) Picture Information Bar 38 °C Record the temperature during a picture is taken. Temperature Record the moon phase of the day when a picture is taken. Moon Phase The main purpose is the active of most animals, which have a relation with the moon phase.
- Page 10 Start to use the Camera (A) Surveillance Mode If the Camera has not any operation from the control panel over 5 minutes. It will into the surveillance mode automatic. If has not any operation over 4,5 minutes. The front red LED starts blinking. After 15 seconds, the LED blinks fast.
-
Page 11: Replace The Batteries
(C) Wake up the Camera Go back to the NORMAL mode by press the POWER button. The LCD will turn on and return to the operation mode. Note: The system need to save the last record file before to weak up the camera. -
Page 12: Technical Specifications
Technical Specifications Image Sensor 1/2 .5” CMOS sensor, 5 mega pixels Display 2.4 inch TFT 240 x 320 GRB panel Lens F=2.7, f=7.5mm, 2G2P F:2.7, 52° View Angle Lens, Focus is fixed White Balance Auto Exposure Auto Resolution HD: 1280 x 720 (720p) Video Encode Motion JPEG...
Need help?
Do you have a question about the TX-09 and is the answer not in the manual?
Questions and answers