Table of Contents
Advertisement
Quick Links
1. Introduction
If you don't read anything else in this manual, read Chapter 2,
Controls and
Monitor.
Note: Operational procedures are the responsibility of the UltraRadiac's users. Instructions provided in this
manual are "how to's", not procedural recommendations.
Your UltraRadiac can measure and display both the instantaneous radiation dose rate (Rate), the amount of
radiation being measured at this moment, and the total accumulated radiation dose received (Dose) since the dose
memory was last cleared.
The Alarms
The UltraRadiac's presettable alarms for both instantaneous Rate and cumulative Dose can alert you to hazardous
conditions. When an enabled alarm's threshold is exceeded, a visual indicator will begin flashing and, optionally,
an LED will blink and/or an audible alarm will sound. Some units also include a vibrator alarm.
The Radiation Units
Depending on the model, your UltraRadiac is factory-set to display the Rate and the Dose in one of these units of
radiation measurement:
R (roentgen) – a measure of radiation exposure.
Gy (gray) – a measure of absorbed dose.
Sv(sievert) – a measure of absorbed dose equivalent.
Most illustrations in this manual show the radiation units asμR (microroentgens, one millionth of a roentgen).
The units are defined in Specifications.
1 of 33
Indicators. These cover the basics of using the UltraRadiac(TM) Personal Radiation
file:///C:/Documents and Settings/Buzz/Desktop/radstuff/Dosimeters & ch...
Basic
Functions, and Chapter 3,
4/11/2014 6:15 PM
Advertisement
Table of Contents

Related Manuals for Mirion Technologies UltraRadiac Plus


Summary of Contents for Mirion Technologies UltraRadiac Plus
- Page 1 file:///C:/Documents and Settings/Buzz/Desktop/radstuff/Dosimeters & ch... 1. Introduction If you don't read anything else in this manual, read Chapter 2, Basic Functions, and Chapter 3, Controls and Indicators. These cover the basics of using the UltraRadiac(TM) Personal Radiation Monitor. Note: Operational procedures are the responsibility of the UltraRadiac's users. Instructions provided in this manual are "how to's", not procedural recommendations.
-
Page 2: Equipment Check
file:///C:/Documents and Settings/Buzz/Desktop/radstuff/Dosimeters & ch... Equipment Check If your organization’s procedures require periodic equipment checks, refer to Chapter 4, Operational Verification Tests. Setting Up the Unit The UltraRadiac has five modes: Rate, Dose, Source Finder, Sleep and Data Logging. Chapter 5, Setting Up the Unit, describes them and tells you how to set and enable the Rate alarms and the Dose alarms. -
Page 3: Turning Off An Alarm
file:///C:/Documents and Settings/Buzz/Desktop/radstuff/Dosimeters & ch... Indicators. To turn the unit off, press ON/OFF until --- is displayed. TURNING OFF AN ALARM The UltraRadiac has two alarms, Low Level and High Level for each of two modes, Rate and Dose. If any alarm sounds, the next four sections tell you how you turn it off. Clearing the Low Rate Alarm Press the CLR/TEST key to turn off the vibrator and the audio alert. -
Page 4: Checking The Accumulated Dose
file:///C:/Documents and Settings/Buzz/Desktop/radstuff/Dosimeters & ch... The visual alerts will continue until the rate falls below the High Dose Alarm threshold. To turn off the visual alerts, you'll have to clear the dose memory. See Clearing the Accumulated Dose. CHECKING YOUR STAY TIME Press ALARM to see the number of minutes you can safely stay in the area at the current Dose Rate. -
Page 5: Using The Backlight
file:///C:/Documents and Settings/Buzz/Desktop/radstuff/Dosimeters & ch... Press the CLR/TEST key; the flashing display will show the selected (H or L) alarm threshold setting. If the Vibrator Alarm has been activated, the display will alternate between the threshold value and a vertically scrolling horizontal bar (---). The unit will automatically return to the main display about 10 seconds after the last keypress. -
Page 6: The Function Keys
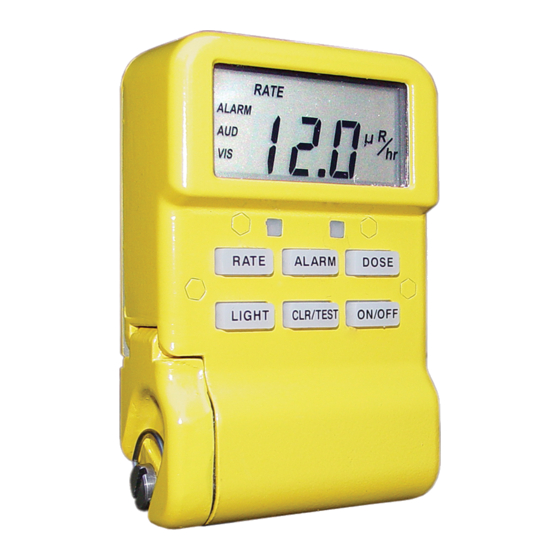
file:///C:/Documents and Settings/Buzz/Desktop/radstuff/Dosimeters & ch... Figure 1 The UltraRadiac Front Panel THE FUNCTION KEYS The primary function of each of the function keys is briefly described below. The programming functions of these keys are covered in Chapter5, "Setting Up the Unit". -
Page 7: Attaching The Belt Clip
file:///C:/Documents and Settings/Buzz/Desktop/radstuff/Dosimeters & ch... You should check your Stay Time frequently when you are in the presence of radiation. Light: In the dark, press to illuminate the display for about five seconds. Note that the backlight may not be visible in daylight or normal room lighting. -
Page 8: Operational Verification Tests
file:///C:/Documents and Settings/Buzz/Desktop/radstuff/Dosimeters & ch... If the belt clip is installed, remove it from the back of the UltraRadiac by unscrewing its two captive retaining screws and lifting the clip off the unit. Now put the UltraRadiac into the carrying case with the display toward the bottom (closed) end of the case. To close the case, refer to Figure 2 and... - Page 9 file:///C:/Documents and Settings/Buzz/Desktop/radstuff/Dosimeters & ch... Press and hold the ON/OFF key until the display appears, then release the key. The unit will display the numbers 0, 1, 2, 3, 4, in sequence. The Rate Mode display should appear, with the word RATE shown at the top left of the screen If a b or a blinking BAT indicator appears in the display or if the display is blank, refer to The Battery Life Indicators.
-
Page 10: Turning The Unit Off
file:///C:/Documents and Settings/Buzz/Desktop/radstuff/Dosimeters & ch... At higher exposure rates, the display will change tomR(milliroentgens). With large exposure rates, it will show just R. It's important to understand these units because each one is 1000 times greater than the previous one. TURNING THE UNIT OFF To turn the unit off: Press and hold the ON/OFF key. -
Page 11: Display Test Sequence
file:///C:/Documents and Settings/Buzz/Desktop/radstuff/Dosimeters & ch... Display Test Sequence A set of numbers in the following order will appear. Check that all of the numbers are exactly as shown below. 00.0 mR 1 1 1 mR 2.22 mR 33.3 mR 444 mR 5.55 R 66.6 R 777 R... -
Page 12: Ending The Display Test
file:///C:/Documents and Settings/Buzz/Desktop/radstuff/Dosimeters & ch... Press the ALARM key - the audio alarm should sound and both LEDs should turn on. If the optional vibrator alarm is installed, the unit will vibrate when any of these three keys is pressed. Checking the Function Keys When the 000 display appears during the esting the Display sequence, press each function key in turn,... -
Page 13: Sleep Mode Test
file:///C:/Documents and Settings/Buzz/Desktop/radstuff/Dosimeters & ch... Press the LIGHT key; the display's backlight will turn on for about five seconds. This function is meant to be used in total darkness; the backlight may not be visible in daylight or normal room lighting. SLEEP MODE TEST Press and hold the RATE key, then press the ON/OFF key. -
Page 14: Operation At Low Temperatures
file:///C:/Documents and Settings/Buzz/Desktop/radstuff/Dosimeters & ch... Contact your local Canberra Service Center for repairs. Figure 6 The GM Tube Has Failed OPERATION AT LOW TEMPERATURES At temperatures below -22¡F (-30¡C), it takes somewhat longer for characters to form on the display. The UltraRadiac automatically corrects for this by sensing the ambient temperature and increasing the display refresh time from two to five seconds. -
Page 15: The Rate Mode
file:///C:/Documents and Settings/Buzz/Desktop/radstuff/Dosimeters & ch... THE RATE MODE To turn the UltraRadiac on, press and hold ON/OFF key until you see the Rate display in Figure 7. Figure 7 The Rate Display The Rate Alarms There are two Rate Alarm Thresholds: Low Rate, for a minor hazard, and High Rate, for a severe hazard. The alarm indicators will remain enabled as long as you remain in the radiation area that triggered the alarm. - Page 16 file:///C:/Documents and Settings/Buzz/Desktop/radstuff/Dosimeters & ch... Optional Vibrator Enabled - The unit will vibrate. Low Threshold There are several indicators for the Low Rate Alarm Threshold (Figure 7). Visual Enabled - The RATE and ALARM indicators and the left LED will flash slowly. Audio Enabled - The audio will beep slowly.
-
Page 17: Changing The Rate Alarm Indicators
file:///C:/Documents and Settings/Buzz/Desktop/radstuff/Dosimeters & ch... Press the CLR/TESTkey to acknowledge the alarm condition and turn off the vibrator. The Rate LED, the audio alert, and the display's ALARM indicator will continue to flash quickly as long as the rate remains above the High Rate Alarm threshold. When the Rate drops below the High Rate Alarm threshold, press the CLR/TEST key to turn off the High Rate Alarm visual and audio indicators. -
Page 18: Changing The Rate Alarm Thresholds
file:///C:/Documents and Settings/Buzz/Desktop/radstuff/Dosimeters & ch... Changing the Rate Alarm Thresholds To change the High level (H) or Low level (L) settings: Press the ALARM and RATE keys. You'll see an H, for High Level Alarm, displayed. To access the Low Level Alarm settings, press the RATE key again; the display will show an L. Press the CLR/TEST key;... -
Page 19: The Dose Mode
file:///C:/Documents and Settings/Buzz/Desktop/radstuff/Dosimeters & ch... The left-most digit will begin to flash. Repeatedly press theRATEkey until the desired value of the digit is displayed. Figure 8 Changing the Rate Alarm Threshold Press the CLR/TEST key to lock in the digit's value. The next digit will begin to flash. Repeat the above two steps to select and lock in each of the two remaining digits. -
Page 20: Clearing The Accumulated Dose
file:///C:/Documents and Settings/Buzz/Desktop/radstuff/Dosimeters & ch... The Dose Mode display (Figure 9) will show you the dose that has accumulated since the unit's memory was last reset to zero. Figure 9 A Typical Dose Display The AUD and VIS display indicators will be seen only if the corresponding Dose Alarm mode and its indicator have been enabled. - Page 21 file:///C:/Documents and Settings/Buzz/Desktop/radstuff/Dosimeters & ch... The alarm indications will continue as long as you remain in the radiation area that triggered the alarm. The optional Vibrator Alarm can be used inaddition to the audio and visual alarms when background noise makes the audio alarm hard to hear.
- Page 22 file:///C:/Documents and Settings/Buzz/Desktop/radstuff/Dosimeters & ch... Clearing the Low Dose Alarm Press the CLR/TEST key to acknowledge the alarm condition and turn off the vibrator and the audio low dose alarm. The Dose LED and the display's ALARM indicator will continue to flash slowly until you reset the dose memory.
-
Page 23: Changing The Dose Alarm Indicators
file:///C:/Documents and Settings/Buzz/Desktop/radstuff/Dosimeters & ch... Changing the Dose Alarm Indicators Press the ALARM and DOSE keys. You'll see an H, for High Level Alarm, displayed. To change the Low Level indicators, press the DOSE key again; the display will show an L. Press the CLR/TEST key to access the selected (H or L) indicators. - Page 24 file:///C:/Documents and Settings/Buzz/Desktop/radstuff/Dosimeters & ch... Press the CLR/TEST key; the decimal point and the threshold unit indicator will begin to flash. Repeatedly press the DOSE key until the desired decimal point location and threshold unit indication are displayed. Press the CLR/TEST key. This action will lock in the selected decimal point location and threshold unit indication.
-
Page 25: Enabling The Source Finder Mode
file:///C:/Documents and Settings/Buzz/Desktop/radstuff/Dosimeters & ch... THE SOURCE FINDER MODE The Source Finder Mode allows the unit to locate an isolated source. In this mode, the unit will start clicking if the unit is near radioactive material. As you move closer to the radioactivity (or farther away), the unit will click faster (or slower). -
Page 26: Enabling The Sleep Mode
file:///C:/Documents and Settings/Buzz/Desktop/radstuff/Dosimeters & ch... THE SLEEP MODE When the Sleep Mode is enabled, most of the unit's circuits will be turned off to conserve battery power. Every 5 minutes, the unit will wake up for 4-6 seconds and check the current Rate. DO NOT place the unit in Sleep Mode before responding! Doing so can expose you to radiation for as long as five minutes before you are alerted. -
Page 27: The Data Logging Mode
file:///C:/Documents and Settings/Buzz/Desktop/radstuff/Dosimeters & ch... If a Rate Alarm is triggered, the unit will stay awake. If no Rate Alarm thresholds have been exceeded, the unit will go back to sleep for five minutes. This wake-sleep cycle will repeat continuously until the Sleep Mode is cancelled. Note: The unit does not accumulate Rate or Dose data while asleep. -
Page 28: Viewing The Data Log
file:///C:/Documents and Settings/Buzz/Desktop/radstuff/Dosimeters & ch... Release both buttons. The unit will automatically return to the Rate Mode. The current Dose and Rate pairs data and its index number have been recorded. To record another reading, point the unit at the location to be recorded and repeat the process. Viewing the Data Log To view the stored data, the unit must be OFF. -
Page 29: Maintenance Procedures
file:///C:/Documents and Settings/Buzz/Desktop/radstuff/Dosimeters & ch... While pressing both the RATE and ALARM keys, press and hold the CLR/TEST key for two seconds. The first index number (0) will appear This indicates that all data has been cleared. To return to the Rate/Dose mode of operation, turn the unit OFF, then back ON. 6. -
Page 30: Installing Or Replacing The Batteries
file:///C:/Documents and Settings/Buzz/Desktop/radstuff/Dosimeters & ch... The UltraRadiac stores its current data in memory when it's turned off. To prevent possible data loss, you must turn the UltraRadiac off before removing the batteries. Installing or Replacing the Batteries To open the battery compartment door, turn its fastener a quarter-turn counter-clockwise, swing the door open and slide out all four batteries. - Page 31 file:///C:/Documents and Settings/Buzz/Desktop/radstuff/Dosimeters & ch... With the batteries correctly installed, close and latch the door. See Latching the Compartment Door. Figure 12 The Battery Polarity Indicators 31 of 33 4/11/2014 6:15 PM...
-
Page 32: The Battery Compartment
file:///C:/Documents and Settings/Buzz/Desktop/radstuff/Dosimeters & ch... THE BATTERY COMPARTMENT To open the battery compartment door, turn its latch a quarter-turn counterclockwise and swing the door open. Inspect the four battery contacts on the inside of the door (Figure 13). If any corrosion is seen, clean it off with a pencil eraser. -
Page 33: Latching The Compartment Door
file:///C:/Documents and Settings/Buzz/Desktop/radstuff/Dosimeters & ch... Latching the Compartment Door Swing the battery cover closed, press it firmly against the unit and turn the fastener a quarter-turn clockwise. Note: It may be necessary to turn the fastener slightly to line it up with the latch post before latch will engage. When the door is properly closed, it will be possible to lay the fastener's D-ring down in the cover's fastener recess.
Need help?
Do you have a question about the UltraRadiac Plus and is the answer not in the manual?
Questions and answers