
Related Manuals for Mirion Technologies UltraRadiac-Plus


Summary of Contents for Mirion Technologies UltraRadiac-Plus
- Page 1 Radiation Safety. Amplified UltraRadiac™-Plus Personal Radiation Monitor User’s Manual 7068914D...
- Page 2 UltraRadiac™-Plus Personal Radiation Monitor User's Manual 7068914D...
- Page 3 The information in this document describes the product as accurately as possible, but is subject to change without notice. Printed in the United States of America. UltraRadiac is a trademark of Mirion Technologies, Inc. and/or its affiliates in the United States and/or other countries.
-
Page 4: Table Of Contents
Table of Contents Preface ............v 1. Introduction ..........1 2. Controls and Indicators ......5 The Function Keys ..........5 The Battery Life Indicator ........7 3. Basic Operation ........9 Powering the Unit ..........9 Turning Off an Alarm ........10 Checking Your Stay Times ...... - Page 5 Completing the Test ......... 25 GM Tube Failure Indication ......26 Operation at Low Temperatures ....... 26 Error Displays ..........27 5. Setting Up the Unit ........28 The Rate Mode ..........29 The Rate Alarm........... 29 Reading the Rate Alarm Threshold ..... 31 Changing the Rate Alarm Indicators ...
- Page 6 Viewing the Data Log ......... 45 Clearing the Data Log ......... 47 6. Maintenance..........48 Cleaning the Unit ..........48 The Batteries ............ 49 Installing or Replacing the Batteries ... 49 Charging the Batteries ........ 51 The Battery Compartment ........ 53 Latching the Compartment Door ....
- Page 7 B. Default Alarm Settings ......65 C. Display Units..........66 D. Glossary ...........68 E. Disposing of This Equipment ....70...
-
Page 8: Preface
Preface The UltraRadiac- Plus is a hand- held personal radiation monitor designed for the needs of first responders. • Measures and displays radiation dose rate and total dose • Presettable two level audio, visual and vibrating alarms for rate and dose. •... - Page 9 ) and weight (9.5 oz) • Low life cycle costs due to calibration stability and automatic self calibration • Mirion Technologies’s unique time-to- count technology for wider dynamic range • Data logging capability to 999 points • “Stay time” display shows time remaining to dose alarm •...
-
Page 10: Introduction
Controls Indicators on page 5 and Basic Operations on page 9. These cover the basics of using the UltraRadiac-Plus Personal Radiation Monitor. Note: Operational procedures are the responsibility of the UltraRadiac- Plus’s users. Instructions provided in this manual are “how to’s”, not... - Page 11 Chapter 1 Introduction Your UltraRadiac-Plus can measure and display both the instantaneous radiation dose rate (Rate), the amount of radiation being measured at this moment, and the total accumulated radiation dose received (Dose) since the dose memory was last cleared.
- Page 12 Operational Verification Tests on page 16. Setting Up the Unit The UltraRadiac-Plus has five modes: Rate, Dose, Source Finder, Sleep, and Data Logging. The chapter Setting Up the Unit on page 28, describes them and tells you how to set and enable the Rate alarms and the Dose alarms.
- Page 13 Chapter 1 Introduction Note: The battery recharging device should only be used with NiMH batteries. Connecting the charger with Alkaline batteries may result in severe damage to the batteries or the device.
-
Page 14: Controls And Indicators
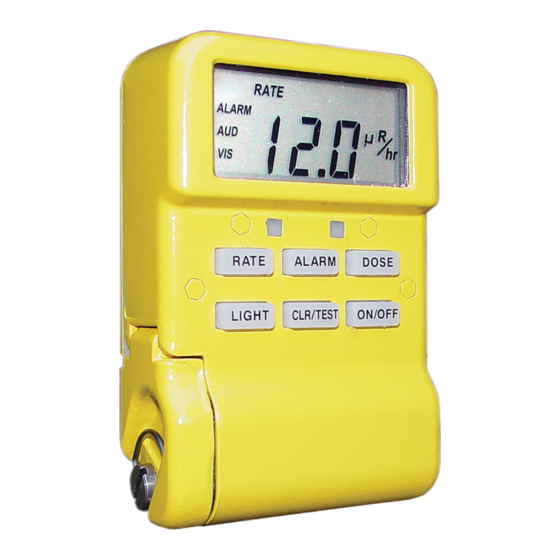
Each of the controls and indicators is covered in detail in the remaining sections of the manual. Figure 1 The UltraRadiac-Plus Front Panel The Function Keys The primary function of each of the function keys is briefly described below. The... - Page 15 Chapter 2 Controls and Indicators Press and hold to turn the unit ON/OFF on or off. Press to change to the Rate RATE Mode. Press to change to the Dose DOSE Mode. Press to see the Stay Time, ALARM the number of minutes you can safely stay in the area at the current Dose Rate.
-
Page 16: The Battery Life Indicator
CLR/TEST and hold to enable the Display Test Sequence The Battery Life Indicator The UltraRadiac-Plus has two battery life indicators. See The Batteries on page 49 for instructions on changing the batteries. • If a blinking 8 is displayed, the unit has stopped functioning. - Page 17 Chapter 2 Controls and Indicators Remaining Battery Life In the Rate Mode with the BAT indicator blinking, press the CLR/TEST key. A three- digit number indicating the approximate remaining battery life, in minutes, will be displayed.
-
Page 18: Basic Operation
Powering the Unit 3. Basic Operation The first time you take your UltraRadiac-Plus out of its shipping carton, you’ll have to install its batteries. For detailed instruction see The Batteries on page 49. Powering the Unit To turn the unit on, press ON/OFF ... -
Page 19: Turning Off An Alarm
Chapter 3 Basic Operation Turning Off an Alarm The UltraRadiac-Plus has two alarms, Low Level and High Level for each of two modes, Rate and Dose. If any alarm sounds, the next four sections tell you how you turn it off. - Page 20 Checking Your Stay Times At that time, the unit may pass into the Low Rate Alarm region depending on the set point. See above instructions for clearing this alarm. • Clearing the Low Dose Alarm Press the CLR/TEST key to turn off ...
-
Page 21: Checking Your Stay Times
Chapter 3 Basic Operation Checking Your Stay Times Press ALARM to see the number of minutes you can safely stay in the area at the current Dose Rate. Specific information on Stay Time is given in the Glossary on page 68. WARNING: If the Dose Rate goes up, your remaining Stay Time... -
Page 22: Clearing The Accumulated Dose
Clearing the Accumulated Dose Clearing the Accumulated Dose Press and hold DOSE + CLR/TEST. The display will flash for a few seconds, then clear the accumulated dose. To return to the Rate Mode, press the RATE key. Reading the Alarm Threshold Press ALARM + RATE or ALARM ... -
Page 23: Changing The Alarm Indicators
Chapter 3 Basic Operation If the Vibrator Alarm has been activated, the display will alternate between the threshold value and a vertically scrolling horizontal bar (– – –). Changing the Alarm Indicators Press the ALARM + RATE keys or ... -
Page 24: Using The Backlight
Using the Backlight Using the Backlight In dim light, you can enable the unit’s backlight to read the display. • Press the LIGHT key. • The display’s backlight will turn on. • To conserve battery power, the backlight will automatically turn off in about five seconds. -
Page 25: Operational Verification Tests
These Operational Verification Tests should be performed periodically, as required by your departmental procedures. Installing the Batteries The first time you take your UltraRadiac-Plus out of its shipping carton, you’ll have to install its batteries. See The Batteries on page 49 for instructions. -
Page 26: Turning The Unit On
Turning the Unit On Turning the Unit On Press and hold the ON/OFF key until the display appears, then release the key. • The unit will display the numbers 0, 1, 2, 3, 4, in sequence. • The Rate Mode display should appear, with the word RATE shown at the top left of the screen (Figure 2). - Page 27 Chapter 4 Operational Verification Tests • AUD and VIS indicate that the Audio and Visual alarms are both enabled. • The unit will start counting and displaying the instantaneous Rate. Naturally occurring background radiation will cause the unit to display a low reading •...
-
Page 28: Turning The Unit Off
Turning the Unit Off At higher exposure rates, the display will change to mR (milliroentgens). With large exposure rates, it will show just R. It’s important to understand these units because each one is 1000 times greater than the previous one. Turning the Unit Off To turn the unit off: •... -
Page 29: Instrument Test
Chapter 4 Operational Verification Tests Instrument Test While in the Rate Mode, press and hold the CLR/TEST key until you see the test display in Figure 3, then release the key Figure 3 The Test Display Display Test Sequence • A set of numbers in the following order will appear. - Page 30 Instrument Test 00.0 µR 1 1 1 µR 2.22 mR 33.3 mR 444 mR 5.55 R 66.6 R 777 R 888 R 999 R 00.0 µR 9 (blinking) • The blinking 9 indicates that the unit passed all tests. A blinking 0 indicates a failure;...
- Page 31 Chapter 4 Operational Verification Tests Checking the Alarm At any time during the Clr/Test sequence of numbers: • Press the RATE key – the audio alarm should sound and the Rate LED, the left and one below the display, should turn •...
-
Page 32: Ending The Display Test
At the end of the test sequence, the blinking 9 will appear, indicating that the Rate Mode is operational. A blinking 0 indicates a failure; contact your local Mirion Technologies (Canberra) Service Center. The unit will return to the Rate Mode in about... -
Page 33: Backlight Test
Chapter 4 Operational Verification Tests Backlight Test Press the LIGHT key; the display’s backlight will turn on for about five seconds. This function is meant to be used in total darkness; the backlight may not be visible in daylight or normal room lighting. -
Page 34: Completing The Test
Completing the Test Figure 4 The Unit is Asleep • To wake the unit, press and hold the ON/OFF key until the SLEEP indicator disappears. • The unit will cycle through the 0–4 startup sequence, then return to the Rate Mode. -
Page 35: Gm Tube Failure Indication
Operation at Low Temperatures At temperatures below –22 °F (–30 °C), it takes somewhat longer for characters to form on the display. The UltraRadiac-Plus automatically corrects for this by sensing the ambient temperature and increasing the display refresh time from two to five seconds. -
Page 36: Error Displays
(6.0 Sv/h), the upper three-segment bar (– – –) on the display will begin flashing to indicate that: • The dose rate exceeds the range of the UltraRadiac-Plus. • The error might be greater than 20%. • The value of the displayed dose rate (and consequently of the calculated dose) is not accurate. -
Page 37: Setting Up The Unit
5. Setting Up the Unit This chapter has been written for the System Administrator, the person responsible for your organization’s UltraRadiac-Plus units. It describes each of the unit’s functions and gives detailed instructions on how to set and enable the alarms. This is applicable only if... -
Page 38: The Rate Mode
The Rate Mode The Rate Mode To turn the UltraRadiac-Plus on, press and hold ON/OFF key until you see the Rate display in Figure 6. Figure 6 The Rate Display The Rate Alarm There are two Rate Alarm Thresholds: Low Rate, for a minor hazard, and High Rate, for a severe hazard. - Page 39 Chapter 5 Setting Up the Unit High Threshold There are several indicators for the High Rate Alarm Threshold (Figure 6). • Visual Enabled – The entire display and the left LED will flash quickly. • Audio Enabled – The audio will beep quickly.
-
Page 40: Reading The Rate Alarm Threshold
The Rate Mode Reading the Rate Alarm Threshold To display the High level (H) or Low level (L) rate alarm thresholds: • Press the ALARM and RATE keys. • You’ll see an H, for High Level Alarm, displayed. • To read the Low Level Alarm setting, press the RATE key again;... -
Page 41: Changing The Rate Alarm Thresholds
Chapter 5 Setting Up the Unit • To change the Low Level indicators, press the RATE key again; the display will show an L. • Press the CLR/TEST key to access the selected (H or L) indicators. • Repeatedly press the ALARM key until you see the desired combination of indicators, AUDio, VISual, vibrator (–... - Page 42 The Rate Mode • If the optional Vibrator Alarm has been activated, the display will alternate between the threshold value and a vertically scrolling horizontal bar (– – –). Changing the Alarm Indicators • To choose one or more of the alarm indicators for the selected alarm level: •...
- Page 43 Chapter 5 Setting Up the Unit • Press the CLR/TEST key; the decimal point and the threshold unit indicator will begin to flash. • Repeatedly press the RATE key until the desired decimal point location and threshold unit indication are displayed. •...
-
Page 44: The Dose Mode
The Dose Mode The Dose Mode When the unit is on, dose data is continuously accumulated and updated every two seconds. • To enter the Dose Mode, press the DOSE key. • The Dose Mode display (Figure 8) will show you the dose that has accumulated since the unit's memory was last reset to zero. -
Page 45: The Dose Alarms
Chapter 5 Setting Up the Unit The Dose Alarms There are two Dose Alarm thresholds: Low Dose, for a minor hazard, and High Dose, for a severe hazard. The optional Vibrator Alarm can be used in addition to the audio and visual alarms when background noise makes the audio alarm hard to hear. -
Page 46: Reading The Dose Alarm Threshold
The Dose Mode Low Threshold There are several indicators for the Low Dose Alarm Threshold (Figure 8). • Visual Enabled – The ALARM indicators and the right LED will flash slowly. • Audio Enabled – The audio will beep slowly. •... -
Page 47: Changing The Dose Alarm Indicators
Chapter 5 Setting Up the Unit • Press the CLR/TEST key; the flashing display will show the selected (H or L) alarm threshold setting. • If the optional Vibrator Alarm has been activated, the display will alternate between the threshold value and a vertically scrolling horizontal bar (–... -
Page 48: Changing The Dose Alarm Thresholds
The Dose Mode • The unit will automatically return to the Dose Mode display about 10 seconds after the last keypress. Changing the Dose Alarm Thresholds To change the High level (H) or Low level (L) rate alarm settings: • Press the ALARM and DOSE keys. - Page 49 Chapter 5 Setting Up the Unit Setting the Alarm Threshold To set the threshold for the selected alarm level: • Press the CLR/TEST key; the decimal point and the threshold unit indicator will begin to flash. • Repeatedly press the DOSE key until the desired decimal point location and threshold unit indication are displayed.
-
Page 50: The Source Finder Mode
The Source Finder Mode • Press the CLR/TEST key to return to the Rate Mode or wait about 10 seconds. The Source Finder Mode The Source Finder Mode allows the unit to locate an isolated source. In this mode, the unit will start clicking if the unit is near radioactive material. -
Page 51: Exiting The Source Finder Mode
Every 5 minutes, the unit will wake up for 4–6 seconds and check the current Rate. The battery life time for the UltraRadiac-Plus in this mode is approximately 2000 hours. WARNING: Do not place the unit in... -
Page 52: Enabling The Sleep Mode
The Sleep Mode Enabling the Sleep Mode To enable the Sleep Mode: • Press and hold the RATE key, then press the ON/OFF key. • The characters SLP will be displayed briefly. • When you see – – – , release both keys. •... -
Page 53: Exiting The Sleep Mode
Chapter 5 Setting Up the Unit • If no Rate Alarm thresholds have been exceeded, the unit will go back to sleep for five minutes. • This wake-sleep cycle will repeat continuously until the Sleep Mode is cancelled. Note: The unit does not accumulate Dose data while asleep. -
Page 54: Capturing Data Pairs
The Data Logging Mode Capturing Data Pairs To capture data pairs, the unit must be ON and in the Rate Mode. • Press the RATE and DOSE keys together. • Hold both buttons down until the displayed number stops blinking (in about three seconds), •... - Page 55 Chapter 5 Setting Up the Unit • When the unit turns on, the last sequence number recorded will be displayed. • Press the RATE button to scroll down, or the DOSE button to scroll up, through the memory. • The first number shown in the display will be the index number, scrolling up (DOSE button) will next display the Rate data and scrolling up once again...
-
Page 56: Clearing The Data Log
The Data Logging Mode When the 999th sequence number has been recorded, the unit will cycle back to the first sequence number and any new data records will overwrite the previously recorded data in that location. Clearing the Data Log To clear all stored data, you must be in the Viewing the Data Log mode. -
Page 57: Maintenance
Cleaning the Unit Remove dust, moisture and loose dirt from the outside surfaces of the UltraRadiac-Plus with a clean soft cloth. If necessary, the unit may be cleaned with a mild solution of ordinary detergent and water, rinsed, and thoroughly... -
Page 58: The Batteries
The Batteries The Batteries If you’re installing batteries for the first time, the following caution can be disregarded. If you’re replacing the batteries, be sure to turn the unit off first. Installing or Replacing the Batteries • To open the battery compartment door, turn its fastener a quarter-turn counterclockwise, swing the door open and slide out all four batteries. - Page 59 Chapter 6 Maintenance Figure 10 Location of the Batteries Figure 11 The Battery Polarity Indicators...
-
Page 60: Charging The Batteries
The Batteries Charging the Batteries The UltraRadiac-Plus is equipped with the capability to use rechargeable AAA batteries as well as standard alkaline batteries. Nickel Metal Hydride (NiMH) batteries can be inserted in to the unit and used directly. To recharge the NiMH batteries insert them into the UltraRadiac-Plus and set the battery charger switch to ON position. - Page 61 Chapter 6 Maintenance Figure 13 Right Side View of UltraRadiac- Plus Note: Do not attempt to charge standard alkaline batteries. Damage can occur.
-
Page 62: The Battery Compartment
The Battery Compartment The Battery Compartment To open the battery compartment door, turn its latch a quarter-turn counterclockwise and swing the door open. • Inspect the four battery contacts on the inside of the door (Figure 14). If any corrosion is seen, clean it off with a pencil eraser. -
Page 63: Latching The Compartment Door
Chapter 6 Maintenance Figure 14 The Inside of the Battery Door Latching the Compartment Door Swing the battery cover closed, press it firmly against the unit and turn the fastener a quarter- turn clockwise. Note: It may be necessary to turn the fastener slightly to line it up with the latch post before latch will engage. -
Page 64: Attaching The Belt Clip
Do not over-tighten. The Carrying Case If the belt clip is installed, remove it from the back of the UltraRadiac-Plus by unscrewing its two captive retaining screws and lifting the clip off the unit. - Page 65 Chapter 6 Maintenance Now put the UltraRadiac-Plus into the carrying case with the display toward the bottom (closed) end of the case. To close the case, refer to Figure 15 and... Fold the top flap down over the front of the case.
- Page 66 The Carrying Case Figure 15 Using the Carrying Case...
-
Page 67: Specifications
Appendix A Specifications A. Specifications Features DOSE RATE – URAD-PLUS-S: 0.01 µSv/h to 2 Sv/h; URAD-PLUS-R: 1.0 µR/h to 200 R/h. Meets ANSI-N42.33-2006 standard above 1 µSv/h (100 µR/h). Dose rate alarm will function to 5.0Sv/h (500 R/h). DOSE – URAD-PLUS-S: 0.001 µSv to 999 Sv;... -
Page 68: Detector
Detector DATA RECORDING – Local data logging to 999 data points; data downloadable via optical (IR) communications port. SELF MONITORING – Continual self- monitoring for the instrument’s state of health. CASE – Die-cast aluminum; available in black or yellow. EMI SUSCEPTIBILITY – Will not be affected, or cause other equipment to be affected, by its use. -
Page 69: Display
Appendix A Specifications RESPONSE TIME – Achieves 90% of final reading in one second; subject to a step change from 1mR/h (10 µSv/h) to 55mR/h (550 µSv/h); updates display every second. Display LCD – Readable at 3 ft (1 m), updated every two seconds;... -
Page 70: Power
Power AUDIBLE ALARM – >85 dBA at 30 cm. VIBRATION ALARM – Included. Power BATTERIES – Four AAA 1.5 V alkaline batteries. MINIMUM BATTERY LIFE – 10 hours of battery life remaining allows display of remaining time. LOW BATTERY INDICATION – Triggered when the remaining battery life is approximately 10 hours;... - Page 71 Appendix A Specifications At operating temperatures below -22°F (- 30°C), it takes somewhat longer for characters to form on the display. The UltraRadiac-Plus automatically corrects for this by sensing the ambient temperature and increasing display refresh time from two to five seconds.
-
Page 72: Physical
WEIGHT – 8.8 oz (249 g) including batteries. Pouch weight is 2.4 oz (68 g). VOLUME – 12.8 in. (210 cc). Qualification Testing UltraRadiac-Plus has been type-tested to meet ANSI-N42.33-2006 with minor exceptions: Sec. 6.4, Sec. 5.12 and Sec. 5.7 (optional). Ordering Information URAD-PLUS-S/Y – UltraRadiac-Plus, Yellow, Sv unit, alkaline batteries. - Page 73 Appendix A Specifications URAD-PLUS-R/B – UltraRadiac-Plus, Black, R unit, alkaline batteries. URAD-PLUS-DCCHARG – DC charger with cigarette lighter connector (needs NiMH rechargeable batteries to operate). URAD-PLUS-MOUNT – Vehicle mount for URAD-PLUS (allows the use of DC charger).
-
Page 74: Default Alarm Settings
B. Default Alarm Settings The Dose and Rate alarm settings (thresholds) for the UltraRadiac-Plus are factory set to the values in the following tables. Low Setting High Setting Rate 500 µR/hr 2 R/hr Dose 100 mR 10 R Low Setting... -
Page 75: Display Units
. Any unit can have larger and smaller subunits, which are indicated by prefixes. As the Rate and Dose change, the UltraRadiac-Plus will automatically adjust its displayed units. For example: The Rate may start with µR/h (natural background radiation is less than 20 µR/h). - Page 76 The ‘centi’ prefix will be seen only on UltraRadiac's displaying sievert units.
-
Page 77: Glossary
The average rate (in time) of radiation; e.g., Roentgen per hour. Also called Rate. Rate The amount of radiation measured by the UltraRadiac-Plus every 2 seconds, then extrapolated to and displayed as units per hour. Roentgen (R) Unit of measure of radiation exposure;... - Page 78 Stay Time The Stay Time is how much time remains, at the current Dose Rate, before the High Dose Alarm is triggered. Stay Time is calculated by dividing (the High Dose Alarm Setpoint minus the already accumulated Dose) by the current Dose Rate, then converting the result to minutes.
-
Page 79: Disposing Of This Equipment
Therefore, following the provisions of COUNCIL DIRECTIVE 2002/96/EC on waste electrical and electronic equipment (WEEE), we ask that you contact your nearest Mirion Technologies office for instructions on the proper disposal of this equipment. - Page 80 Warranty Mirion Technologies (Canberra), Inc., (we, us, our) warrants to the customer (you, your) that for a period of ninety (90) days from the date of shipment, software provided by us in connection with equipment manufactured by us shall operate in accordance with...
- Page 81 EXCLUSIONS Our warranty does not cover damage to equipment which has been altered or modified without our written permission or damage which has been caused by abuse, misuse, accident, neglect or unusual physical or electrical stress, as determined by our Service Personnel.
Need help?
Do you have a question about the UltraRadiac-Plus and is the answer not in the manual?
Questions and answers