Table of Contents
Advertisement
Available languages
Available languages
Quick Links
SYMBOLE FIGURANT SUR L'ETIQUETTE OU DANS LA NOTICE D'UTILISATION
SYMBOL APPEARING ON THE LABEL OR IN THE INSTRUCTION MANUAL
Adresse du fabricant
Manufacturer's address
Dirección del fabricante
Date de fabrication
Date of production
Fecha de fabricación
Numéro de lot
Batch number
Número de lote
Référence du produit
Product reference
Referencia del producto
Poids maximum de l'utilisateur
Maximum user weight
Peso maximo del usuario
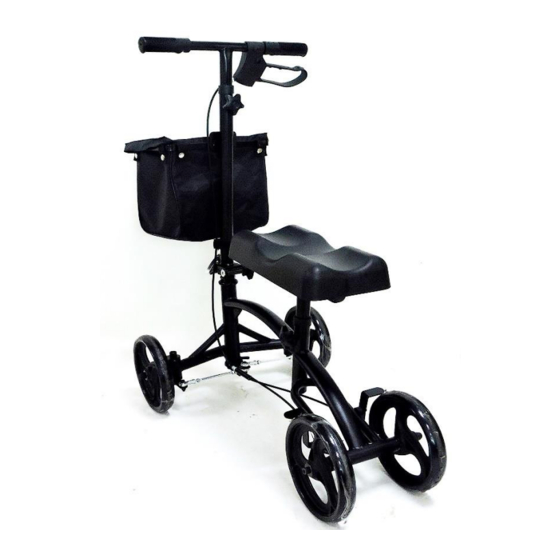
DEAMBULATEUR REPOSE-GENOU
Notice d'utilisation
DISPOSITIF MEDICAL
KNEE WALKER
Instructions manual
MEDICAL DEVICE
REF. 826175
Invitation à consulter le manuel d'utilisation
Invitation to consult the user manual
Invitación a consultar el manual de usuario
Respecter les consignes de sécurité
Follow the safety instructions
Respetar las instrucciones de seguridad
Conformité CE
CE conformity
Conformidad CE
Craint l'humidité
Does not tolerate dampness
Conformidad CE
Dispositif médical
Medical Device
Dispositivo médico
1
Advertisement
Table of Contents

Related Manuals for identités 826175


Summary of Contents for identités 826175
- Page 1 Notice d’utilisation DISPOSITIF MEDICAL KNEE WALKER Instructions manual MEDICAL DEVICE REF. 826175 SYMBOLE FIGURANT SUR L’ETIQUETTE OU DANS LA NOTICE D’UTILISATION SYMBOL APPEARING ON THE LABEL OR IN THE INSTRUCTION MANUAL Adresse du fabricant Invitation à consulter le manuel d’utilisation Manufacturer’s address...
-
Page 2: Notice D'instructions
NOTICE D’INSTRUCTIONS IMPORTANT Lire attentivement la notice avant toute utilisation de ce produit et la conserver en cas de besoin. Utilisateur : si vous êtes dans l’incapacité de lire ou de comprendre les avertissements, précautions ou instructions, veuillez contacter votre professionnel de santé ou distributeur avant d’utiliser ce produit sous peine de risques et de dommages. Consulter votre médecin ou spécialiste de santé... - Page 3 • Assurez-vous de débloquer les freins avant de déplacer à nouveau le fauteuil. • Pour tout transfert ou lorsque la chaise est immobile, actionnez également les freins. • Ne vous penchez jamais lorsque vous êtes sur la chaise. • Vérifiez le roulement des roues et les freins •...
- Page 4 Comme le montre la figure 3 ci-dessous, le paquet de pièces détachées et d'accessoires en vrac contient : B1 : Boulon M10*58 B2 : Vis hexagonale extérieure M8*45 B3 : Vis à tête cylindrique à six pans creux stan- dard M6*35 B4 : Vis M8 avec bouton en forme d'étoile B5 : Cache-poussière en fer B6 : Ecrou autobloquant M8...
- Page 5 Étape 3 : Insérez le guidon en forme de T dans l'ensemble de la barre supérieure pliable comme indiqué sur la figure 6, puis vissez le B4 et le B2 dans le trou correspondant. Figure 6 Étape 4 : Assemblez les ensembles de roues avant et arrière selon l'ordre des pièces indiqué à la figure 7, en vous référant à la figure 3 pour l'assemblage des pièces.
- Page 6 Étape 5 : Attachez le câble de frein avec une bande Velcro, comme le montre la Figure 8. Étape 6 : Distinguez l'avant de l'arrière avant l'installation, comme le montre la Figure 9. Alignez la plate-forme pour genoux avec le trou du tube de réglage du cadre du déambulateur, et verrouillez cette position à...
-
Page 7: Entretien
Instructions sur certains composants : 1. Fonctionnement du frein: Comme indiqué dans la figure ci-dessous: État d'utilisation normal, frein désengagé. Engager le frein selon les besoins dans le processus d'utilisation du déambulateur. Appuyez sur le levier de frein pour maintenir l'état de freinage. 2. -
Page 8: Caracteristiques Techniques
CHANGEMENT DE PROPRIETAIRE Le produit peut être réutilisé. Il doit d'abord être nettoyé et désinfecté en respectant les consignes d'hygiène. Lors du transfert du produit, pensez à remettre tous les documents techniques nécessaires au nouvel utilisateur. Au préalable, le produit devra être inspecté... -
Page 9: Product Description
INSTRUCTIONS MANUAL IMPORTANT Read the instructions carefully before using this product and keep them if necessary. User: If you are unable to read or understand any warnings, precautions or instructions, please contact your health care professional or distributor before using this product or risk and damage may result. Consult your physician or health care professional before using any assistive device. - Page 10 • Ensure the brakes are released before the chair is moved again. • Always ensure that the device is stationary and the brakes are applied when transferring to and from the device. • Do not lean out of the device. •...
- Page 11 As shown in Figure 3 below, the loose pack of spare and accessory parts: B1: Carriage Bolt M10*58 B2: Outer Hexagonal Screw M8*45 B3: Standard Hexagon Socket Head Cap Screw M6*35 B4: M8 Screw with Star-shaped Knob B5: Iron Dust Cover B6: M8 Self-locking Nut B7:M10 Knob Nut (Star-shaped) B8: Velcro strap...
- Page 12 Step 3 : Insert the T-shape handle bar into the foldable upper bar assembly as shown in Figure 6, and then screw the B4 and B2 into the corresponding hole to lock the connection Figure 6 Step 4 : Assemble the front and rear wheel assemblies according to the parts orders shown in Figure 7 with reference to Figure 3 for the assembly of the parts Figure 7...
- Page 13 Step 5 : Tie the brake cable with a Velcro strap, as shown in Figure 8. Step 6 : Distinguish the front from the rear before installation, as shown in Figure 9. Align the knee platform with the adjust- ment tube hole of the walker frame, and lock this positon with one B4 and B2. The installed knee platform should basically keep level with the Step 7 : As shown in Figure 10, put the hooks on the cloth basket through the two holes on the foldable upper rod assembly...
-
Page 14: Care And Maintenance
Instructions on some components : 1. Brake Operation: As shown in the figure below: Normal use state, brake disengaged. Engage the brake as needed in the use process of the walker. Press down the brake lever to keep braking state. 2. -
Page 15: Change Of Ownership
CHANGE OF OWNERSHIP The product can be reused. It must first be cleaned and disinfected in accordance with hygiene instructions. When transferring your product, remember to hand over all the necessary technical documents to the new user. Beforehand, the product must be inspected by an authorised specialist.
Need help?
Do you have a question about the 826175 and is the answer not in the manual?
Questions and answers