Table of Contents
Advertisement
Available languages
Available languages
Quick Links
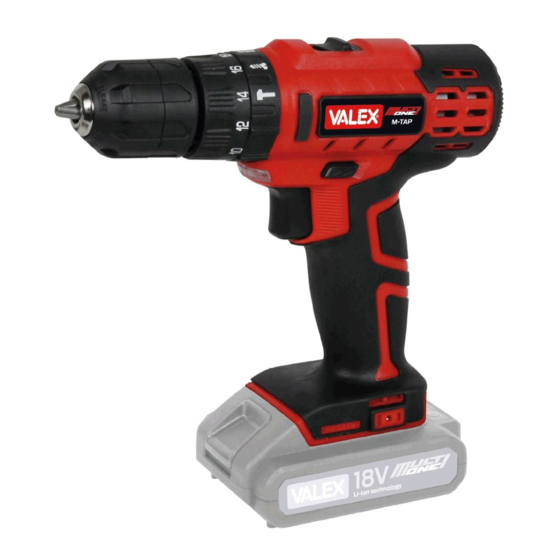
Trapano avvitatore a batteria M-TAP 18 - MULTI ONE
ISTRUZIONI D'USO
Istruzioni originali
Cordless drill M-TAP 18 - MULTI ONE
INSTRUCTION MANUAL
Translation of the original instructions
ATTENZIONE! Prima di usare la macchina, leggete e comprendete le istruzioni di sicurezza e le istruzioni d'uso fornite.
CAUTION! Before using the machine, read and understand the supplied safety instructions and operating instructions.
1429399
29-05-2018
- 1 -
Advertisement
Table of Contents

Related Manuals for Valex MULTI ONE M-TAP 18


Summary of Contents for Valex MULTI ONE M-TAP 18
- Page 1 1429399 29-05-2018 Trapano avvitatore a batteria M-TAP 18 - MULTI ONE ISTRUZIONI D’USO Istruzioni originali Cordless drill M-TAP 18 - MULTI ONE INSTRUCTION MANUAL Translation of the original instructions ATTENZIONE! Prima di usare la macchina, leggete e comprendete le istruzioni di sicurezza e le istruzioni d’uso fornite. CAUTION! Before using the machine, read and understand the supplied safety instructions and operating instructions.
- Page 2 è conforme ai requisiti essenziali di there complies with the essential health and Valex SpA - Via Lago Maggiore 24 sicurezza e salute contenuti nelle seguenti safety requirements contained in the following...
- Page 3 - 3 -...
-
Page 4: Installazione
TRASPORTO Per trasportare l’utensile utilizzate sempre il suo imballo o la sua vali- getta; questo lo preserverà da urti, polvere e umidità che ne possono compromettere il regolare funzionamento. Durante il trasporto sganciate la batteria dall’utensile. ATTENZIONE! Il trapano – avvitatore a batteria è idoneo alla foratura di metallo, legno, plastica, laterizio e al serraggio –... -
Page 5: Avviamento E Arresto
AVVIAMENTO E ARRESTO INSERIMENTO E DISINSERIMENTO PERCUSSIONE Ruotare la ghiera (Fig. A pos.11) sul simbolo per inserire la percus- ATTENZIONE! Prima di avviare l’utensile elettrico è obbligatorio sione, oppure in un’altra posizione qualsiasi per disinserirla. indossare occhiali, guanti, cuffie di protezione (non in dotazione). ATTENZIONE! Durante l’utilizzo fate in modo che nessuno si ILLUMINAZIONE ZONA DI LAVORO avvicini alla vostra zona di lavoro. -
Page 6: Manutenzione
meno di un preforo ecc. Smaltimento batterie: Le batterie incluse nell’apparecchio Al termine dell’avvitamento il giunto di rotazione interno all’avvitatore possono essere smaltite assieme ad esso. si disaccoppierà e l’utensile elettrico diverrà molto rumoroso e vibrerà Non gettate nel fuoco e non disperdete nell’ambiente le batterie maggiormente;... -
Page 7: Installation
INSTALLATION IMPORTANT! The manufacturer is not liable for any direct and/ or indirect damage caused by incorrect connections. IMPORTANT! The battery-operated drill - screwdriver is sui- IMPORTANT! Before carrying out the following operations, make table for drilling metal, wood, plastic and brick and for tightening sure that the battery is disconnected from the drill. - Page 8 STARTING AND STOPPING LIGHTING FOR WORK AREA The light (Fig. A pos.7) comes on or off automatically when the tool IMPORTANT! Before starting the electrical tool it is compulsory is switched on. to wear protection goggles, gloves and headphones (not provided). IMPORTANT! Make sure nobody is approaching the working CHANGING THE CUTTING TOOL area while the tool is running.
-
Page 9: Maintenance
to the screw head, and failure of the electrical tool (in this case not PROBLEMS, CAUSES AND SOLUTIONS covered by the warranty). In this case, unscrew the screw, perform a PROBLEM CAUSES SOLUTIONS pre-hole with a driller and re-screw modifying the adjustments. Do not force screws that do not screw! The electrical Battery empty...
Need help?
Do you have a question about the MULTI ONE M-TAP 18 and is the answer not in the manual?
Questions and answers