
Subscribe to Our Youtube Channel
Related Manuals for EK Loop Vertical GPU Holder EVO Gen4 Riser


Summary of Contents for EK Loop Vertical GPU Holder EVO Gen4 Riser
- Page 1 EK-Loop Vertical GPU Holder EVO - Gen4 Riser INSTALLATION MANUAL 1st Revision – January 18, 2022...
- Page 2 3. Before installation of the Vertical GPU Holder, power off your computer and unplug the power cables. 4. EK is not responsible for any damages due to external causes, including but not limited to: improper use, problems with electrical power, accident, neglect, alteration, repair, improper installation, and improper testing.
-
Page 3: Table Of Contents
TABLE OF CONTENTS WHAT IS ENCLOSED REQUIRED TOOLS DIMENSIONS OF THE VERTICAL GPU HOLDER INSTALLATION GUIDE SUPPORT AND SERVICE SOCIAL MEDIA - 3 -... -
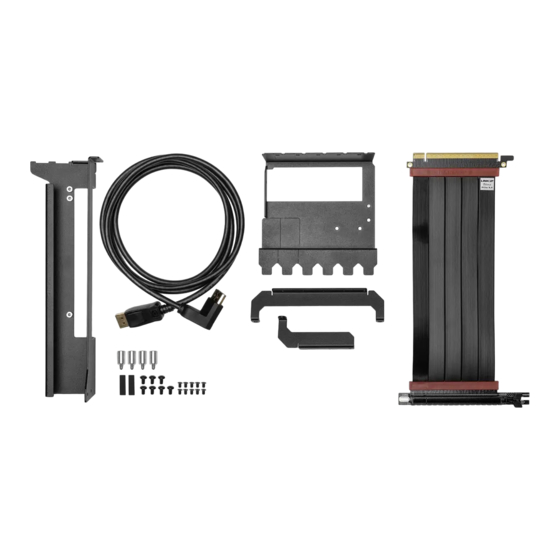
Page 4: What Is Enclosed
WHAT IS ENCLOSED Position EAN Description Quantity 104623 Bracket 1 104625 Bracket 2 9 / 10 104627 Bracket 3 104744 Bracket 4 103483 PCIe Riser Cable 4.0 102789 M3x5 Countersunk Screw 8107 M2.5x4 DIN7985 Screw 102689 UNC 6-32x1/4" Screw 104921 UNC 6-32x1/4"... -
Page 5: Required Tools
M3 Standoff Spacer (2x) UNC 6-32 Standoff Spacer (2x) UNC 6-32x1/4” (7x) M2.5x4 Phillips Pan Head Screw (3x) Universal Mounting Mechanism – You may not need every screw from this package. EAN: 104785 M3x5 Countersunk Screw (6x) Protective Foam 2mm (2x) REQUIRED TOOLS Phillips Head Screwdriver - 5 -... -
Page 6: Dimensions Of The Vertical Gpu Holder
DIMENSIONS OF THE VERTICAL GPU HOLDER 53.6 20.3 36.7 - 6 -... -
Page 7: Installation Guide
INSTALLATION GUIDE STEP 1 Before you start to assemble the Holder with the GPU to the motherboard, make sure that your computer is powered off and the PSU power cable unplugged. It is M3x5 also recommended that you put your computer with the COUNTERSUNK motherboard in a horizontal position before you continue SCREW (6x) - Page 8 OPTION 1 OPTION 2 - 8 -...
- Page 9 OPTION 5 In this position, the GPU Holder may support 3-slot GPUs because the GPU clamping part of the Holder is raised above the PCIe bracket holder part of PC chassis. You still need to double check that there will be no overlapping of I / O ports or interference of the GPU with the CPU cooler.
- Page 10 STEP 3 Before mounting the GPU on a holder, you may stick 1 or 2 protective adhesive foams for the extra protection of your GPU during installation. PROTECTIVE FOAM STEP 3 STEP 4 POSITION OF cca 3 mm Attach the PCIe Riser Cable 4.0 on a holder with two M2.5x4 Phillips RISER CABLE 4.0 pan head screws.
- Page 11 This GPU Holder is also compatible with the previous 3.0 version of POSITION OF the EK Riser cable. When mounting 3.0 cable position it differently, as RISER CABLE 3.0 is shown in the scheme. Attach it with two M2.5x4 Phillips pan head screws.
- Page 12 STEP 6 Remove the two screws from the bottom right side of the motherboard (or just the one in the middle if you will use Bracket 4 instead of Bracket 3). Compare one of the removed screws with both of the Standoff spacers from the package to determine which has the same thread Ф...
- Page 13 STEP 7 Carefully connect the Riser cable from the GPU Holder to the PCIE slot on the motherboard. STEP 7 STEP 8 Remove the appropriate PCIE brackets from your case. Which brackets you need to remove depends on the installation option you chose at STEP 1.
- Page 14 STEP 9 UNC 6-32x1/4” You may install the GPU to the GPU Holder before or after mounting the SCREW OR PC GPU Holder onto the PC case (depending of your configuration). CASE SCREWS (3-5x) Use at least five screws to attach the GPU Holder to the left and right side of the PC case.
- Page 15 STEP 11 UNC 6-32x1/4” SCREW Carefully mount the GPU onto the GPU Holder with the two UNC 6-32x1/4 screws. Pay special attention not to damage the GPU. STEP 12 Finally, connect the GPU cables (as instructed by the GPU manufacturer) to complete the installation.
-
Page 16: Support And Service
SUPPORT AND SERVICE In case you need assistance or wish to order spare parts or a new mounting mechanism, please contact: https://www.ekwb.com/customer-support/ For spare parts orders, refer to the chapter »WHAT IS ENCLOSED« on page 4 where you can find the EAN number of each part you might need.
Need help?
Do you have a question about the Loop Vertical GPU Holder EVO Gen4 Riser and is the answer not in the manual?
Questions and answers