
Related Manuals for SoundMax SM-CMD3005


Summary of Contents for SoundMax SM-CMD3005
- Page 1 SM-CMD3005 MULTIMEDIA DVD/CD/MP3 RECEIVER WITH BUILT-IN 3.5” TFT DISPLAY AND TV TUNER Instruction manual DVD/CD/MP3- 3.5” TFT-...
-
Page 2: Table Of Contents
Dear customer! Thank you for purchasing our product. For safety, it is strongly recommended to read this manual carefully before connecting, operating and/or adjusting the product and keep the manual for reference in the future. Table of contents Table of contents...2 Important safeguards ...3 Installation/Connection ...4 Panel controls ...8... -
Page 3: Important Safeguards
Important safeguards Using the device at temperature below -10º please heat up the passenger compartment to the recommended temperature! Read carefully through this manual to familiarize yourself with this high-quality car stereo system. Disconnect the vehicle's negative battery terminal while mounting and connecting the unit. When replacing the fuse, be sure to use one with an identical amperage rating. -
Page 4: Installation/Connection
Installation/Connection Installation... - Page 6 Electrical connection Caution: Do not interchange the connection of the wiring! For some car models you may need to modify wiring of the supplied power cord. Contact your authorized car dealer before installing this unit.
- Page 7 Using the ISO Connector 1. If your car is equipped with the ISO connector, then connect the ISO connectors as illustrated. 2. For connections without the ISO connectors, check the wiring in the vehicle carefully before connecting, incorrect connection may cause serious damage to this unit.
-
Page 8: Panel Controls
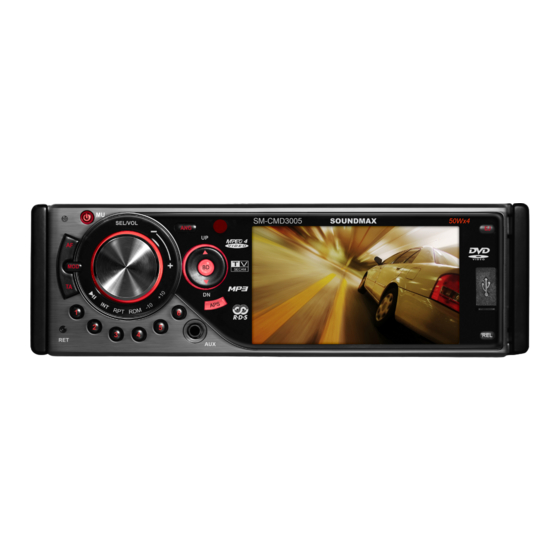
Panel controls Front panel POWER/MU (mute) button ANG (i.e. TILT) button REL (Release) button MOD button TA button VOL/SEL knob AF button TFT display IR remote sensor 10. BD button 11. UP and DN buttons 12. APS button 13. EJECT button 14. - Page 9 Description of the Unit Chassis Facet After removing the Front Panel Description of the Unit Chassis Facet After Sliding Down the Front Panel...
- Page 10 Remote control EQ button – press to select the corresponding equalizer preset modes to adjust the sound quality. PWR button - press it to turn the power on, press again to turn the power off. MODE button - press it to select the mode: => TUNER => DISC (the type of disc in the unit) =>...
- Page 11 MENU button - In DVD mode press it to enter the disc menu. cursor buttons/OK button - Use these buttons to navigate through menus and lists. Use OK to confirm. buttons – In Disc mode press these buttons to go to previous/next track. Press and hold for 2 seconds to start fast backward/forward playing.
- Page 12 Changing the battery 1. Press the catch and at the same time pull out the battery tray. 2. Insert the 1 x lithium battery, type CR 2025 3V battery with the stamped (+) mark facing upward. Insert the battery tray into the RC. Warning: Store the battery where children cannot reach.
-
Page 13: General Operation
General operation Reset the unit Operating the unit for the first time or after replacing the car battery, you must reset the unit. Press the RESET button on the panel to restore the unit to the original factory settings. Power on/off Press POWER button on the panel or PWR button on the RC to turn the unit on. - Page 14 Loud mode Press the LOUD button on the RC to turn on/off LOUD mode. When turning on LOUD mode, it will enhance bass level immediately when the bass is not enough. Equalizer mode Press the EQ button on the RC to select the preset music equalizer curves: => POP => ROCK => CLAS => FLAT =>.
-
Page 15: Digital Tuner
Digital tuner Note: RDS (Radio Data System) service availability varies with areas. Please understand if RDS service is not available in you area, the following service is not available, either. Band selection Press the MOD button on the panel or MODE button on the RC to select the TUNER mode. Press P/N/BAND button on the RC or BD button on the panel once or more to select: FM1, FM2, FM3, AM1, AM2. - Page 16 Local radio station search Press the LOC button on the RC shortly to turn the LOCAL function ON or OFF. When the LOCAL function is on the local stations (stations with weak radio signal) can be played. When the LOCAL function is off both local and distant stations (stations with strong radio signal) can be played.
-
Page 17: Disc Operations
Disc operations Disc glossary PBC (PlayBack Control) PBC is a menu recorded on the disc with SVCD or VCD2.0 format. For the discs contained PBC, it can playback interactive software with the menu displayed on TV. And if the disc contains still images, it can playback high definition of still image. - Page 18 Supported sampling frequency for MP3 disc: 8 KHz – 48 KHz (44.1 KHz preferably) Supported bit-rates of MP3 disc are: 32 - 320 kbps (128 kbps preferably). Following formats are not supported *.ACC, *.DLF, *.M3U, *.PLS, MP3 PRO, files with DRM. Open session discs are not supported.
- Page 19 Loading a disc Turn the power on. Press the EJECT button on the panel to flip it down. Insert the disc with the printed side facing upward into the slot. Press EJECT button on the panel to eject the disc. The panel will be closed automatically. Playback will start automatically.
- Page 20 to play 34-th track, firstly press the 10+ button for 3 times, then press the 4 button (the 0/10 button is used as the 0 button). Note: In MP3/WMA mode, long pressing the +10 or –10 button can play the next 10 or last 10 track. Scanning forward and backward Press and hold for 2 seconds the UP/DN buttons on the panel or the fast playing in forward or backward direction: X2 =>...
- Page 21 Press the cursor buttons on the RC to select the desired title. Then press the OK or PLAY/PAUSE button to open the root menu of the selected title. Press the cursor buttons to select desired track, then press the OK or PLAY/PAUSE button to play the selected track.
- Page 22 If you want to delete the list, move the cursor to CLEAR, press OK to delete all the list set before. Press PROG again to exit program play. On-screen display (OSD) During playback press the OSD button on the RC repeatedly to turn on/ off the playback status. In DVD mode the display will show the following: The number of the playing title =>...
- Page 23 Audio/Video/Picture files operations When AUDIO/PICTURE/VIDEO file is played, Category/Folder/File list will be displayed on the screen, and file/folder name being played will be displayed on top. Current selected item will be highlighted. Category Select 1. Use to select: AUDIO PICTURE VIDEO.
-
Page 24: Mp3 Overview
MP3 overview Notes on MP3: MP3 is short for MPEG Audio Layer 3 and refers to an audio compression technology standard. This product allows playback of MP3 files on CD-ROM, CD-R or CD-RW discs. The unit can read MP3 files written in the format compliant with ISO 9660. However it does not support the MP3 data written by the method of packet write. -
Page 25: System Setup Menu
System setup menu Press the SETUP button on the RC to display the system setup menu. Use the cursor buttons on RC to select the desired menu: System setup, Language setup, Audio setup, Video setup, Speaker setup, Digital setup. Press OK to enter it. Use the cursor buttons to select the desired setting. - Page 26 Reset to the initial factory setups Language setup OSD language Select the OSD language. Audio language Select the audio language (if DVD disc supports several audio languages). Subtitle language Select the subtitle language (if DVD disc supports several subtitle languages). Menu language Select the DISC menu language (if DVD disc supports several menu languages).
- Page 27 Speaker setup LT/RT: The audio out is Left and Right channels format even if the original sound is 5.1CH format. Stereo: The audio out format is stereo even if the original sound is 5.1CH format. VSS: The audio format Advanced Virtual Surround Sound Digital setup OP MODE Select the output mode: Line out, RF remode.
-
Page 28: Tv Operation
TV Operation 1. To switch on a suited video color system and a suited TV accompanying sound system In TV mode, short press the BD button repeatedly to switch on a suited video color system of the 5 ones of the unit: PAL, SECAM, PAL M, PAL N, NTSC. -
Page 29: Anti-Theft System
Anti-theft system Remove the panel Press the POWER/MU button to turn the power off. Press REL button to detach the panel. Place the panel into the case and take it with you when you leave the car. Remove the unit Remove the panel and the trim plate. -
Page 30: Handling Discs
Handling discs Dirty, scratched or warped discs may cause skip ping or noise. Handle the disc only by the edges. To keep clean do not touch its surface. Discs should be stored in their cases after use to avoid scratches. Do not expose discs to direct sunlight, high humidity, high temperature or dust. -
Page 31: Troubleshooting Guide
Troubleshooting guide Symptom Cause No power The car ignition is not on. The fuse is blown. Disc cannot be Presence of disc inside the player. loaded. Disc cannot be Inserting the disc in upside down. read. Compact disc is extremely dirty or defective. -
Page 32: Specification
Specification General Power supply: 12 V DC Maximum power output: 50 W x 4 channels Compatible formats: DVD/SVCD/VCD/HDCD/MP3/WMA/Picture-CD/JPEG playback/MPEG4 Supported disc types: CD-R/-RW/DVD±R/±RW/USB/SD/MMC card Dimensions (L x W x H): 165 x 178 x 50 mm ESP function: 40 sec. for Audio CD, 120 sec. for MP3 TFT display Screen size: 3.5 inch... - Page 33 ... 33 ... 34 ... 35 ... 39 ... 44 ... 46 ... 49 3 ... 57 ... 59 ... 62 ... 64 ... 65 ... 67 ... 66...
- Page 34 -10º...
- Page 36 REL,...
- Page 37 ISO!
- Page 38 ISO ( 12 (+)/ ACC+/ ISO, (+) --- (-) --- (-) --- ((-) --- (+) --- (-) --- (+) --- (+) ---...
- Page 39 POWER/MU (mute) ANG (TILT) REL (Release) VOL/SEL UP/DN EJECT 1/PLAY/PAUSE 2/INT 3/RPT 4/RDM 5/-10 6/+10 20. USB RET (reset) 22. AUX...
- Page 40 Eject...
- Page 41 EQ – PWR – MODE – ) => DISC ( => SD/MMC => AUX => TV =>. MUTE – SEL – => BAS => TRE => BAL => FAD =>. SETUP – +/- - STOP – CLK – ANGLE/ST – LOC/SLOW_FWD –...
- Page 42 P/N/BAND – NTSC => AUTO =>. TILT - MENU - DISC TUNER AF - RADIO PLAY/PAUSE – 10+/PTY – SEARCH – APS. TUNER RPT – DISC RDM – DISC RADIO TITLE/PBC – SUBTITLE – LOUD – STEP – TUNER OK - DISC : PAL =>...
- Page 43 (CR 2025 3V), – 6...
- Page 44 RESET, POWER VOL/SEL VOL/SEL POWER/MU SEL, : => TUNER => DISC ( ) => CARD ( POWER POWER/MU, MU, EJECT, VOL, SEL, POWER, MODE : VOL => BAS => TRE => BAL => FAD =>. VOL/SEL, MODE SD/MMC ) => AUX => TV =>. +/-, ) =>...
- Page 45 SEL, Loud LOUD FLAT =>. Angle TILT, ANGLE2 => ANGLE3 => ANGLE4 =>. VOL/SEL VOL/SEL Loud. : => POP => ROCK => CLAS => : => ANGLE0 => ANGLE1 =>...
- Page 46 RDS ( P/N/BD APS. MODE UP/DN 1-6. UP/DN (18 FM, 12 AM). UP/DN 1-6, (1-6). TUNER. : FM1, FM2, FM3, AM1, AM2.
- Page 47 Mono/Stereo ANGLE/ST STEREO. LOCAL LOCAL : PI, PS, TP, PTY, TA, AF, DATA. – AF ( VOL/SEL NEWS, AFFAIRS, INFO, SPORT, EDUCATE, DRAMA, CULTURE, SCIENCE, VARIED, WEATHER, FINANCE, – – 1~6. APS. : MONO, LOCAL. – PTY.
- Page 48 CHILDREN, SOCIAL, RELIGION, PHONE IN, TRAVEL, LEISURE, DOCUMENT, PTY NONE, POP M, ROCK M, EASY M, LIGHT M, CLASSICS, OTHER M, JAZZ, COUNTRY, NATION M, OLDIES, FOLK M. TA (...
- Page 49 PBC ( – – : DVD/SVCD/VCD/HDCD/MP3/WMA/Picture-CD/JPEG playback/MPEG4. : MP3 (*.mp3) WMA (*.wma) : MP4 MPEG 2(*.vob) MPEG 1(*.dat) : JPEG (*.jpg) ISO 9660 ISO 9660 + – 448. – PBC, DVD- Joliet - : CD-R/-RW/DVD±R/±RW.
- Page 50 USB/SD/MMC SD/MMC, 2 1 (SD/MMC). FAT 12/FAT 16/FAT 32 FAT 12/16 ( FAT 32 ( : 32 (id3tag ver 1.0) USB 2.0. USB: USB 2.0. Sharp, Samsung, : 8 M ~ 1 MMC: : 16 M ~ 1 – 99. - 99 : 32 - 320 : *.ACC, *.DLF, *.M3U, *.PLS, MP3 PRO,...
- Page 51 EJECT SD/MMC/USB SD/MMC SD/MMC SD/MMC PLAY/PAUSE Stop DVD/VCD/CD/MP3/WMA STOP PLAY/PAUSE, UP/DN or Disc. PLAY/PAUSE, PLAY/PAUSE, UP/DN STOP...
- Page 52 0/10) 0/10) MP3/WMA X16 => X20 => DVD/VCD : X1/2 => X1/3 => X1/4 => X1/5 => X1/6 => X1/7 => PLAY/PAUSE, STEP, PLAY/PAUSE, VCD/CD RPT CHAPTER ( ALL. ALL ( RPT. 0/10, 10+, UP/DN PLAY/PAUSE, DVD/VCD) SLOW_FDW DVD/VCD) RPT 1 ( ) =>...
- Page 53 Intro ( CD/VCD) RANDOM OFF. TITLE/PBC PLAY/PAUSE, PLAY/PAUSE, PBC ( TITLE/PBC PLAY/PAUSE DVD) PBC, SEARCH RANDOM ON => MENU...
- Page 54 VCD/CD/MP3/WMA PROG VCD, CD, MP3, WMA => VCD/CD MP3/WMA SUBTITLE SEARCH PLAY/PAUSE «PLAY» «CLEAR» PROG, => => => => WMA, MP3, VCD, CD => => => => => =>...
- Page 55 Mono L ( ) => Mono R ( ZOOM X2, ZOOM X3, ZOOM X4, ZOOM X1/3, ZOMM X1/3, ZOOM X1/4, ZOOM OFF DVD- P/N/BAND AUTO =>. AUDIO/PICTURE/VIDEO AUDIO PICTURE VIDEO. DVD) AUDIO VCD) AUDIO ) => Stereo. DVD/VCD) DVD/VCD) : => PAL => PAL –M => PAL –N => NTSC => : ZOOM ANGLE/ST...
- Page 56 PICTURE ( PLAY/PAUSE, PROG, VIDEO PICTURE, STOP, Category/Folder/File. ID3 tag 1.0/ 2.0,...
- Page 57 «.mp3». PC « » . VBR: 44,1 CD-R MP3 CD-R MPEG 3 « » 448. VBR, CD-R CD-RW, ISO 9660, CD-RW CD-ROM, CD-R CD-RW. ISO 9660. «.mp3», « MP3» « »,...
- Page 58 CD-R CD-RW CD-R CD-RW 1. ID3TAG.
- Page 59 SETUP NTSC: PAL: 16:9: – 0000.
- Page 61 LOGIC Dolby, 5.1, 5.1, : Line out, RF remod.
- Page 62 NTSC : PAL (PAL-DK, PAL-BG, PAL-I); SECAM (SECAM-BG, SECAM-DK); PAL M (PAL M); PAL N (PAL N); NTSC (NTSC MN). APS, UP/DN UP/DN : PAL, SECAM, PAL M, PAL N, NTSC. PAL, APS, UP/DN (1-10), UP/DN 10+, (1-10)
- Page 63 1-6.
- Page 64 POWER/MU. REL,...
- Page 66 « ». RESET.
- Page 67 DVD/SVCD/VCD/HDCD/MP3/WMA/Picture-CD/JPEG playback/MPEG4 CD-R/-RW/DVD±R/±RW/USB/SD/MMC card 165 x 178 x 50 CD, 120 480x272 16:9 300:1 .: 120 .: 120 65.0 – 74.0/87.5 – 108.0 - 1620 - 20 RCA- (2V)
Need help?
Do you have a question about the SM-CMD3005 and is the answer not in the manual?
Questions and answers