Table of Contents
Advertisement
Quick Links
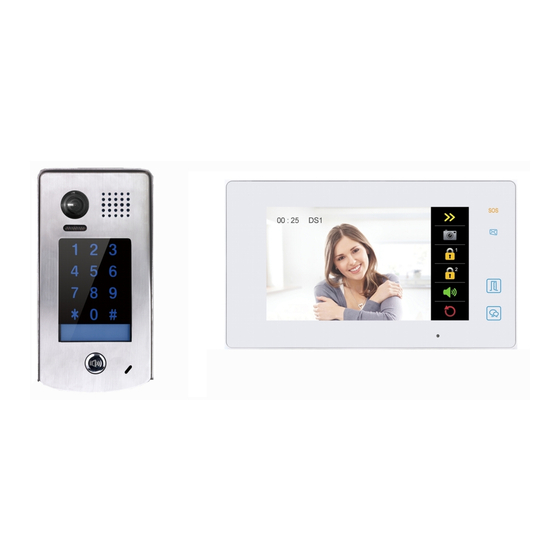
Art. 1SEK/M-KP
2-WIRES VIDEOKIT SEE EASY
IT
EN
Composto da:
Composed by:
Item
1SEK/M-KP
SEM7MEW
SEC/KP
SEPS/1
IT
Prima di procedere con l'installazione verificare che siano presenti tutti gli articoli mostrati sopra, altrimenti contattare il proprio distri-
butore. Leggere attentamente le istruzioni di sicurezza contenute in questo manuale.
EN
Check the box and make sure you have all of the part listed above otherwise please contact your local supplier. Please read carefully the
safety instructions in this manual.
FR
Avant de commencer l'installation vérifier que tous les articles montrés ci dessus soient présent, si vous rencontrez le moindre problème,
contactez votre revendeur. Il est impératif de lire le mode d'emploi et les instructions de sécurité contenues dans ce manuel.
ES
Antes de iniciar la instalación averiguar en la caja que estén presentes todos los artículos mostrados arriba, de otro modo contactar con
el distribuidor. Leer cuidadosamente las instrucciones de seguridad contenidas en este manual.
FR
Composé par:
Q.ty
Monitor a colori LCD 7" vivavoce con memoria video
1
Handsfree 7'' LCD colour monitor with video memory
Vidéophone mains libre couleurs LCD 7'' avec mémoire vidéo
Monitor manos libres en color LCD 7'' con memoria video
Staffa per fissaggio del monitor a muro
Bracket for monitor wall mounting
1
Support pour fixation du moniteur au mur
Soporte por fijacion del monitor a muro
Modulo telecamera fish-eye a colori con gruppo fonico e tastiera a sfioramento per controllo
accessi
1
Fish-eye colour camera module with door speaker and touch sense access control keypad
Module caméra «fish-eye» à couleurs avec module phonique et le clavier de contrôle d'accès
"Fish eye" módulo cámara a colores con grupo fónico y el teclado para control de acceso
Trasformatore di alimentazione e driver di linea
System power supply and bus driver
1
Transformateur et adaptateur de ligne
Transformador adaptador de línea
Tettuccio
Rain shelter
1
Visière parapluie
Visera antilluvia
Viti ed accessori di fissaggio
Fixing screws and accessories
8
Vis et accessoires pour montage au mur
Tornillos y accesorios de fijacion
Barra DIN per fissaggio alimentatore
DIN rail for power supply mounting
1
Rail DIN pour alimentation
Barra DIN para fijacion alimentador
ES
Compuesto por:
Description
Mi 2528/6
- 1 -
Advertisement
Table of Contents

Related Manuals for Farfisa 1SEK/M-KP


Summary of Contents for Farfisa 1SEK/M-KP
- Page 1 Art. 1SEK/M-KP 2-WIRES VIDEOKIT SEE EASY Composto da: Composed by: Composé par: Compuesto por: Item 1SEK/M-KP Q.ty Description Monitor a colori LCD 7” vivavoce con memoria video Handsfree 7’’ LCD colour monitor with video memory SEM7MEW Vidéophone mains libre couleurs LCD 7’’ avec mémoire vidéo Monitor manos libres en color LCD 7’’...
- Page 2 Istruzioni di sicurezza Safety Instructions Instructions de sécurité Instrucciones de seguridad Non installare vicino ad altri appa- Do not install close to other elec- Ne pas installer proche d’une No instalar cerca de otros aparatos rati elettronici come computer, TV, tronic equipment such as comput- source de radiation comme ordi- electrónicos como ordenadores,...
-
Page 3: Product's Description
eventuale del dispositivo potrebbe harsh chemicals, cleaning solvents nements. La chute eventuelle au defectuosos. La caída eventual del pregiudicarne il funzionamento. or strong detergents. To clean, wipe sol du dispositif pourrait en com- aparato al suelo podría perjudicar Le schede interne possono essere with a damp cloth from time to time. -
Page 4: Installation
Installazione. Installation. Installation. Installaciòn. Posizionare la telecamera in modo Posicionar la cámara de manera Place the camera so that it will not Positionner la caméra de manière che i raggi solari, o altre fonti lu- que los rayos solares u otras fuen- be under direct sun or reflected que les rayons directes ou indirecte minose dirette o riflesse di forte... -
Page 5: Installation Instructions
Se rencomenda de contactar el configurazione dell’indirizzo e delle included in this manual. correcte de l’adresse et des autres servicio técnico de ACI FARFISA en altre funzioni attraverso il menù fonctions par le menù OSD du el caso de esquemas de instalación Electric door lock OSD del monitor. -
Page 6: Very Important
Viceversa per utilizzare serrature Vice versa to correctly operate AC Vice versa pour utiliser gâches Viceversa para utilizar cerraduras elettriche in corrente alternata door lock releases it is required an électriques en courant alternatif eléctricas en corriente alterna es è necessario un trasformatore additional optional transformer un transformateur optionnel est necesario un transformador op-... -
Page 7: Door Panel Programming
PROGRAMMAZIONE PULSAN- DOOR PANEL PROGRAMMING PROGRAMMATION DE CLAVIER PROGRAMACIÓN DEL TECLADO TIERA Questa sezione spiega la procedura This section explains how to pro- Cette section explique la procédure Esta sección explica el procedi- per la programmazione delle fun- gram the door station functions. de programmation des fonctions miento para la programación de zioni della pulsantiera. - Page 8 Durante la digitazione della se- While inputting the programming Comme vous tapez la séquence de A medida que escribe en la secuen- quenza di programmazione la sequences the door station pan- programmation, la clavier mettra cia de programación, el teclado pulsantiera evidenzierà...
- Page 9 Ripristina la configurazione di fabbrica. Durante questa fase la retroilluminazione della pulsantiera sarà verde e sarà inibito il funzionamento dei tasti a sfioramento. 1234 + # 00 + # Reset configuration to factory default. During this process the Ripristino completo panel backlight will be green and the touching panel operation will Reset all settings be forbidden.
- Page 10 Cancella tutti i codici di apertura tranne il codice Master. 06 + # 1234 + # Ripristina il codice Master al valore 1234. Cancella codici Original Master Delete PIN codes Delete all the PIN codes except the Master code. code: 1234 Restore the Master code to default value 1234.
- Page 11 Selezione dell’indirizzo del posto esterno: 0 (principale), 1, 2, 3 12 + # 0 + # (secondari). Indirizzo del posto esterno Door station address ID Select the door station address: 0 (main entrance), 1, 2, 3 Ex.: 0 (secondary). Beeep Beeep Adresse du plaque de rue Beep...
- Page 12 I codici utenti del gruppo 1 consentono l’apertura del relè 1. I codici utente del gruppo 2 consentono l’apertura del relè 2 20 ... 59 + # 2011 + # (è richiesto un dispositivo aggiuntivo). Ciascun gruppo è costituito Codici gruppo 1 da un massimo di 40 codici di apertura.
- Page 13 TERMINAZIONE LINE TERMINATION TERMINAISON TERMINACION Sul retro del monitor sono presenti On the monitor’s rear panel there Au verso du moniteur ils sont Sobre el reverso del monitor están alcuni dip-switches di programma- are some configuration dip-switch- présent quelques dip-switches à presentes algunos dip-switches.
- Page 14 SEZIONE DEI CAVI CABLE CROSS SECTION SECTION DES CABLES SECCIÓN DE LOS CABLES It is strongly recommended to use E’ fortemente consigliato l’utilizzo Il est vivement conseillé l’utilisation Es aconsejado fuertemente empleo twisted cables. If not twisted cables di cavi twistati. L’utilizzo di cavi non de câbles tressés.
- Page 15 IMPIANTO VIDEOCITOFONICO MONOFAMILIARE CON UN MONITOR ONE-WAY VIDEOINTERCOM SYSTEM WITH ONE MONITOR INSTALLATION VIDEOPORTIER A UNE DIRECTION AVEC MONITEUR SISTEMA DE VIDEOPORTERO MONOFAMILIAR CON UN MONITOR Termination switch 6 = ON MONITOR AS MASTER I terminali L1 e L2 non sono polarizzati. L1 and L2 terminals are not polarized.
- Page 16 IT IMPIANTO VIDEOCITOFONICO MONOFAMILIARE CON DUE POSTI INTERNI (SEM7MEW e SEM7ME) ONE-WAY VIDEOINTERCOM SYSTEM WITH TWO MONITORS(SEM7MEW and SEM7ME) FR INSTALLATION VIDEOPORTIER A UNE DIRECTION AVEC DEUX MONITEURS (SEM7MEW et SEM7ME) SISTEMA DE VIDEOPORTERO MONOFAMILIAR CON DOS MONITORES(SEM7MEW y SEM7ME) SEM7ME Termination switch 6 = ON...
- Page 17 ISTRUZIONI DI FUNZIONAMEN- OPERATING INSTRUCTIONS MODE D’EMPLOI INSTRUCCIONES DE FUNCIONA- MIENTO Menú principal Menu principal Menù principale Main menu En modalité stand-by toucher En modalidad stand-by tocar la In modalità stand-by toccare lo When in stand-by mode, touch the pantalla LCD en un punto cualquier: l’écran LCD dans un point quel- schermo LCD in un punto qualsiasi: LCD screen on any place: the main...
- Page 18 permette la memorizzazione di seconds. Touch the icon to save (max 32GB), un film de 10 secondes El monitor grabadará automátic- un massimo di 100 immagini nella further pictures. sera enregistré. Appuyez sur amente una imagen después 3 memoria interna. Nel caso in cui pour enregistrer une autre image.
- Page 19 - Lista nomi: è possibile utilizzare - Namelist: use this option to make - Liste de nom: vous pouvez utiliser - Namelist: se puede utilizar esta questa opzione per effettuare una a call to a specific monitor installed cette option pour faire un appel à un opción para realizar una llamada a chiamata ad uno specifico monitor in the system by its address, (for...
- Page 20 Le opzioni “Non disturbare 8H” e The options “Do not disturb 8H” and Les options «Ne pas déranger 8H» Las opciones “Do not disturb 8H” “Non disturbare” consentono di et «Ne pas déranger toujours» per- y “Do not disturb always” van “Do not disturb always”...
- Page 21 contiene le voci: “Informazioni SD” ory into the uSD card. de l’appareil dans la mémoire uSD. la tarjeta, “Image copy” para co- relative alla capacità della sche- The option 'Monitor on with devia- L'option [Monitor on avec dé- piar las imágenes de la memoria da, “Copia immagine”...
-
Page 22: Technical Specifications
Sul proprio smartphone installa- On your smart phone install the Sur votre téléphone intelligent, ins- En su propio teléfono inteligente re l’app “VDP connect”, toccare il tallez l'application "VDP connect", instale la aplicación "VDP connect", "VDP connect" app, tap the “ ”, menù... -
Page 23: Troubleshooting
FR RÉSOLUTION DE PROBLÈMES ES GUIDA ALLA RISOLUZIONE DEI TROUBLESHOOTING. ESPECÍFICACIONES TÉCNICAS PROBLEMI. Problema Problem Possibile soluzione Possibile solution Problème Problema Solution possibile Posible solución Il monitor non si accende Verificare che tutti i dispositivi siano correttamente ali- No power on mentati Le moniteur ne s’allume pas Check if all the devices are rightly supplied from power... - Page 24 La ACI Srl Farfisa Intercoms si riserva il diritto di modificare in qualsiasi momento i prodotti qui illustrati. La ACI Srl Farfisa Intercoms se réserve le droit de modifier à tous moments les produits illustrés.ACI Srl Farfisa ACI Srl Farfisa Intercoms reserves the right to modify the products illustrated at any time.