Table of Contents
Advertisement
Quick Links
INSTRUCTION MANUAL
7A10473700A4
PARAMOUNT BED CO, LTD.
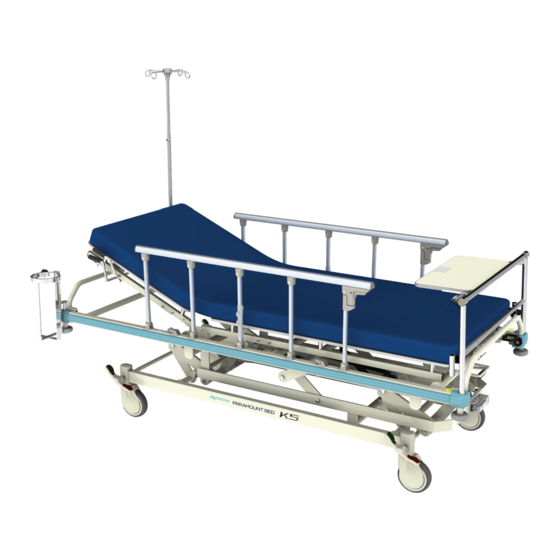
K5 Series Stretcher
Preface
Thank you for purchasing the K5 Series Stretcher.
This instruction manual describes precautions and how to safely use
and operate the stretcher.
●
Before using this stretcher, please read this instruction manual to fully
understand the safe and proper operating procedures.
●
The correct operating procedures should be explained not only to
the persons using the bed but also to caregivers.
●
After reading this instruction manual, store it where it can be easily
accessed for later reference.
●
Users and/or carers are requested to report information about any serious
incident related to this stretcher that occurs within the EU to the manufacturer
and the regulating authority of the member country of residence.'Serious
incident' means any incident that directly or indirectly led, might have led
or might lead to any of the following:
a) The death of a user, carer or other person.
b) The temporary or permanent serious deterioration of a user's, carer's or
other person's state of health.
c) A serious public health threat.
●
The actual product purchased may differ from detailed descriptions
given in this instruction manual due to product improvements.
●
Value in the specification such as working range, dimensions, angles
and mass are subject to normal manufacturing tolerances. Besides some
exemptions, display purpose words such as "approximately", "about"
etc. are omitted.
●
For any queries, please feel free to contact your dealer directly.
Advertisement
Table of Contents

Subscribe to Our Youtube Channel
Related Manuals for PARAMOUNT BED K5 Series


Summary of Contents for PARAMOUNT BED K5 Series
- Page 1 INSTRUCTION MANUAL K5 Series Stretcher 7A10473700A4 Preface Thank you for purchasing the K5 Series Stretcher. This instruction manual describes precautions and how to safely use and operate the stretcher. ● Before using this stretcher, please read this instruction manual to fully understand the safe and proper operating procedures.
-
Page 2: Table Of Contents
CONTENTS Page INTENDED USE / PART NAMES SAFETY PRECAUTIONS INSTALLATION OPERATION OVERVIEW SPECIFICATION OPERATING INSTRUCTIONS 1. Back Section Adjustment 2. Height Adjustment 3. Trendelenburg/ Reverse Trendelenburg Adjustment CASTERS SIDE-RAIL OXYGEN CYLINDER HOLDER ACCESSORY HOOK X-RAY CASSETTE RADIOGRAPHY OPTIONAL ACCESSORIES 1. Storage Tray (PC-5078) 2. -
Page 3: Intended Use / Part Names
INTENDED USE / PART NAMES 1. INTENDED USE they receive treatment. ※Please refer to the 「SPECIFICATION] for the target patient groups and the intended users. 2. PART NAMES The page number shown next to this symbol indicates where the related p. -
Page 4: Safety Precautions
Do not remove or deface any labels. If the safety label is removed or defaced, replace the part to which the label is affixed. Contact Paramount Bed or your distributor (see “Contact Information” on page 37) for any queries. 3A10645400A0... - Page 5 SAFETY PRECAUTIONS SAFETY PRECAUTIONS WARNING Do not operate the stretcher with a body part placed in the gap. If the stretcher is operated with a body part placed in the gap, the part may get caught, resulting injury. Be especially careful to check patients who might act in unexpected ways or cannot maintain their posture independently.
- Page 6 SAFETY PRECAUTIONS SAFETY PRECAUTIONS WARNING Take care to prevent a patient from falling off the stretcher even when side-rail are raised. The patient may fall off the stretcher from the end of side-rail or the head end or the foot end of the stretcher, resulting in injury.
- Page 7 For option directly attached to the stretcher such as mattresses or foot board, use suitable product specified by Paramount Bed. Using other product may create unintended gaps, cause interference between product, or lower the product safety, which may result in injury or operational failure.
- Page 8 SAFETY PRECAUTIONS SAFETY PRECAUTIONS WARNING Fasten the knob bolts when any optional attachments are mounted in the option attachment holes. Option Otherwise, there is a risk of injury Attachment Hole from falling off the stretcher if options unexpectedly comes loose and tips over.
- Page 9 SAFETY PRECAUTIONS PROHIBITED Do not allow the stretcher to be operated by a child aged 12 or under, or someone deemed incapable of comprehending the operation of the stretcher. There is a risk of unexpected injury by mistake. Do not use the stretcher for infants or small children. This stretcher is not designed for infants or small children.
- Page 10 SAFETY PRECAUTIONS SAFETY PRECAUTIONS PROHIBITED Do not get on the mattress base when it is raised. Excessive force on the mattress base can cause damage or deformation. Do not stand on the caster lock pedals. The stretcher may tip over, causing an injury or the stretcher may break. Do not place an object that sticks out from the base cover.
- Page 11 SAFETY PRECAUTIONS CAUTION When performing the height adjusment or inclination angle adjustment, pay attention not to hit the wall and beam. The stretcher or wall may be damaged or deformed. Make sure that the stretcher does not hit the wall and beam during the height adjusment or inclination angle adjusment.
- Page 12 SAFETY PRECAUTIONS SAFETY PRECAUTIONS CAUTION Do not excessively turn the handle for adjusting the angle of Hi-Lo section base. (PK-5114, PK-5114X only) Be careful when adjusting the angle of Hi-Lo section base. Turning the handle excessively may result in the handle damage or malfunction.
-
Page 13: Installation
INSTALLATION To avoid possible malfunctions, do not install the stretcher in the following locations. Location expose to direct sunlight. Location near heat sourches such as a stove or heater Location which is heavily electrically charged such as near an MRI. Location that has a high oxygen level. -
Page 14: Operation Overview
OPERATION OVERVIEW SAFETY PRECAUTIONS Back Raising The back section base can be manually adjusted from an angle 0 to 90 (see p.17) Height Adjusment The stretcher height can be adjusted from 58 cm to 90 cm, measured from the floor to the mattress base. -
Page 15: Specification
204 Kgf (2000 N) Linkage Mechanism Using a Gas Spring Height adjustment Linkage Mechanism Using a Manual Actuator system Trendelenburg Linkage Mechanism Using a Gas Spring Service life 8 years (based on Paramount Bed data), excluding consumable items such as casters. - Page 16 204 Kgf (2000 N) Linkage Mechanism Using a Gas Spring Linkage Mechanism Using a Manual Actuator Height adjustment system Trendelenburg Linkage Mechanism Using a Gas Spring Service life 8 years (based on Paramount Bed data), excluding consumable items such as casters.
- Page 17 SPECIFICATIONS Function to support and transfer the body of patients. Frequently used functions Caster lock/unlock, side-rail raising and lowering operation. Classification and standards standards The Stretcher described in this instruction manual is designed and manufactured according to the following equipment classification and standards. Classification as Medical Device in Europe : Class 1 Safety standards applied...
-
Page 18: Operating Instructions
OPERATING INSTRUCTIONS 1. Back Section Adjustment The back Section base can be raised and lowered by operating the back-raising lever. Raising Grasp the back-raising lever and base grip, WARNING then pull up the back section base. Releasing the back-raising level secures Make sure the caster are locked the back section base at the set position. -
Page 19: Height Adjustment
OPERATING INSTRUCTIONS 2. Height Adjustment Use the handle to adjust the height of the stretcher Pull out handle shaft completely Shaft Lower Counter clockwise Hi-Lo Handle Raise Handle grip Clockwise Open handle grip as shown and turn it Handle grip Height adjustment The height from the floor to the stretcher base can be adjusted. -
Page 20: Trendelenburg/ Reverse Trendelenburg Adjustment
3. Trendelenburg/ Reverse Trendelenburg Adjustment (Only PK-511*) How to operate Stretcher Trendelenburg/ Reverse Trendelenburg 3A10678500A0 Adjust Lever 3A10678400A0 Level Gage Trendelenburg/ Reverse Trendelenburg (TR/RTR) Lever 【 Trendelenburg (to raise) 】 Hold TR/RTR lever, and raise the stretcher facing arrow ... - Page 21 3. Trendelenburg/ Reverse Trendelenburg Adjustment (Only PK-511*) 【When returning to a horizontal position】 Make sure that adjust lever is on vertical position When returning to horizontal position, hold TR/RTR lever, and lower the stretcher to a horizontal position. Stretcher automatically stop at the horizontal position Check level gage by visual [Level Gage)
-
Page 22: Casters
CASTERS WARNING Lock the caster except when moving the stretcher. Otherwise, the patient may be injured while getting on or off a moving stretcher. CAUTION Do not attempt to forcibly move the stretcher while the caster are locked. Otherwise, malfunctioning may result. Do not stand on the caster-locking pedals, otherwise, the pedals may be damaged or deformed. -
Page 23: Side-Rail
SIDE-RAIL Side-rail are attached to both sides of the stretcher to prevent a sleeping patient from falling off the stretcher To Raise Hold the top bar of the folded side-rail and lift it up. Then, the automatic stopper will work Top Bar and ensure locking. -
Page 24: Oxygen Cylinder Holder
OXYGEN CYLINDER HOLDER WARNING The oxygen cylinder holder is fitted side of the head and foot end of the back section base. The oxygen cylinder holder can hold oxygen cylinders (diameter of up to 150 mm) with a maximum 1000-liter capacity. The oxygen cylinder holder can be used by inserted into one of the option attachment holes. -
Page 25: Accessory Hook
ACCESSORY HOOK The accessory hook is a product for attaching a urine bag or drainage bag The accessory hook is used by attaching it to the side-rail Groove Hook Accessory Hook Groove In order to prevent loose urine bag etc.,unexpectedly, please hang by using rubber band in the ※... -
Page 26: Ray Cassette Radiography
X-RAY CASSETTE RADIOGRAPHY X-Ray imaging using the cassete-based system can be performed within the range indicated by the shaded area in the diagram below. Imaging can be performed with the back-section base in either raised or horizontal position. Both of back and foot section using cassette which can be perform X-Ray. Imaging cannot be performed when the stretcher is in an inclined (Trendelenburg or reverse trendelenburg) position. - Page 27 X-RAY CASSETTE RADIOGRAPHY Setting a cassette (How setting to leg section) Check cassette tray adjuster that stored under the Cassette tray adjuster bottom of foot side then hold the handle part Handle To set the cassette tray in the Leg section, use cassette tray adjuster that installed in the main body.
-
Page 28: Optional Accessories
OPTIONAL ACCESSORIES 1. Storage Tray (PC-5078) This storage tray is designed to be attached to K5 series to place an objects. WARNING Do not place an object weighing 15 kg or more on the accessory storage tray. The accessory storage tray may get damaged or deformed. -
Page 29: Foot Board With Writing Table (Pk-2100Aa)
2. Foot Board with Writing Table (PK-2100AA) This writing table is designed to be attached to the K5 series to write on the table. The foot board with a writing table can be mounted and detached as required. It should be detached for treating a patient’s legs. -
Page 30: Pole (Kc-56A/Kc-56B)
The maximum load capacity of each hook is 1 Kg. Overloading may damage the hooks and resulting personal injury. CAUTION Only use Paramount Bed KC-56A/KC-56B/EC-562 IV Pole. Competitive products may not properly clamped into the optional accessory attachment holes. The slide pipe should be adjusted within the ranges below. Note that the pipe may become detached if extended too far. -
Page 31: Oxygen Cylinder Holder (Pc-5057)
OPTIONAL ACCESSORIES 4. Oxygen Cylinder Holder (PC-5057) This oxygen cylinder holder is made for attaching to the medical device to use the oxygen cylinder. WARNING The oxygen cylinder holder is fitted side of the head and foot end of the back section base. The oxygen cylinder holder can hold oxygen cylinders (diameter between 9.5 cm and 11.5 cm) with a maximum 500-liter capacity. -
Page 32: Daily Maintenance And Cleaning
DAILY MAINTENANCE AND CLEANING To ensure long service life, periodically inspect the stretcher, tighten any loose parts, and lubricate where required. The stretcher and mattress should always be kept dry because water or moisture will cause corrosion in metal, resulting in abnormal noise or the spread of bacteria. Therefore, any water or moisture on the stretcher should be wiped off... - Page 33 DAILY MAINTENANCE AND CLEANING For safety in use, inspect the product regularly, at least once a year. The product exhibits wear and deterioration according to the frequency and conditions of use. Inspect for loose parts, the operation of moving parts on the stretcher, and the presence of damage regularly. When an irregularity has been noticed or when a detailed inspection is desired, contact your dealer.
-
Page 34: Product Symbol Definitions
PRODUCT SYMBOL DEFINITIONS The symbols below are used for this product. Symbol Symbol handle clockwise to raise the CE mark stretcher and turn counterclockwise to lower it. 4 casters in locked status Indoor use symbol 4 casters in unlocked the european community checking that the collapsible Serial number stretcher side-rail... -
Page 35: Long-Term Storage
LONG-TERM STORAGE The following precautions should be noted when the stretcher is not in use for extended periods of time. 1. Lay the back section base flat. 2. Lower the stretcher to the lowest position. 3. Do not place objects other than mattress on the stretcher 4. -
Page 36: Troubleshooting
TROUBLESHOOTING your dealer for repair. Stretcher damaged in earthquakes, fires, floods or other incidents must be inspected and repaired by stretcher. Problem Check Reference page The stretcher cannot be Check if there are any obstacles Remove any obstacles impeding the movement Unlock the casters The stretcher cannot be moved Check if the casters are locked... -
Page 37: After Sales Service
Mattress, casters, the rubber of operation pedals, hydraulic cylinders and gas spring are consumable parts. 2. Minimum stock availability period Paramount Bed keeps replacement parts (necessary to maintain stretcher performance) in stock for at least 8 years after the discontinuation of production. 3. Questions regarding after-sales service... -
Page 38: Stretcher Disposal
STRETCHER DISPOSAL Stretcher disposal When the K5 series stretcher has reached the end of its usable life, discard it according to local standards. For any queries, please feel free to contact your dealer or to the following addresses. Website: https://www.paramount.co.jp/english/ Paramount Bed Co., Ltd. - Page 39 NOTES...
- Page 40 2021.03...
Need help?
Do you have a question about the K5 Series and is the answer not in the manual?
Questions and answers