
Related Manuals for Right Weigh 310-PP Series


Summary of Contents for Right Weigh 310-PP Series
- Page 1 INSTALLATION & OPERATION MANUAL ONBOARD LOAD SCALE EXTERIOR ANALOG 310-PP SERIES...
- Page 2 WELCOME Thank you for choosing to drive more and scale less! Here at Right Weigh, we are committed to making our products simple to install and easy to use. If your vehicle configuration is not described in this manual, our technical support team is ready to answer your questions! +61 418 622840 leigh@rwlsau.com.au...
-
Page 3: Table Of Contents
CONTENTS Parts Required Specifications & Overview Install Calibrate Operate & Weigh Troubleshoot a Problem Warranty Statement, Return Policy, & Repairs... -
Page 4: Parts Required
PARTS REQUIRED These parts are sold separately in the 103-SK kit: Male Branch Tee The tube size should match the existing suspension air line 1/4” Tube to Female NPT The thread size and type should match the thread size and type of the male branch 1/4”... -
Page 5: Specifications & Overview
SPECIFICATIONS & OVERVIEW Technical Specifications Operating/Storage Temperature: -40° F to +185° F (-40° C to +85° C) Enclosure: Black Polypropylene Gauge Size: 3.5” 4.5” 7.56” 114 mm 192 mm 4.5” 8.51” 114 mm 216 mm 17.84” 2.97” 453 mm 87 mm... - Page 6 SPECIFICATIONS & OVERVIEW The 310-PP series is designed for use on an axle group with a single height control valve suspension system. Within this series, there are different products designed for different axle group configurations. Before installation, make sure you have the proper gauge for your application:...
-
Page 7: Install
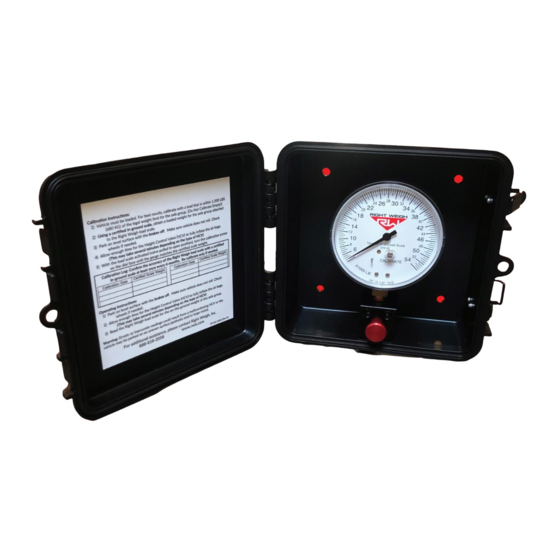
INSTALL The 310 Series gauge comes in a protective box. The following steps will walk you through how to correctly mount and install the scale. Be sure to choose a location that is easily accessible and safe from potential damage (forklift posts, tire caps, etc.) MOUNT SCALE Choose a location to mount the scale that is easily accessible and safe from potential damage (forklift... - Page 8 INSTALL CUT EXISTING AIR LINE Cut the air line going to one of the air bags in the suspension group to be monitored. ASSEMBLE TEE FITTING Choose a tee fitting that matches the size of the existing air line, then install a female NPT tube fitting onto the tee as shown. Use teflon tape or equivalent to seal threads, tighten securely.
- Page 9 INSTALL ROUTE AIR LINE TO GAUGE Route the new 1/4” air line from the tee fitting to the gauge. Secure air line with zip ties. Use 1/4” tube to 1/4” NPT elbow fitting to connect air line to gauge. AIR UP SUSPENSION SYSTEM Check for leaks and that all fitting connections are secure.
-
Page 10: Calibrate
CALIBRATE 1: The vehicle must be fully loaded. For best results, calibrate with a loaded weight within 1500lbs or 750kgs of your typical axle group weight (DO NOT calibrate empty!) 2: Using a certified in-ground scale, obtain a loaded weight for the axle group attached to the gauge. 3: Park on a level surface. -
Page 11: Operate & Weigh
OPERATE & WEIGH 1: Park on a level surface. Shift the transmission to neutral and set the parking brakes. 2: Chock the wheels to prevent unexpected vehicle movement. Release the parking brakes. 3: Make sure the Height Control Valve (HCV) has fully inflated the air bags. If needed, briefly dump the air from the suspension and allow the HCV to refill the system. -
Page 12: Troubleshoot A Problem
To test for an HCV is malfunctioning or broken problem, acquire a weight reading from the Right Weigh gauge and write it down (refer to gauge operating instructions for proper procedure). Drive the vehicle around the block and return to the same location. - Page 13 NOTES...
- Page 14 NOTES...
-
Page 15: Warranty Statement, Return Policy, & Repairs
In no event shall Right Weigh, Inc. be liable for direct, indirect, special, incidental or consequential damages (including loss of profits or loss of time) resulting from the performance of a Right Weigh, Inc. product. In all cases, Right Weigh, Inc. liability will be limited to the original cost of the product in question. - Page 16 THANK YOU FOR YOUR BUSINESS SCAN HERE FOR ADDITIONAL RESOURCES AND VIDEOS https:/ /rightweigh.com.au/manuals-resources/ RightWeighInc rightweigh_inc rwlsinc right-weigh-inc- Right Weigh, Inc. PP-003-0000-AU Revision G Hillsboro, Oregon USA ©2015-2022 Right Weigh, Inc. All rights reserved. June 2022...
Need help?
Do you have a question about the 310-PP Series and is the answer not in the manual?
Questions and answers