
Related Manuals for Right Weigh 202-DDG-01


Summary of Contents for Right Weigh 202-DDG-01
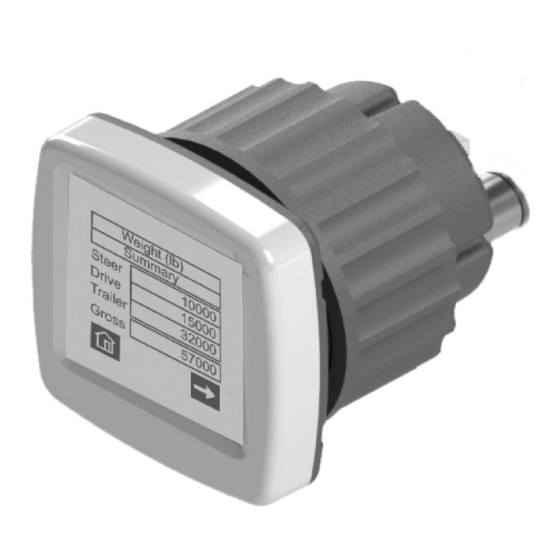
- Page 1 Interior Digital Load Scale 202-DDG-01 Installation and Operation Manual Please read carefully before installation...
-
Page 2: Table Of Contents
Contents Specifications: ........................2 1.0 Installation and Set-up Overview..................3 2.0 Gauge Installation and Electrical Connection ..............5 3.0 Airline Installation and Routing ..................8 4.0 System Settings Overview .................... 11 4.1 Change Air Sensor Names ..................11 4.2 Enable Estimated Steer Axle ..................12 4.3 Change Units (LBS or KG) .................. -
Page 3: Specifications
Specifications: Operating Temperature: -20° C to +85° C (-4° F to +185° F) Storage Temperature: -20° C to +85° C (-4° F to +185° F) Power Supply: 9 VDC to 32 VDC Units: Pounds (LBS) or Kilograms (KG) Housing: Black ABS... -
Page 4: Installation And Set-Up Overview
Height Control Valve (HCV). Note: Independent lift axles cannot be considered part of an axle group. Warning! The 202-DDG-01 digital dash gauge must be mounted inside the vehicles cabin. It is not designed to withstand harsh external environments. - Page 5 Installing and setting up the Right Weigh digital gauge involves four major steps. Gauge installation and electrical connection: This involves mounting the gauge into the vehicle’s dash panel or another appropriate location within the vehicles cabin. Airline installation and routing: This involves attaching a new airline that runs from the axle group to the gauge mounting location.
-
Page 6: Gauge Installation And Electrical Connection
2.0 Gauge Installation and Electrical Connection The 202-DDG-01 digital dash gauge is designed to be panel mounted and can be installed in many different locations within the vehicles cabin. Step 1: Choose a location to mount the gauge. Note: If you choose to mount the gauge in the vehicles dash panel, you will need at least 3 inches (76 mm) of clearance on the inside of the dash to accommodate the electrical and airline connections. - Page 7 Use this option if the vehicles dash panel cannot accept aftermarket gauges. Step 2: Insert the Right Weigh digital dash gauge into the mounting hole. Hold the gauge in position so the display appears level on the dash panel or gauge pod/bracket.
- Page 8 Note: The thickest portion of the gauge bezel indicates the bottom of the display face. Step 3: Screw the gauge nut onto the back of the gauge until it is tight, and firmly holds the gauge in position. DO NOT OVER TIGHTEN! This could cause problems with the display and touchscreen.
-
Page 9: Airline Installation And Routing
An auxiliary airline must be installed to connect the 202-DDG-01 digital dash gauge to one air spring from the axle group being monitored. Note: The 202-DDG-01 gauge cannot be used on an axle group that has two HCVs. To monitor an axle group that has two HCVs you will need the 202-DDG-02 dash gauge. - Page 10 Note: Make sure the airline is long enough to reach the mounting location of the gauge. Step 3: Route the new airline up into the cabin where the Right Weigh digital dash gauge is mounted. Make sure to avoid sharp edges and engine components that could become hot.
- Page 11 Step 4: Insert the new airlines into the push-to-connect sensor fitting on the back of the gauge. Step 5: After the airline is connected to the sensor fittings, air-up the suspension system and check all fitting connections for air leaks. Step 6: Installation is now complete.
-
Page 12: System Settings Overview
4.0 System Settings Overview The default settings for the Right Weigh digital dash gauge can be changed to make the information specific to your needs. The following is a list of the settings and feature options. Review each one and configure the gauge as needed. -
Page 13: Enable Estimated Steer Axle
Step 3: Select an appropriate name from the list of options. Press for more options. Step 4: To confirm and return to the HOME screen, press three times and once. 4.2 Enable Estimated Steer Axle The Estimated Steer feature is an approximate steer axle weight based on the relative air pressure changes in the drive axle’s air suspension system. -
Page 14: Change Units (Lbs Or Kg)
On the EstSteer screen, press the “On” indicator. Step 3: To confirm and return to the HOME screen, press twice and once. 4.3 Change Units (LBS or KG) By default, the gauge will be set to display weight in pounds (LBS). To change the system units, follow these screen steps: Step1: From the HOME screen, navigate to the “Units”... -
Page 15: Adjust Backlight And Screen Contrast
4.4 Adjust Backlight and Screen Contrast To adjust the backlight brightness and/or the screen contrast, follow these steps: Step 1: From the HOME screen, navigate to the “Display Settings” screen. then select “Settings”. Press Press “Display Settings”. Step 2: Select the display setting to change. Use your finger on the slide bar to increase or decrease the backlight brightness and/or the display contrast. -
Page 16: Reset Calibration Data To Factory Default Values
HOME screen. Note: If a PIN code is forgotten or lost, you will need to contact Right Weigh support for instruction to reset the PIN code. (See section 8.0 Additional Support for contact details.) -
Page 17: Calibration Overview
5.0 Calibration Overview To correctly calibrate the Right Weigh digital scale, you will need to enter an empty weight and a maximum legal loaded weight value for the axle group being monitored. It does not matter which value you enter first (empty or loaded). However, when a calibration value is entered the gauge will associate that value with the current air pressure in the suspension system at that moment. - Page 18 Step 5: From the “Home” screen, press then select “Calibration”. If required, enter the PIN code and press “Enter”. Step 7: Select the axle group. Step 8: Press the “Empty” or “Loaded” button depending on which value you are entering. You will be asked if you want to enter new calibration data.
-
Page 19: Operating And Weighing Instructions
6.0 Operating and Weighing Instructions In order for the 202-DDG-01 digital gauge to provide the most accurate weight values, you must take care to position the vehicle correctly. For best results, follow these steps. Step 1: Park on a level surface. Shift the transmission to neutral and set the parking brakes. -
Page 20: Troubleshooting
7.0 Troubleshooting Erratic or inaccurate readings could result from the following: 1) The vehicle is NOT parked on a level surface: parking on a sloped or banked surface will cause the vehicle weight distribution to shift between the axle groups. 2) The vehicle’s brakes are on: when the vehicle brakes are set they could apply additional pressure or torque on the suspension air bags. -
Page 21: Additional Support
8.0 Additional Support Contact: United States, Canada and All Other Countries: Right Weigh, Inc. Tel: (888) 818-2058 www.rwls.com rwls@rwls.com Australia and New Zealand: Smart Truck Solutions Tel: 0418 622840... -
Page 22: Appendix A
Check with your Right Weigh dealer for optional installation kits. 1. Approximately 20 to 30 feet (6 to 9 meters) or more of 1/4 inch nylon tubing. -
Page 23: Warranty Statement
(including loss of profits or loss of time) resulting from the performance of a Right Weigh, Inc. product. In all cases, Right Weigh, Inc. liability will be limited to the original cost of the product in question. Right Weigh, Inc. reserves the right to make improvements in design, construction, and appearance of products without notice. - Page 24 PP-003-0002 Rev A June 2015 Right Weigh, Inc. Hillsboro, Oregon, USA www.rwls.com ©2015 Right Weigh, Inc. All rights reserved.
Need help?
Do you have a question about the 202-DDG-01 and is the answer not in the manual?
Questions and answers