
Related Manuals for Joto E-HP-JCH-51


Summary of Contents for Joto E-HP-JCH-51
- Page 1 Joto Cap & Flat Press Manual Model No.: E-HP-JCH-51 OPERATOR’ S MANUAL Bringing images to life This product is SGS Electrical Safety Certified...
-
Page 2: Safety
Proceed with caution when using the heat press. To reduce the likelihood of circuit overload, Joto recommends to use a dedicated circuit if possible. Make sure that the cord is safely secured so it cannot be pulled or tripped over. -
Page 3: Table Of Contents
This product is SGS Electrical Safety Certified Congratulations on your purchase of a Joto 5 in 1 Cap & Flat Press! In order to work professionally with the machine and start production, please make sure you read this manual carefully. Reproduction of this manual requires written consent from Joto. Errors and amendments of technical details excepted, all rights reserved. -
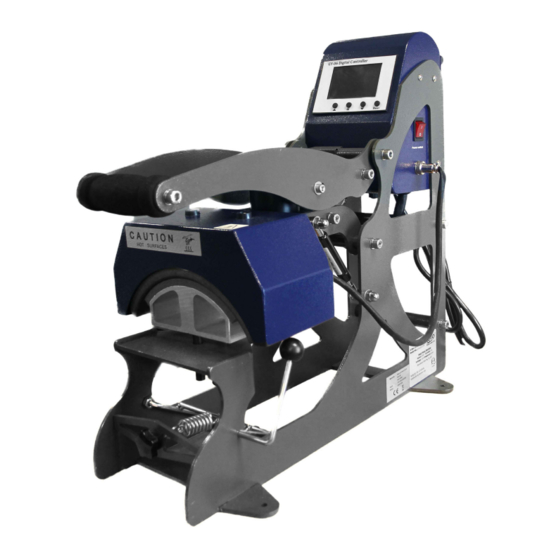
Page 4: Flat And Cap Press Overview
Cap & Flat Press Overview Technical Specs Model No.: E-HP-JCH-51 Machine Type: Flat & Cap Machine Size: 20.70” x 19.68” x 9.84” (526mm x 500mm x 250mm) Printable Area Size: 3.14” x 5.11” x 0.39” (80mm x 130mm x 10mm) - Page 5 Cap & Flat Press Overview TOP VIEW FRONT VIEW LEFT VIEW RIGHT VIEW www.jotoimagingsupplies.com 1-800-565-5686 Blaine, WA | Las Vegas, NV | Antioch TN | Coquitlam, BC | Brampton, ON...
-
Page 6: Machine Parts Diagram
Machine Parts Diagram Electric Case GY-06 Digital Controller Power Cord Electromagnetic Suck Plate Connecting screws Power Switch Heater Socket Hat Rack www.jotoimagingsupplies.com 1-800-565-5686 Blaine, WA | Las Vegas, NV | Antioch TN | Coquitlam, BC | Brampton, ON... -
Page 7: Platten Overview
Platen Overview Bottom Flat Heat Platen Top Flat Heat Platen 5.9”x 5.9” 5.9”x 5.9” 15 x 15cm 15 x 15cm Curvy Heat Platen Curvy Heat Platen Curvy Heat Platen Bottom Curvy Heat Platen Bottom Bottom Bottom 4.01” x 6.35” 3.93” x 5.43” 2.83”... -
Page 8: Setting Up Your Heat Press
Setting Up Your Cap & Flat Press Turning On Your Mug Press Turn the Main Power Switch ON. The Main Power Switch is at the right side of the heat press. Current temperature, set temperature, current time, set time will display. How to Read The Display 1.) Left side PV value = Current Temperature 2.) Right side PV value = Current Time... -
Page 9: Operating Instructions
Operating Instructions Pressing a cap 1.) Turn ON the Power Switch. 2.) Set the appropriate Press Temperature, and Time. 3.) Tape your imaged transfer/sublimation paper to your cap/substrate with heat tape. 4.) Set the pressure. To do this, place a blank cap/substrate into the cap press. Adjust the pressure knob at the bottom of the press until the cap fits snuggly when press is closed. -
Page 10: Replacing Elements
Replacing Platen Element Replacing your Heat Element 1.) Ensure the power switch is OFF. 2.) Unplug the heat press if it is still plugged in. 3.) Detach the platen element cord from the mug press. Unscrew the ring that holds the cord in place before detaching. -
Page 11: Maintenance
Note: This heat press should not be set to exceed 400˚F (200˚C) Setting the press temperature to above 400˚F (200˚C) may cause a fire hazard. If your mug press stops working, please contact Joto at 1-800-565-5686 so we can help you troubleshoot. -
Page 12: Heat Pressing Guide
Heat Pressing Guide Transfer Vinyls MultiCut One-4-All MultiCut Premium Temperature: 265˚F Temperature: 310-330˚F Time: 3-5 seconds Time: 45 seconds Peel: Warm (Cotton) Peel: Warm/Cool MultiCut New Flock MultiCut Lustre Temperature: 310-330˚F Temperature: 310-330˚F Time: 15 seconds Time: 15-20 seconds Peel: Warm Peel: Hot to Cold MultiCut Nylon MultiCut Style... -
Page 13: Expanded View
Expanded Diagram VII. Explosion View Part Name Davit Arm Serial Part Name Serial Part Name Machine Frame Electromagnet Machine Frame Electric Case Davit Arm Flat Heat Platen Cover Electric Case Electromagnet Power Cord Cap Heater Cover Power Cord Flat Heat Platen Cover Fuse Holder Flat Heat Platen Fuse Holder... -
Page 14: Circuit Diagram
Circuit Diagram www.jotoimagingsupplies.com 1-800-565-5686 Blaine, WA | Las Vegas, NV | Antioch TN | Coquitlam, BC | Brampton, ON... -
Page 15: Warranty
HEREBY DISCLAIMS, THE OBLIGATIONS OF JOTO UNDER THIS WARRANTY ARE EXPRESSLY LIMITED TO THE FOLLOWING: a. JOTO will repair or replace at its option, free of charge, any product, component of its products, and any component it sells separately which is installed in JOTO’s heat presses, within twenty four months and sixty months for the heating platen from date of original purchase. -
Page 16: Contact
Bringing images to life www.jotoimagingsupplies.com Tel: 1-800-565-5686 Fax: 1-800-565-5622 Coquitlam, BC | Brampton, ON Blaine, WA | Las Vegas, NV |Antioch TN...
Need help?
Do you have a question about the E-HP-JCH-51 and is the answer not in the manual?
Questions and answers