Table of Contents
Advertisement
Quick Links
Advertisement
Table of Contents

Related Manuals for Durafly Excalibur V2


Summary of Contents for Durafly Excalibur V2
- Page 1 INSTRUCTION MANUAL Please read this manual carefully before operating this plane.
-
Page 2: Safety Precautions
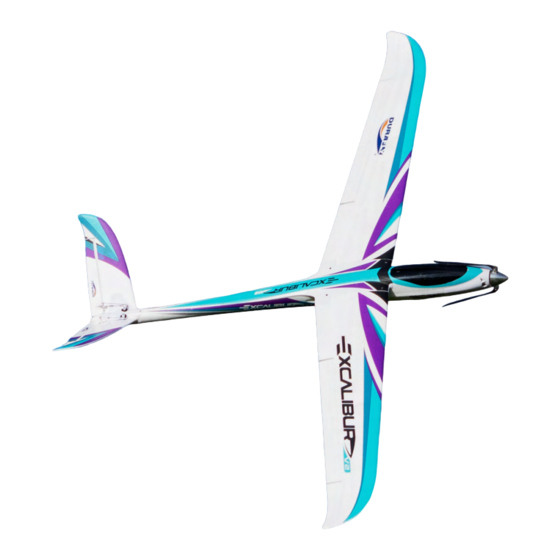
WARNING Read this instruction manual fully so as to become completely familiar with the features of the product before operating. Failure to operate this product correctly could result in damage to the product, personal property and cause serious injury. This is a sophisticated hobby product and is NOT a toy. It must always be operated with caution, common sense and some basic mechanical ability. - Page 3 Excalibur V2 has arrived! The Excalibur V2 is the perfect marriage of modern design and materials, with rock solid engineering and performance. The entire model features carefully positioned carbon and glass fibre reinforcement...
-
Page 4: Required To Complete Model
4. Control & mounting accessories REQUIRED TO COMPLETE MODEL: In its ‘Plug n Fly’ format the Excalibur V2 will still require some additional electronic components to get it ‘flight ready’. Durafly recommends the products below for optimum performance and great value. Available at Hobbyking.com. - Page 5 ASSEMBLY ( PNF ) : Out of the box your Excalibur V2 comes with reinforced foam hinges. However before assembly can begin, each hinge line must be flexed back and forth 5-6 times to reduce tension and load on the servo.
- Page 6 2.3x6mm 3.Center the aileron servos and connect the ball link to the ball end on each control horn. Use the quick keeper to secure the rod to the servo horn as show (A,B). Screw or unscrew the ball link as required to get the aileron level with the wing trailing edge with the servo centered.
- Page 7 This is also the best location to achieve the correct CG. Congratulations, Basic assembly of your Excalibur V2 is now complete. Please perform a final check on all screws, bolts and components, ensuring all are secureand firmly in place.
-
Page 8: Setting Up Your Model
For Safely reasons, it is advised that this is done with the prop removed from the model. 2.The Excalibur V2 handles exceptionally well in flight, and that's not down to a good design alone, but a good pre-flight set-up as well. Before you fly your Excalibur V2, please follow the recommended settings... -
Page 9: Control Throws
3.The recommended center gravity (CG) for the Excalibur V2 is approximately 20-25mm from the wings leading edge when measured along the plastic of the wing fairing at the center. Your Excalibur V2 should balance within this range when using anything from a 1800mAh to a 2200mAh 4S 40-65C LiPo batterry when installed directly under the canopy hatch. -
Page 10: Additional Parts Included
2.If you are fortunate enough to have access to a good moderate to strong wind slope site, you will definitely want to slope the Excalibur V2. In fact after you slope soar it you may never want to fly it with power again! To help streamline the Excalibur V2 and turn it into a sloping dream machine, we’ve... - Page 11 With assembly and set-up now complete, your Durafly Excalibur V2 should now be ready for flight. However we recommend your read and follow the advice given in the following pages of this manual before flying your model.
-
Page 12: Pre-Flight Checks
ADDITIONAL PARTS INCLUDED: ● Select your flight area carefully. Always choose an open space that is unobstructed from trees and buildings and away from crowded areas. Avoid flying in area’s with roads, electric/telephone poles/wires and water near by or within close proximity to full size air traffic. ●... -
Page 13: Excalibur Tips
15mins with mixed throttle flying. Mixed throttle flying is really where it's at with the Excalibur V2. Full power climbs will get you to the cloud base in seconds, and a quick flick of the sticks has you coming back down again in either a powered or none powered dive, either way it will be blisteringly fast and rock solid all the way. - Page 14 ● Set ‘Brake On’ on the ESC if it is not done so already out of the box. The prop will not fold if the brake is not set to ‘On’. To set the brake ‘on’ use the Durafly or Aerostar programming card (see...
-
Page 15: Spare Parts Listing
Control Accessory Set Brushless Motor Part No: Part No: Part No: SKU: 9499000414-0 SKU: 9499000137-0 Part No: SKU: 9499000136-0 SKU: 9499000415-0 Decal Set Durafly ESC card Aerostar ESC card Part No: Part No: Part No: SKU: 9499000411-0 SKU: 9164000041-0 SKU: 9164000024-0... -
Page 16: Troubleshooting
TROUBLE SHOOTING: Problem Cause Solution 1. Charge the batteries. 1. Battery is not fully charged. 2. Install a full charged battery. 2. Transmitter battery low. 3. Check for connection 3. Motors not connected. between the ESC and motor. 4. Replace motor. Motor does 4. - Page 17 APEX CE SPECIALISTS LIMITED UK REP M1 4HT, UK APEX CE SPECIALISTS LIMITED...
Need help?
Do you have a question about the Excalibur V2 and is the answer not in the manual?
Questions and answers