Table of Contents
Advertisement
Available languages
Available languages
Quick Links
Advertisement
Chapters
Table of Contents

Related Manuals for Takuma profoil


Summary of Contents for Takuma profoil
- Page 1 USER’S GUIDE...
-
Page 2: Table Of Contents
Contents About ......................Safety ......................Package Contents ................4. Preparation .................... 5. Assembly ....................6. Board Mount ..................Positioning tips ................... 8. After Care ....................Warranty .................... -
Page 3: About
The information in this manual was accurate at the date of publication. However, specifications can be modified at any time without notice. For up- By using this product, you agree that you do so at your own risk. TAKUMA does to-date product information, visit the TAKUMA website: not accept any responsibility for personal injury or material damage in the case of an accident due to incorrect use. -
Page 4: Package Contents
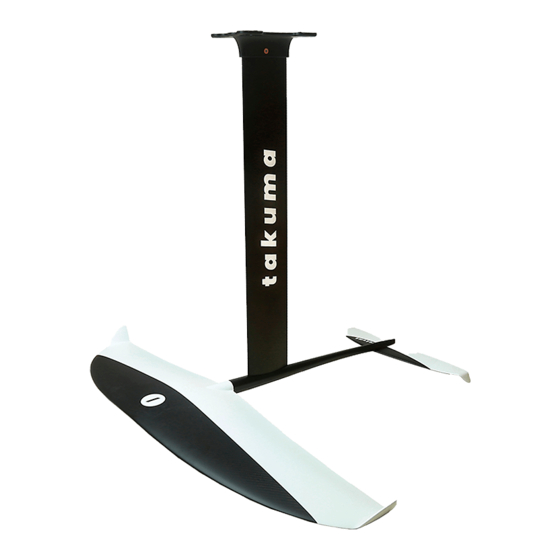
PACKAGE CONTENTS PREPARATION 2x M6-14 3x M6-18 To facilitate the assembly of the PROFOIL, we recommend watching the tutorials on our YouTube channel 4 x M6-T Nuts Torx key Assemble your PROFOIL in a clean and dry place. 4 x M6-25... -
Page 5: Assembly
ASSEMBLY STEP 2 STEP 1 Front Wing Back Wing Unscrew the M6-14mm screws from the bottom of the fuselage and then carefully Unscrew the M6-18mm screws from the bottom of the fuselage and then carefully attach the back wing. mount the front wing. M6 14 mm Apply a thin layer of Tef Gel on the M6-18mm screws before inserting them and then close tightly using the torx key. - Page 6 STEP 3 Result Mast Unscrew the M6-30mm screws from the bottom of the mast and apply a thin layer of Tef Gel to them. Insert the mast into the fuselage and fix tightly with the 3 x M6-30mm screws.
-
Page 7: Board Mount
BOARD MOUNT Innovative Top Plate Design Place the Top Plate and foil on top, position it towards the front of the box and align the T-Nuts with the inner top plate holes. The top plate is uniquely designed for quick and easy installation. It enables you to maintain the same position each time you reattach the foil. -
Page 8: Positioning Tips
POSITIONING TIPS The Profoil is designed to be positioned towards the front of your foil box for an optimum STEP 2 setting (see option 1). If you experience too much lift, we recommend moving the foil more towards the middle Removing the Top Plate (see option 2) or further back (see option 3). -
Page 9: After Care
It is important to rinse your foil after every session to prevent corrosion. If you All TAKUMA products are met with strenuous quality control. With the correct ride daily, you may not want to disassemble it after each session however after-care our products should last you a long time. - Page 10 GUIDE UTILISATEUR DU profoil...
- Page 11 Sommaire A propos ....................Sécurité ....................Détails du pack .................. Préparation du matériel .............. 5. Assemblage ..................6. Montage du foil sur la planche ..........Conseils de positionnement ............. 8. Maintenance ..................Garantie ....................
-
Page 12: A Propos
Ce sont les foils les plus appréciés du marché qui ont fait progresser et évoluer si vous n’êtes pas un nageur expérimenté ou si vous êtes sous l’influence de le monde du foil. Avec leurs winglets retournées ( vers le haut ), les PROFOIL l’alcool, de drogues ou de médicaments. -
Page 13: Détails Du Pack
DÉTAILS DU PACK PRÉPARATION DU MATÉRIEL 2x M6-14 3x M6-18 Pour faciliter le montage du PROFOIL, nous recommandons de regarder les tutoriels sur notre chaîne YouTube. 4 x M6-T Nuts Torx key Assemblez toujours votre PROFOIL dans un endroit propre et sec. -
Page 14: Assemblage
ASSEMBLAGE ÉTAPE 2 ÉTAPE 1 Aile avant Aile arrière ( Stabilisateur ) Dévissez les vis M6-16mm du bas du fuselage, puis montez soigneusement l’aile arrière. Dévissez les vis M6-18mm du haut du fuselage, puis montez soigneusement l’aile avant. M6 14 mm Appliquez une fine couche de TEF GEL sur les vis M6-18mm avant de les insérer, puis vissez fortement à... - Page 15 ÉTAPE 3 Résultat Mât Dévissez les vis M6-30mm du bas du mât et appliquez une fine couche de TEF GEL dessus. Insérez le mât dans le fuselage et vissez fortement avec les 3 vis M6-30 mm.
- Page 16 MONTAGE DU FOIL SUR LA PLANCHE Conception innovante de la plaque supérieure Placez la platine et le foil au dessus des boitiers, positionnez-la vers l’avant des boitiers et alignez les écrous en T avec les trous intérieurs de la platine. La platine est spécialement conçue pour une installation rapide et facile sur la planche.
-
Page 17: Conseils De Positionnement
CONSEILS DE POSITIONNEMENT Le Profoil est conçu pour être positionné vers l’avant de vos boitiers pour un réglage ÉTAPE 2 optimal (see option 1). Si vous rencontrez trop de portance, nous vous recommandons de déplacer le foil Retirer la platine davantage vers le milieu (see option 2) ou vers l’arrière (see option 3). -
Page 18: Maintenance
GARANTIE Il est important de rincer votre FOIL après chaque séance pour éviter Tous les produits TAKUMA sont soumis à un contrôle qualité rigoureux. Avec la corrosion. Si vous ridez tous les jours, vous ne voudrez peut-être pas un bon entretien, nos produits devraient durer longtemps. Cependant, dans le démonter après chaque séance, mais nous vous recommandons... - Page 19 OTHER LANGUAGES Español / Deutsche / Italiano / Nederlands / Português / Polskie / Română / Slovák / Slovenščina / Български / Русский / Hrvatski / Lietuvių / Magyar / Svenska / Sverige / Malti / 中文 / 日本語 / ىربع...
Need help?
Do you have a question about the profoil and is the answer not in the manual?
Questions and answers