Advertisement
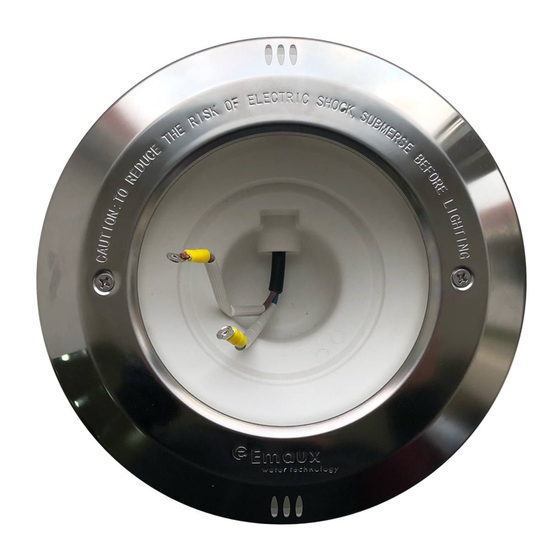
ØConnect the cable terminals to the lamp, using the 2 screws supplied with
the lamp,see Figure 10.
ØFully centre the gasket in its seat.
ØFirmly tighten the nuts.
ØBefore lamp replacement, ensure the power to the underwater light is
cut off.
ØIn order to ensure full water tightness, Discard the old Gasket and replace
it with a new one.
Remote operation:
Changes color Mode by Button1-11, Turn off light by OFF Button, see Figure 11.
Mode: 1)Red+Green+Blue. 2) Blue. 3)Red. 4) Green.
5) RGB Colour Sequence. 6) RGB Colour Sequence.
7) Red+Green/Blue+Green/Blue+Red Sequence.
8) Red+Green/Blue+Green/Blue+Red Sequence.
9) Red+Green/Blue+Green/Blue+Red Sequence.
10) Red+Green/Blue+Green/Blue+Red Sequence.
11) RGB Colour Sequence.
REPLACEMENT PARTS
Item
Part No
1
03011189
01050008
1
01050025
2
2
89041609
3
89041610
4
3
03011184
4
01110013
5
04011004
08040026
08040025
6
5
08040024
7
08040022
08040023
9
8
6
02010019
10
7
01230003
11
8
89041601
12
9
89041602
10
89041603
13
11
89041604
E040709
14
16
12
E040405
89041608
15
13
E040718
01050010
14
01050148
15
89041605
16
01171106
Figure 10
Figure 11
Description
M6 80 Screws
Plastic Lid EMAUX
Plastic Lid Blank
Stainless Steel Lid EMAUX
Stainless Steel Lid Blank
M6 55 Hexagon Head Screws
Face Ring
Par56 Bulb 300W
Par56 144 LEDs 12V 10W Auto RGB
Par56 144 LEDs 12V 10W Cool White
Par56 252 LEDs 12V 16W Auto RGB
Par56 252 LEDs 12V 16W Cool White
Par56 252 LEDs 12V 16W RGB with remote
Waterproof O Ring for Par56
Waterproof Cover
Waterproof O Ring with Tooth Head for Cable
Nut Fitting
Fastening suite
Water Joint Fittings for Cable
Two Core Cable 2.5m With wiring connector For no
remote version
Three Core Cable 2 5m With wiring connector For
remote version
Vinyl Pool Fitting For NP300 Lights Niche
Vinyl Pool Fitting NP300 Lights Niche with Copper Nut
NP300 Lights Niche
NP300 Lights Niche with Copper Nut
Plug with O Ring
Joint for wire
pipe
4-4
NP300 Series Underwater Light
User Manual
Gasket
r Never install in vertical position with the lamp facing upwards / downwards,
r Intended for fresh & salt water swimming pool
A) Ensure that the electrical system of your pool conforms to the following requirements of all
local codes and ordinances. A licensed or certified electrician must install the electrical
system to meet or exceed those requirements before the niche (fixture-housing) is
installed.
B) Installation Guideline:
Qty
1) The top of the light lens be at least 18 inches (457mm) below the water level. Some installers
2
position the niche 24 inches (610mm) below anticipated water level to avoid any
inspection authority issues with this requirement.
1
2) The lighting circuit must have a Ground Fault Circuit Interrupter (GFCI), and an
6
appropriately rated circuit breaker.
1
3) The junction box or the low voltage transformer is located at least 8 inches (203mm) above
water level and at least 48 inches (1912mm) from the edge of the pool
4) The light fixture and all metal items within 5 feet (1534mm) of the pool must be properly
1
electrically bonded.
5) The niche must be properly installed so
1
that the "Top" sign inside is at the 12
1
o'clock position and that the top edge of
1
6
the underwater light's lens is at least 18
1
inches (457mm) below the surface of the
1
water in the pool
1
6) The niche is properly electrically bonded
and grounded via a ground connector located
1
at the rear of the niche
C) Terminal Block must meet the IEC60988-2-1
1
standard having the rated connecting capacity
1
1
GENERAL INFORMATION
To GFCI, CircuitBreaker
and Power Source
Rigid Conduit
Installation Diagram for NP300
1
-4
18"min. to
top of Lens
EMLI20071401
Advertisement
Table of Contents

Subscribe to Our Youtube Channel
Related Manuals for emaux NP300 Series


Summary of Contents for emaux NP300 Series
- Page 1 NP300 Series Underwater Light ØConnect the cable terminals to the lamp, using the 2 screws supplied with the lamp,see Figure 10. User Manual ØFully centre the gasket in its seat. ØFirmly tighten the nuts. ØBefore lamp replacement, ensure the power to the underwater light is Gasket cut off.
- Page 2 Be sure the top of the niche be at least Concrete important that the company logo of Emaux of the lid is located on 18 inches (457mm) below the water level, and the TOP the 6 o'clock position.
Need help?
Do you have a question about the NP300 Series and is the answer not in the manual?
Questions and answers