
Related Manuals for SoundMax SM-CMD3014


Summary of Contents for SoundMax SM-CMD3014
- Page 1 SM - CM D 3 0 1 4 M ULTI M ED I A D VD / CD / M P3 RECEI VER w it h bu ilt - in 4 ” TFT displa y a nd TV t u ne r I nst ruct ion m anual D VD / CD / M P3 - "...
-
Page 2: Table Of Contents
D e a r cu stom er ! Thank you for purchasing our product. For safet y, it is st rongly recom m ended t o read t his m anual carefully before connect ing, operat ing and/ or adj ust ing the product and keep the m anual for reference in t he fut ure. Ta ble of con t en t s Table of cont ent s .................... -
Page 3: I M Port Ant Safeguards
I m por t a n t sa fe gua r ds ‚ Read carefully t hrough t he m anual t o fam iliarize yourselves wit h t his unit . ‚ Keep t his m anual handy as a reference for operat ing procedures and precaut ions. Do not allow persons who have not read t hrough t his m anual t o use this unit . -
Page 4: Accessories
‚ Make sure you disconnect t he power supply if t he syst em appears t o be working incorrect ly, is m aking an unusual sound, has a st range sm ell, has sm oke em it t ing from it or liquids have got inside it . Let a qualified t echnician check t he system . -
Page 5: I Nst Allat Ion/ Connect Ion
I n st a lla t ion / conn e ction ‚ Choose t he m ount ing locat ion where t he unit will not int erfere wit h t he norm al driving funct ion of t he driver. - Page 6 I nstall t he sleeve int o t he dashboard; ensure it is inst alled with t he correct side and t here are no obst acles ( wires, dashboar d elem ent s, etc) for t he unit inst allat ion. Aft er installing t he sleeve int o t he dashboard, bend t abs fit t ing t o the size of t he dashboard t o fix t he sleeve in place.
- Page 7 2 . D I N REAR- M OUN T ( M e t hod B) For t his m ethod, use t he screw holes in t he lat eral sides of t he unit. Fix t he unit w it h t he help of t he fact ory radio m ount ing bracket s.
- Page 8 Ele ct r ical Con n e ct ion I SO Con n e ct ion t a ble Locat ion Funct ion Conne ct or A Conne ct or B Rear right ( + ) - Purple Tel m ute/ Grey Rear right ( - ) - Purple/ Black Front right ( + ) - Grey Bat tery + 12V/ Yellow...
- Page 9 Pa rk in g w ir e con n e ct ion I f Parking cable is connected t o hand brake switch, t he video display of t he TFT m onit or will be cont rolled by driving st at us. When t he car is m oving ahead, if t he video disc is played, t he screen shows warning and blank screen.
-
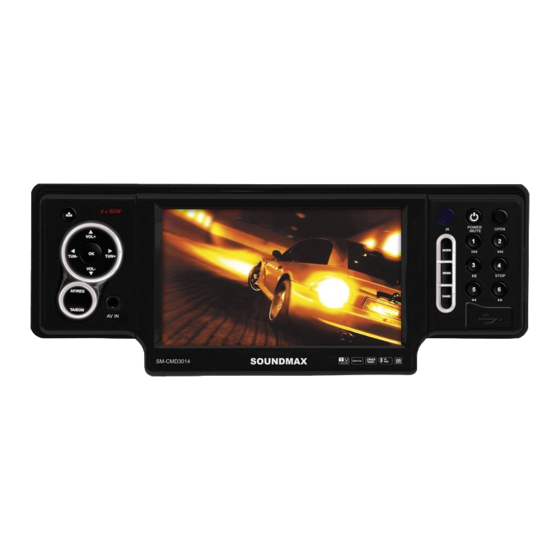
Page 10: Unit Cont Rols
Unit con t rols Fr ont pane l TUN- butt on EJECT but ton VOL+ but ton OK butt on TUN+ but t on TFT display MODE but ton I R sensor 3/ PLAY/ PAUSE but t on 10. POWER/ MUTE but t on 11. - Page 11 I nner p a ne l 1. Disc slot ( available when front panel is open) 2. RESET but t on ( hole) 3. Panel st atus indicat or (blinks when front panel det ached) 4. Mem ory card slot...
- Page 12 Re m ot e cont rolle r ( RC) 1. MODE but t on 2. POWER butt on 3. UP cursor but t on 4. BND/ RDM but t on 5. ENTER but t on 6. LEFT cursor butt on 7.
- Page 13 Cha nging t he ba t t ery 1. Press the cat ch and at t he sam e t im e pull out the bat tery t ray ( pic. 1) . 2. I nsert the 1 lit hium bat t ery, t ype CR2025 ( 3V) battery wit h t he stam ped ( + ) m ark facing upwar d.
-
Page 14: General Operat Ions
Ge n er a l ope r a t ion s Rese t t h e u n it Operat ing the unit for t he first t im e or aft er replacing t he car bat tery, you m ust reset t he unit. Press EJECT but t on and t hen press RESET but t on ( hole) under t he panel t o restore t he unit t o t he original fact ory sett ings. - Page 15 Se t ting t h e sou nd ch ar a ct er ist ics ‚ Press SEL but t on t o ent er t he audio set t ing m enu consist ing of following item s: Bass = > Treble = > Balance = >...
- Page 16 PI CTURE ( available in DVD and TV m odes) : ‚ Red: Adj ust level of red color. Support 50 levels. Default level is 25. ‚ Green: Adjust level of green color. Support 50 levels. Default level is 25 ‚...
- Page 17 ‚ REG: REG ON ( t he receiver accepts regional variant s of t he t uned stat ion wit h REG icon t urned on) , and REG OFF ( t he receiver ignor es regional variant s) . ‚...
- Page 18 Subw oofer Connect a subwoofer t o t his unit using the Subwoofer output of t his unit . For subwoofer operat ion an ext ernal am plifier is required. D u a l zon e fun ct ion DUAL - dual zone funct ion enabling user t o listen to radio or wat ch TV in t he front zone, and at t he sam e t im e play audio or video from disc, USB or m em ory card.
-
Page 19: Radio Operat Ions
Ra dio ope r at ion s Ba n d sele ct ion Select t he RADI O m ode. Press BAND but t on on t he panel or BND/ RDM but t on on t he RC t o select the desired band: FM1, FM2, FM3 ( OI RT) , AM ( MW). - Page 20 RD S fu nct ion RDS ( Radio Dat a Syst em ) service availabilit y varies wit h areas. Please underst and if RDS service is not available in you area, t he following service is not available, eit her . AF ( Alt er n a t ive fr e qu e n cies) fun ct ion Press AF but t on on t he RC or AF/ REG but t on on t he panel t o enable AF funct ion.
-
Page 21: Tv- T Uner Operat Ions
TV- t u n e r ope r a t ion s Connect t he TV ant enna to t he TV antenna j ack on the rear of t he unit . Select TV m ode. To access t he TV m ode m enu, press MENU but t on. -
Page 22: Disc/ Usb/ Sd/ Mmc Operat Ions
D isc/ USB/ SD / M M C oper a tion s USB/ SD / MMC n ot es USB form at supports 2.0. Capacit y: up t o 8 Gb. For correct and sat isfact ory operat ion, licensed SD/ MMC m em ory cards of fam ous brands should be used wit h t his unit . - Page 23 M P3 / D ivX/ JPEG file playba ck When you insert a st orage cont aining MP3/ DivX/ JPEG file, t he screen will show following interface: 1. St orage folder list 2. Scroll bar 3. Current playback info 4.
- Page 24 Fa st for w ard/ r e w ind Press and hold repeat edly SEEK- / PREVI OUS or SEEK+ / NEXT but t ons on t he RC or press repeat edly 6/ F.FWD and 5/ REWI ND but t ons on t he panel for fast backward or forward playing correspondingly. Wit h each pr essing playback speed will increase.
- Page 25 Pr ogr am m ing t h e playba ck ‚ Press PTY/ PROG but t on to open program m enu. ‚ Use cursor butt ons t o select t he program posit ion and use num ber but t ons t o input t he desired t rack/ t it le/ chapt er ( depending on t he disc t ype) .
- Page 26 Se le ct ing a udio langu age ( for D VD on ly) During DVD disc playback, press AUDI O/ GOTO but ton on t he RC repeat edly t o select t he audio language t o list en. This funct ion will not work if a disc does not support m ult i- language audio. Se le ct ing subt it le la ngu age ( for D VD only) I f your DVD disc support s m ult i- language subt it le, press SUB- T but t on on t he RC repeatedly t o switch am ong disc-support ed languages.
-
Page 27: Dvd Set Up M Enu
D VD se t up m e nu Press SETUP but t on on t he RC t o display set up screen, use LEFT/ RI GHT cursor but tons and ENTER butt on t o select t he desired set up page: System , Language, Audio, Video, Digital. I n t he selected page select an opt ion using UP/ DOWN cursor butt ons, then press RI GHT cursor but t on t o go t o sett ing list . - Page 28 N ot e : The rat ing can be select ed only under t he password unlocked st at us, and the lim it s can be worked only under t he password locked st atus. ‚ Default I f t his it em is selected, t he unit will ret urn t o original sett ing. La nguage se tup ‚...
- Page 29 Video se t up Set a param et er with UP/ DOWN cursor but tons: Bright ness, Cont rast , Hue, Sat urat ion, Sharpness. D igit a l set up ‚ Dynam ic range I f wat ching large dynam ic scope m ovie program at night , select ing t his m ode you can reduce t he volum e t o a very low level, at t he sam e t im e, t o keep t he fine details sound.
-
Page 30: Handling And Cleaning Discs
H a n dlin g a n d cle a nin g discs ‚ Dirt y, scrat ched or w arped discs m ay cause skip ping or noise. ‚ Handle t he disc only by t he edges. To keep clean do not t ouch it s surface. ‚... -
Page 31: Troubleshoot Ing Guide
Trou ble sh oot in g guide Below is a t able describing sim ple m easures t hat can help you elim inat e m ost pr oblem s likely t o em erge when t his unit is in use. I f below m easures do not help, t urn t o a service center or t o the nearest dealer. Sy m pt om Ca use Solu t ion... -
Page 32: Specificat Ion
Spe cifica t ion Ge n e r al Power supply: 12 V DC Maxim um power output : 4 x 50 W Unit dim ensions/ Net weight : 178 x 50 x 180 m m / 1.8 kg Gift box dim ensions/ Gross weight : 286 x 122 x 230 m m / 2.5 kg Tem perat ure range: - 20... - Page 33 St orage support DVD/ DVD± R/ DVD± RW, CD/ CD- R/ CD- RW, USB, SD/ MMC Form at support DVD- video/ DVD-audio/ SVCD/ VCD/ HDCD/ MP3/ CDDA/ Pict ure- CD/ Phot o-CD/ JPEG/ MPEG4 ( DivX/ XviD) ESP funct ion: 8 sec.
- Page 34 " " " " " " " " " " " " " " " 1 " " " " " " " " ....................34 " ...................35 " ..................37 ...................38 " ..................45 " .....................49 " " ....................55 " " ...................58 "...
- Page 35 " ‚ " " " " " " ‚ " " " " " " " " " " " " " " " " " " " " " " " " " ‚ " " ‚ " " "...
- Page 36 ‚ " " " " " " " " " " " " " " " " ‚ " " " " " " " " " " " " " " " " " " " " " " "...
- Page 37 " " " " " 5. I SO- " " " " " " " ( 5X25 " " " " " "...
- Page 38 ‚ " " " " " " " " " " " " , " " " " " ‚ " " " " " " " " " " " " " " " " " " " ‚ "...
- Page 39 " " " " " " ) « » ( " " " " " " " " " " " " " " " " " " " " " " " " " " " " " " "...
- Page 40 " " – " " – " " – " " " " " " " " " " " " " " " " " " " " " " " " " " " " " " " "...
- Page 41 " " " " " " " " " " " " " " " " " " " " " " " " " OPEN. " " " " " " " " " " " " " " "...
- Page 42 " "...
- Page 43 " I SO ( + ) - " ( - ) - " ( + ) - + 12 1 " ( - ) - " " ( + ) - ( - ) - ( + ) - ( - ) - "...
- Page 44 " " " " " " " " " " " " " " " " " " " " " " " " " " " " " " "...
- Page 45 " " TUN- EJECT VOL+ TUN+ TFT- MODE " 3/ PLAY/ PAUSE POWER/ MUTE OPEN 1/ PREVI OUS 2/ NEXT AF/ REG TA/ EON 15. " MENU BAND 5/ REWI ND 19. USB- 6/ F.FWD 4/ STOP...
- Page 46 " " " " " " " ) RESET " " " " " " " "...
- Page 47 " " MODE POWER " " BND/ RDM ENTER " " " " EJECT PTY/ PROG P.SCN/ RPT SEEK- / PREVI OUS STOP/ PBC " " PLAY/ PAUSE MUTE MENU SUB- T " " SETUP ANGLE I NT VOL+ VOL- A-B/ ZOOM AUDI O/ GOTO DUAL...
- Page 48 " " " " " " " " " " " (CR 2025 3V) , " " " " " " ‚ " " " " " ‚ " " " " " " " " " " " " "...
- Page 49 " " " " " " " " " " " " " " " " " " " " EJECT RESET " " " " " " " " " " " " " " " " " " "...
- Page 50 " " ‚ " " " " " " " SEL, : Bass ( ) = > Treble " " " = > Balance = > Fader " ) = > EQ ( ‚ " " " " " " "...
- Page 51 ‚ " " " " " " " Balance: " ‚ " " " " " " Fader: " " ‚ " DSP OFF - FLAT - CLASSI CS - POP - ROCK - DSP OFF. " " PI CTURE ( « »...
- Page 52 ‚ " " " " " " PI : MUTE/ SOUND. PI sound: " " " " " " " " " " " " " " " " " " " " " " " " " " " "...
- Page 53 ‚ " " " " " Stereo: , STEREO/ MONO. " " " " " " " " ‚ " " " " " " Beep: . 2ND ( " " " " " ) / ALL ( ) / OFF ( ‚...
- Page 54 " " " " " " " " " DUAL - " " " " " " " " " " " " " , USB " " " " " " " " " " " " " "...
- Page 55 " " " " " " " " " " " " " BND/ RDM BAND " " " : FM1 - FM2 - FM3 ( OI RT) – MW (AM) . " " ‚ " " " " " "...
- Page 56 " " " " " " " " " :" " " " " " " " " " " " ‚ " " " " " P.SCN/ RPT " " " " " " " " RD S " "...
- Page 57 " " " " " " " / EON " " " PTY ( " " " " " " " " " PTY/ PROG ( PTY), " " " " " " " " " " " " " "...
- Page 58 " " ‚ " " " " " " " " " " ‚ " " " " " " " " " MENU. (Aut o Program Manual " " " " " " " " Program ) VOL+ / VOL- "...
- Page 59 " " " / USB- " USB/ SD / MM C " USB: USB 2.0. " " " " " " " " SD/ MMC: " " " " " ‚ " EJECT " " " " " " " "...
- Page 60 " " " " " " PLAY/ PAUSE 3/ PLAY/ PAUSE " " " " " " " M P3 / D ivX/ JPEG " " " " " " " " " MP3/ DivX/ JPEG, " " " " "...
- Page 61 " " " " " " " " " SEEK- / PREVI OUS 1/ PREVI OUS " " " " " " " " " " " " " " " " " " " " SEEK+ / NEXT 2/ NEXT "...
- Page 62 " " " " " " " " BND/ RDM, " " " " " " " ‚ " " " " " " PTY/ PROG, ‚ " " " " " " " " " " " " " "...
- Page 63 " " " " " " " " " " " " AUDI O/ GOTO; " " " " " " " " " " " " " " " " " " " " " " " " " "...
- Page 64 " D VD " " " " " " " " " " " SETUP " " " " ENTER " " " " " " " " " " " " " " " " " " " " "...
- Page 65 " " " ( 1) " " " ( 8) " " " " " " " " " :" " " " " " " ‚ " " " " " " " " " " " ‚ " "...
- Page 66 " " " " " " " " " ‚ " " " " " " " " " " " " " " " " " " " " " " " " " " " " " " "...
- Page 67 " " ‚ " " " " " " " " ‚ " " " " " " " " " ‚ " " " " " " " " " " " ‚ " " " " " " "...
- Page 68 " " " " " " " " " " " " " " " " " " " " " " " " " " " " " " " " " " " " " " " " "...
- Page 69 " " " " " " " " " " " " " " " " " " " " " " " " " " " " " " " " RESET. " " " " " " " "...
- Page 70 " " " " 4 x 50 " " / 1,8 " " / 2,5 " - 20 C - + 60 " " " 4” TFT- 480 RGB x 272 16: 9 400: 1 " " " " , 130 "...
- Page 71 " DVD/ DVD± R/ DVD± RW, CD/ CD- R/ CD- RW, USB, SD/ MMC " DVD- video/ DVD-audio/ SVCD/ VCD/ HDCD/ MP3/ CDDA/ Pict ure- CD/ Phot o-CD/ JPEG/ MPEG4 ( DivX/ XviD) " " DVD, 40 CD, 120 c "...
Need help?
Do you have a question about the SM-CMD3014 and is the answer not in the manual?
Questions and answers