
Related Manuals for SoundMax SM-CDM1044


Summary of Contents for SoundMax SM-CDM1044
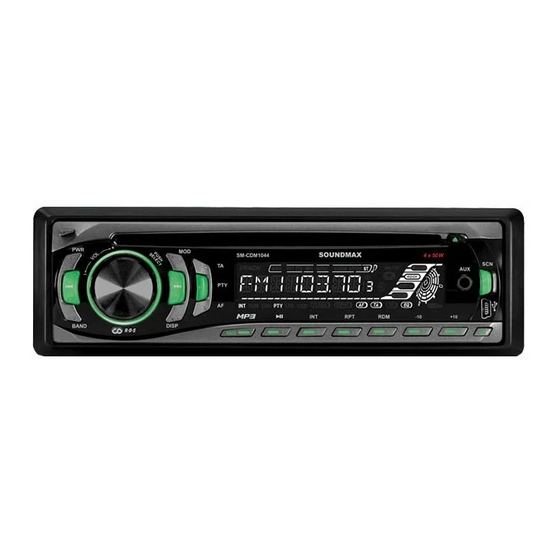
- Page 1 SM - CD M 1 0 4 4 CD / M P3 RECEI VER CD / M P3 - " " I n st r u ct ion m a n u a l...
-
Page 2: Table Of Contents
D e a r cu stom er ! Thank you for purchasing our product . For safet y, it is st rongly recom m ended t o read t his m anual carefully before connect ing, operat ing and/ or adj ust ing the product and keep the m anual for reference in t he fut ure. Ta ble of con t e n t s TABLE OF CON TEN T S .................................... -
Page 3: I Mportan T Safeguard S
I m por t a n t sa fegu a r ds ‚ Read carefully t hrough t his m anual t o fam iliarize yourself wit h t his high-qualit y sound syst em . ‚ The beginning of operat ion is t he m om ent of the unit installat ion. Before use t he device in wint er it is recom m ended to heat up t he passenger com par tm ent during 20 seconds or t o t he operat ion tem perat ure. -
Page 4: Accessori Es
Acce ssor ie s Receiver 1 pc Front panel 1 pc Carrying case 1 pc I SO connect or harness 1 pc MiniUSB-USB connect ion cable 1 pc Mount ing parts: Hexagon nut M5 T 1 pc Mount ing box 1 pc Release keys 2 pcs... -
Page 5: I N Stallati On / Con N Ecti On S
I n st a lla t ion / Con n e ct ion s ‚ Choose t he m ount ing locat ion where t he unit will not int erfere wit h the norm al driving funct ion of t he driver. - Page 6 Aft er inst alling t he sleeve int o the dashboard, bend tabs fit t ing t o t he size of t he dashboard t o fix t he sleeve in place. Use t he m etal st rap t o fix t he rear side of t he unit. Determ ine a place for fixing and inst all t he st rap as shown in t he pict ure.
- Page 7 2 . D I N REAR- M OUN T ( M e t hod B) For t his m et hod, use t he screw holes in t he lateral sides of t he unit . Fix t he unit wit h the help of t he fact ory radio m ount ing bracket s.
- Page 8 Conn e ct ion diagr am N ot e s: ‚ I n spit e of having any kinds of speaker syst em , m ust use 4 ohm s im pedance of speaker t o reduce t he dist ort ion during high volum e level. ‚...
- Page 9 Using t he I SO Conne ct or I f your car is equipped with t he I SO connector, t hen connect t he I SO connect ors as illust rat ed. For connect ions wit hout t he I SO connectors, check the wiring in the vehicle carefully before connect ing, incorrect connect ion m ay cause serious dam age t o this unit .
-
Page 10: Pan El Con Trols
Pa n e l con t r ols Fr ont pane l OPEN but t on PWR but t on VOL regulat or/ SELECT but t on NEXT butt on MOD but t on TA but t on PTY but t on Disc slot Display 10. - Page 11 I nner p a ne l Press OPEN but t on on t he front panel t o det ach it . SD/ MMC card slot Panel stat us indicat or RESET but t on (hole) Pressing RESET hole will erase the clock set t ing and st ored stat ions. Panel stat us indicat or light s up when you slide t he panel down, flashes when you rem ove the panel.
-
Page 12: Lcd Di Splay Layout
LCD d ispla y la yout Track inform at ion on 18. Random playback indicator Audio form at playback 19. EON funct ion indicat or Repeat playback indicat or 20. PTY funct ion indicat or Folder playback 21. Local recept ion indicat or MP3 audio form at playback 22. -
Page 13: Gen Eral Operati On S
Ge n e r a l ope r a t ions Pow er but t on Press any but t on (except OPEN and EJECT) or insert disc t o switch the unit on. Press PWR but ton t o swit ch t he unit off. - Page 14 Equ alize r se t t ing Press and hold SELECT but t on; t hen press it repeatedly unt il DSP OFF ( DSP ON) is displayed. Rotate VOL regulator to choose between sound effects: POP M = > ROCK M = > CLASSI CS = > FLAT = > DSP OFF. BEEP fun ct ion Press and hold SELECT but t on;...
-
Page 15: Rad I O Operati On S
Ra dio ope r a t ion s Ba n d sele ct ion Press repeat edly BAND but t on t o select your desired radio band in radio m ode: FM1, FM2, FM3, MW1 (AM1) , MW2 (AM2). Each band can store 6 preset stat ions, for a t ot al of 30 preset m em ory st at ions. Tuning Pr ess PREVI OUS or NEXT but t on;... -
Page 16: Radi O Data System
Ra dio D a t a Syst e m N ot e : RDS ( Radio Dat a Syst em ) service availabilit y var ies wit h areas. Please underst and if RDS service is not available in you area, t he following service is not available, eit her . AF ( Alt er n a t ive Fr equ en cies) fu n ct ion Press AF but t on to t urn the AF funct ion on or off. - Page 17 PTY ( Pr ogr am Type ) This radio will allow you t o select the t ype of program required, and will search for a stat ion broadcast ing that t ype of pr ogr am . Press PTY but t on t o show t he m usic t ype. Then press 1 - 6 num ber but t ons to choose different m usic program s available.
- Page 18 m ode, the unit will seek for t raffic announcem ent program when TA but t on is pressed; in TA ALARM t he unit does not ret une t o TA inform at ion. MASK DPI / MASK ALL During AF search, PI st at ions and non- RDS ( Radio Dat a St at ion) stat ions with st rong signal will be m asked, in t he lat ter case, t he non- RDS stat ions m ay cause int erference, result ing t he real AF t o be m asked due t o the m isj udgm ent of t he radio under interference.
-
Page 19: Di Sc/ Usb/ Sd/ M M C O Perati On S
D isc/ USB/ SD / M M C ope r a t ion s Loadin g a nd e j e ct ing a disc Turn t he power on. I nsert t he disc wit h t he printed side facing upward int o the slot. Press EJECT but t on t o ej ect t he disc. - Page 20 Pla y / Pa use Press 1/ PLAY/ PAUSE but t on to pause t he playback, press one m ore t im e t o resum e t he nor m al playback. I nt r o pla yba ck When 2/ I NT but ton is pressed, t he first several seconds of each t rack of t he disc is played.
-
Page 21: H A N Dlin G Com Pa Ct Discs
H a n dlin g com pa ct discs ‚ Do not insert anyt hing ot her t han a CD int o t he CD loading slot. ‚ Do not use cracked, chipped, warped, or ot herwise dam aged discs as t hey m ay cause skipping or noise dam age t he player . -
Page 22: Troublesh Ooti N G Gu I D E
Tr ou ble sh oot in g gu ide Below is a t able describing sim ple m easures t hat can help you elim inate m ost problem s likely t o em erge when t his unit is in use. I f below m easures do not help, t urn t o a service center or t o the nearest dealer. Sy m pt om Ca u se Solu t ion... -
Page 23: Speci Fi Cati On
Sp e cificat ion Ge n e r a l Pow er supply 12 V DC Current consum pt ion 10 A Max im um power out put 4 x 50 W Dim en sions ( L x W x H) 178 x 50 x 163 m m FM st e reo r a dio Frequency range... - Page 24 " " " " " " " " " " " " " " " 1 " " " " " " " ........................................24 " ................................25 " ....................................26 ................................27 " ..................................33 " ................................35 " .......................................
- Page 25 " ‚ " " " " " " ‚ " " " " " " " " " " " " " " " " " " " " " " " " " " ‚ " " " " "...
- Page 26 " " " " " " I SO m iniUSB- USB " " " " M5 T " " " " " " " " " " " ( 5X25 " M5 ( 5X29,3 " " " " " " "...
- Page 27 ‚ " " " " " " " " " " " " , " " " " " ‚ " " " " " " " " " " " " " " " " " " " " ‚...
- Page 28 " " " " " " ) « » ( " " " " " " " " " " " " " " " " " " " " " " " " " " " " " " "...
- Page 29 " " – " " – " " – " " " " " " " " " " " " " " " " " " " " " " " " " " " " " " " "...
- Page 30 " " " " " " " " " " " " " " " " " " " " " " " " " " " " " " " " " " " " " " " " "...
- Page 31 " ‚ " " " " " " " " " " " " ‚ " " " " " " " "...
- Page 32 " I SO " " " " " " I SO, " " " " " " " " " I SO " " " " " " " " " " " " " " " " " " ( + ) - - - "...
- Page 33 " " OPEN VOL/ SELECT NEXT " " EJECT PREVI OUS BAND DI SP 1/ PLAY/ PAUSE 2/ I NT 3/ RPT 4/ RDM 5/ - 10 6/ + 10 26. USB-...
- Page 34 " " " " " OPEN, " " SD/ MMC- " " ) RESET " " " " " " " " " RESET " " " " " " " " "...
- Page 35 " " " " " " " " " " " " " " " " " " " " " " " " " " " " " " " " " " " " " " " " FLAT "...
- Page 36 " " " " " " " " " " OPEN EJECT) " " " " PWR, " " " " " " " " " " " " " " " " " " " " " " " "...
- Page 37 " " " " " " " " " " " " " " " " " " " SELECT, DSP OFF (DSP " " " " ON) . : POP M = > ROCK M = > CLASSICS = > FLAT = >...
- Page 38 " " " " " " " " " BAND, : FM1, FM2, FM3, MW1 ( AM1), MW2 " " " " " " " ( AM2) . " " " " " " " " " PREVI OUS NEXT; "...
- Page 39 " " ( RD S) RD S " " " " " " " " " " RDS ( " " " " " " " " " " AF ( " " " " " " " " " "...
- Page 40 " PTY ( " " " " " RDS, " " " " " " " " PTY, " " " " " 1- 6, " " " " " " " " " " " " " 1- 6, "...
- Page 41 TA SEEK/ TA ALARM " " " " " " " TP ( Traffic " " " " " " " " Program – " " " " " " " " ( RETUNE) , PI ( " " " "...
- Page 42 " " " / USB/ SD / MM C " " " " " " " " " " " " " " EJECT, " " SD / M M C " " " " " " SD/ MMC " "...
- Page 43 " " " " " " " MP3- 5/ –10 6/ + 10, " " " " " " " " " " 1/ PLAY/ PAUSE, " " " " " " " " " " 2/ I NT, " "...
- Page 44 ‚ " " " " " " AMS 3 SELECT, " " " " " " “ A” . VOL, " SELECT " " " " " " " " " " " " VOL, " " " " " SELECT,...
- Page 45 " " ‚ " " " " " " " " " ‚ " " " " " " " " " " " " ‚ " " " " " " " " " " " ‚ " " "...
- Page 46 " " " " " " " " " " " " " " " " " " " " " " " " " " " " " " " " " " " " " " " " "...
- Page 47 " " " RESET. " " " " " " ( ERROR 1 – 11) " " " " " " " " " " " " " ( ERROR 1 – 11)
- Page 48 " " " " " " ( " " " " ) " 87,5 – 108,0 " " 10,7 " 522 – 1620 " " " " " D/ CD- R/ CD- RW/ USB/ SD/ MMC " CDDA/ MP3 " –...
Need help?
Do you have a question about the SM-CDM1044 and is the answer not in the manual?
Questions and answers