
Related Manuals for StarTech.com M2E4BTB3


Summary of Contents for StarTech.com M2E4BTB3
- Page 1 4-Bay M.2 NVMe Enclosure - Thunderbolt™ 3 - PCIe Actual product may vary from photos User Manual SKU#: M2E4BTB3 For the latest information and specifications visit www.startech.com/M2E4BTB3 Manual Revision: 03/05/2020...
- Page 2 This manual may make reference to trademarks, registered trademarks, and other protected names and/or symbols of third-party companies not related in any way to StarTech.com. Where they occur these references are for illustrative purposes only and do not represent an endorsement of a product or service by StarTech.com, or an endorsement of the product(s) to which this manual...
-
Page 3: Safety Statements
を行い、 電気障害やつまづきの危険性など、 安全上のリスクを回避するよう にしてください。 Misure di sicurezza • I terminiali dei fili elettrici non devono essere realizzate con il prodotto e/o le linee elettriche sotto tensione. • I cavi (inclusi i cavi di alimentazione e di ricarica) devono essere posizionati e stesi in modo da evitare pericoli di inciampo, rischi di scosse elettriche o pericoli per la sicurezza. Säkerhetsåtgärder • M ontering av kabelavslutningar får inte göras när produkten och/eller elledningarna är strömförda. • K ablar (inklusive elkablar och laddningskablar) ska dras och placeras på så sätt att risk för snubblingsolyckor och andra olyckor kan undvikas. To view manuals, videos, drivers, downloads, technical drawings, and more visit www.startech.com/support... -
Page 4: Table Of Contents
Operating Temperature ......................... 8 Removing the Drives..........................8 Supported Video Resolutions ....................... 9 Daisy Chain Multiple Thunderbolt 3 Devices .................. 10 Configure the Display Devices ......................10 Warranty Information ................11 To view manuals, videos, drivers, downloads, technical drawings, and more visit www.startech.com/support... -
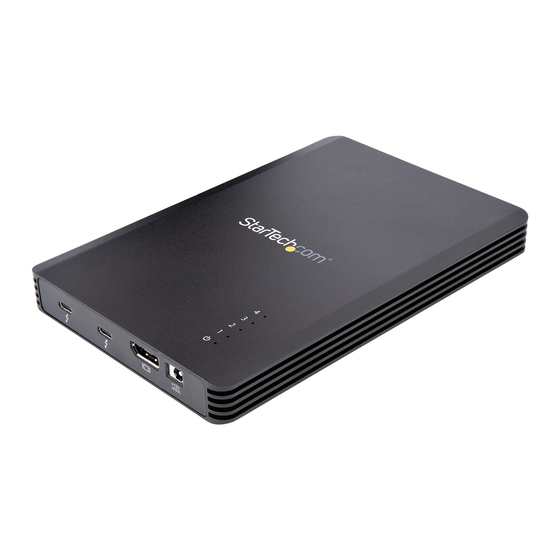
Page 5: Product Diagram
Output Port Display Device DC 12V Connect a Universal Power Adapter • Power Port Rubber Foot Prevent scratching • Pads Allow air to flow under the Enclosure • To view manuals, videos, drivers, downloads, technical drawings, and more visit www.startech.com/support... -
Page 6: Top Angled View
Drive Correspond with M.2 Drives 1-4 • Activity M.2 Drive activity detected • Flashing Indicators M.2 Drive not connected • No M.2 Drive activity detected • To view manuals, videos, drivers, downloads, technical drawings, and more visit www.startech.com/support... -
Page 7: Bottom View - Drive Bay Closed
Bottom View - Drive Bay Closed Component Function Drive Bay Secure the Drive Bay Cover • Screws Drive Bay Cover and protect the M.2 Drives • Cover Cool the M.2 Drives • To view manuals, videos, drivers, downloads, technical drawings, and more visit www.startech.com/support... -
Page 8: Bottom View - Drive Bay Open
Connect up to 4 M.2 Drives • Socket Drives are numbered to correspond • with the Drive Activity LED Indicators (from left to right: 1, 2, 3, 4) To view manuals, videos, drivers, downloads, technical drawings, and more visit www.startech.com/support... -
Page 9: Requirements
• Cover. Remove the Holding Screw for the M.2 Drive using a Phillips Head Screwdriver. Slide the M.2 Drive into the M-Key Socket at a 45 degree angle. To view manuals, videos, drivers, downloads, technical drawings, and more visit www.startech.com/support... -
Page 10: (Optional) Connect A Thunderbolt 3 Peripheral
Thunderbolt 3 Ports on the Enclosure. (Optional) Connect Displays Note: Connect and setup the DisplayPort Enabled Display Device before connecting and setting up the Thunderbolt 3 Enabled Display Device. To view manuals, videos, drivers, downloads, technical drawings, and more visit www.startech.com/support... -
Page 11: Powering The Enclosure
Computer to the Enclosure. Connect a Thunderbolt 3 Cable (included) to one of • the Thunderbolt 3 Ports on the Enclosure and to a Thunderbolt 3 Port on the Host Computer. To view manuals, videos, drivers, downloads, technical drawings, and more visit www.startech.com/support... -
Page 12: Operation
Remove the two Drive Bay Screws using a Phillips Head • Screwdriver. Carefully flip the Enclosure to release the Drive Bay • Cover. Remove the Holding Screw for the M.2 Drive using a Phillips Head Screwdriver. To view manuals, videos, drivers, downloads, technical drawings, and more visit www.startech.com/support... -
Page 13: Supported Video Resolutions
In a multi-display configuration, set the refresh rates on • each of the connected Display Devices to the same values, otherwise the Display Devices might not properly display. To view manuals, videos, drivers, downloads, technical drawings, and more visit www.startech.com/support... -
Page 14: Daisy Chain Multiple Thunderbolt 3 Devices
Configure the Display Devices Use the Windows operating system to adjust display settings for multiple Display Devices. The Host Computer’s hardware must support dual external displays through its Thunderbolt 3 Port. To view manuals, videos, drivers, downloads, technical drawings, and more visit www.startech.com/support... -
Page 15: Warranty Information
Limitation of Liability In no event shall the liability of StarTech.com Ltd. and StarTech.com USA LLP (or their officers, directors, employees or agents) for any damages (whether direct or indirect, special, punitive, incidental, consequential, or otherwise), loss of profits, loss of business, or any pecuniary loss, arising out of or related to the use of the product exceed the actual price paid for the product. - Page 16 StarTech.com is an ISO 9001 Registered manufacturer of connectivity and technology parts. StarTech.com was founded in 1985 and has operations in the United States, Canada, the United Kingdom and Taiwan servicing a worldwide market.
Need help?
Do you have a question about the M2E4BTB3 and is the answer not in the manual?
Questions and answers